Archive for the ‘SharePoint Ideas’ Category

SharePoint Staff Vacation Planner – DIY Guide – Part 1

Date:August 2nd, 2010 Author: Tags: , , ,
Category: General, SharePoint Ideas, SharePoint Planner, SharePoint Reminder Comments:10 ;

SharePoint offers a great foundation for non-programming business people to build applications around our business processes, just the way we want them.  This guide will show you how to build your own SharePoint staff vacation and absence planning system.

Staff vacation and absence planning can cause trouble and strife in any organization.  The good old wall planner can work for staff who are all in the same physical locations . . .

. . . . until you approve an absence then forget to enter it on to the planner, and then allow someone else to book vacation at the same time, leaving your department under staffed.

. . . . .or until you forget that Sam has booked a week’s vacation and call him up furious on Monday morning asking why he isn’t in work.

. . . . . .or authorize Jenny’s week off in the Caribbean only to get a thorough ticking off from HR because you have allowed Jenny to exceed her annual leave entitlement.

I’ve been guilty of all these crimes in my time. So I was pleased to find that with SharePoint we can make things a little more organized, and using our PivotPoint, Reminder and Planner web parts together we can set up a slick little Vacation Planning system in just a few minutes.

So, what we are aiming for here is:

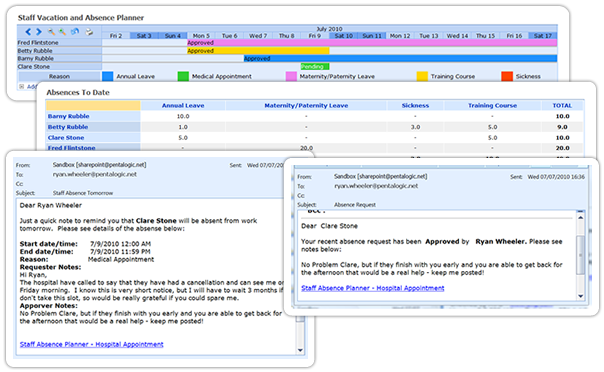
  • A dashboard “Absence Planner” display, which will be accessible to all staff via SharePoint.
  • A personal and managers “Absences to Date” dashboards.
  • An automated Absence Request approval system
  • An email reminder to line managers of imminent staff absence.

To be clear: this is not a ready made “Vacation Planning” template or application, its a guide showing how you could build your own system, using some of SharePoints built in features and then add a little pizazz with our web parts. Its going to take a little work to set this up for your organisation but then it should be a better fit than a packaged solution.

Setting up the Vacation Planner should take you about an hour if you have our webparts already, a little more if you need to download them.  So we have broken this guide up into 4 parts, which we will be publishing over the next 5 days:

Today – set up your Staff Vacation and Absences list and filtered views

Part 2 – set up a Staff Vacation Planner dashboard with SharePoint Planner webpart

Part 3 – Set up Absences to date dashboard with SharePoint PivotPoint Webpart

Part 4 – Set up a absence request and approvals workflow with SharePoint Reminder Webpart

Part 5 – see the system in action, and see how much of this you could achieve with SharePoint out of the box.

For those of you who can’t wait that long, you can download the full PDF guide and a 30 day free trial of the webparts here.

First set up your List

We are going to use a Calendar List, add some extra columns, and switch on Approvals.

So, from which ever section of your site you want choose select Site Actions from the top right of the page, then from the dropdown, select Create then from the Tracking tab, select Tasks.

Call your list whatever you want – Staff Absence Planner works for me, decide whether you want it to display in the quick launch menu  – probably no need as few people will need to access the list that way once we have our system set up.  Then select no in the Alerts option.  Click OK and you list is set up.

Now go to the Settings tab in your list and first of all choose Create Column. We are going to add a few extra columns to the list. Add the columns Requested By and Authorized By, the column type for both of these is “Person or Group” and you want them both to display in the default view. Make these mandatory fields by clicking Yes for Require that this column contains information. Now we are going to add a column to show the reason for the absence – annual leave, maternity leave, training, sabbatical, whatever.  The column type for this column is going to be Choice and again we are going to made completion of this field mandatory, and show the field in the default view. Finally a column for the number of days of each absence, we want this to be a number column, I have set the minimum value to 0.5 days and the maximum to 30 days, and again we want it to be a mandatory field.

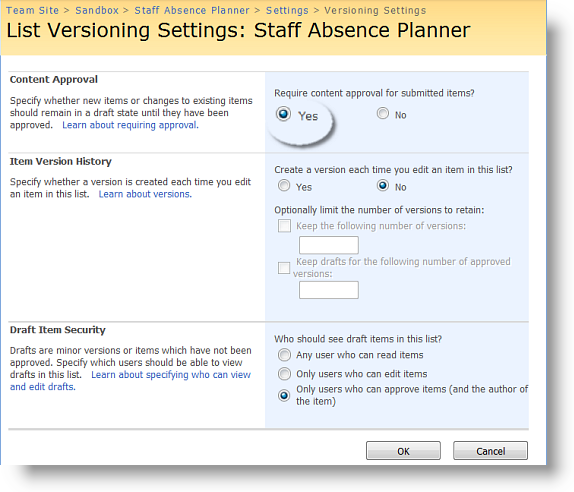
Next let’s switch on Approvals.  Back in the Settings tab of your list choose List Settings and from the General tab choose Versioning Settings. In Content Approval click Yes and we are done with the list set up.

Set up Filtered Views

Now for the filters.  If you haven’t made much use of filters before it may be worth having a look at these resources:

SharePoint filter techniques articles

Filters can really enhance the power of SharePoint lists, and we are going to use 3 here in our vacation planner.

#1 – Approved and Pending Absences for Planner

We want our Planner to provide a dashboard display for all staff, showing absences requested and approved.  So that staff can see when it will be possible to book an absence and managers can decide whether they wish to approve a staff absence request.

Our list actually contains 3 approval status’s “Pending”, “Approved” and “Rejected” we don’t need to display absence requests that have been rejected on our Planner, so we are going to set up a list view to show just “Pending” and “Approved” requests.

Go back to Site Settings and choose Create View.  From the menu here choose Standard View. N.B.  This choice is very important – Planner only works on Standard views. In the Create View Page add a name for your view, we have used Staff Absences – Approved and Pending. In the Audience section be sure you have checked Create Public View this again is an essential for Planner to work.  In the column section choose the columns that you wish to display to people who are creating or entering a list item.  This will not impact of the Planner display.

We are then going to skip over the “Sort” section and from the Filter section choose Show Items only when the following is true.

Column Approval Status is equal to Pending OR column Approval Status is equal to Approved.  Click OK and we are done with the filter.

#2 – Approved absences for managers “Absences to Date” Dashboard

Set up of this is exactly the same as the last one, except we are going to call it “Absences to Date” and just show items where column approval status is equal to approved.

#3  – The Magical [Me] Filter, for “My Absences” Dashboard.

If you haven’t used this filter before you are going to love it!  It shows whoever is logged in just the list items relating to them, so its ideal for our “My Absences” dashboard view, but also has a whole host of other uses.

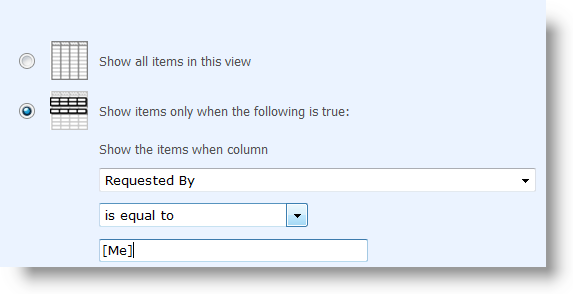
We need a Standard, public view again – yes even though it’s “My Absences” it’s still a public view or other people won’t be able to use it.  Call it My Absences then head down to the filter section and choose to show items where column Requested By, is equal to [Me].

So, now we have laid the foundations for our system by setting up the basic list and filters.

In Part 2 we will create a “wall chart” dashboard, using SharePoint Planner webpart.


How to edit List forms in SharePoint 2010

Date:July 29th, 2010 Author: Tags: , ,
Category: General, SharePoint Ideas Comments:8 ;

In SharePoint 2007 there is a well known trick for opening up a list’s forms (New/View/Edit) in design mode – append ?ToolpaneView=2 onto the url – this is often used to add instructions or javascript using a Content Editor Web Part (CEWP) e.g.

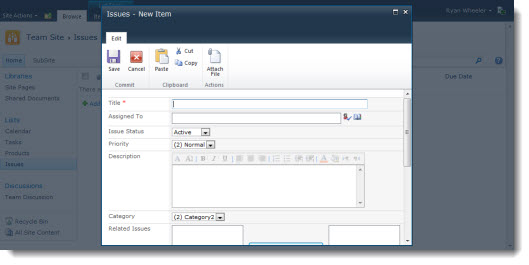
However when I first tried to use my tried and tested shortcut in SharePoint 2010 I came a little unstuck as now the New/View/Edit forms appear in a fake popup window and modifying the URL doesn’t work.

There are two ways to do this in SharePoint 2010 – and once you know where to find them they should actually make life that little bit easier.

The first is to open up the form in a new window and then add ToolpaneView=2 onto the end of the URL, so

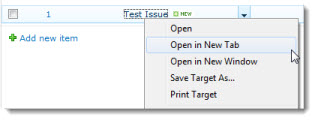
Right click on Add new Item or the lists Title field and select Open in New Tab or hold down CTRL while left clicking.

Alternatively you can do this using the new-fangled ribbon toolbar – select under List Tools the List tab, then on the right hand side of the ribbon you should see an icon for Form Web Parts which gives a menu of the different forms associated with the list that you can edit.


Showing the records ID on the View and Edit forms

Date:July 23rd, 2010 Author: Tags: , ,
Category: SharePoint Ideas Comments:37 ;

SharePoint - Modify View and show ID column

ID’s are a convenient, often short, way to uniquely refer to something. Unless you’re the Tax man who seems to believe he can’t get through his day without giving me, thats just one person, 7 unique id’s – presumably one for each extremity that he would like a piece off…

I digress… ID’s – SharePoint uses an ID for each item in a list and sometimes its handy to know them “Ere Bob – have you done task 1234 yet?”

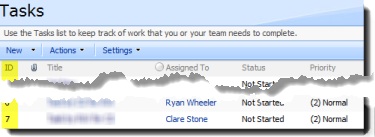
You can easily add them to the list view (Modify this View then find the ID column, click display)

SharePoint - view with ID column

But what about if you want to see this on the View and Edit forms? (You can’t see it on the New form as it doesn’t get an ID assigned until you’ve created it)

You can’t do this in the UI. You can create a custom View/Edit form using SharePoint designer but its quite complex, is a pain when we add new fields and its fraught with potential problems.

So instead we’re going to look into every ones favourite SharePoint UI hacking tools – the Content Editor Web Part (CEWP) and javascript/jQuery.

(more…)

5 Things you never knew you couldn’t do with SharePoint Alerts

Date:July 19th, 2010 Author: Tags: , , ,
Category: General, SharePoint Alert, SharePoint Ideas, SharePoint Reminder Comments:1 ;

We often hear that communication is key to the success of any enterprise or organization. Making people aware of “what’s going on” is an essential.  So for a collaboration platform like SharePoint tools for telling people what’s happening are a central part of the setup.

SharePoint has it’s built in “Alert Me” feature.  New users seeing this often expect it to deliver functionality similar to that which comes as standard in MS Outlook.  But that isn’t what SharePoint Alerts do.  They tell you when something is added or changed.  This is great for document or content management, but not so good for managing calendars or tasks or projects – when you might prefer to be alerted when something is about to happen, or is overdue – or you might actually want to alert someone else, not yourself.

So here’s a little look at some of the things you might expect to be able to do with SharePoint Alerts but can’t.  And some suggestions as to how you might get round these shortcomings.

(more…)

SharePoint List Superpowers

Date:July 9th, 2010 Author: Category: General, SharePoint Ideas, SharePoint Planner, SharePoint Reminder Comments:5 ;

Now we all know that SharePoint Lists are pretty amazing things: easy to use, searchable, customizable… Where would we be without them?

But did you know that each list type comes with its own special “Superpower”?

If you understand the different superpowers of each list type it makes choosing which list to use on any given occasion much easier.

(more…)

SharePoint Terminology – Farms, Web Front Ends, Web Application and Sites

Date:July 8th, 2010 Author: Tags: , ,
Category: General, SharePoint Development, SharePoint Ideas, Training Comments:9 ;

There is a great deal of confusion around some terms related to the different levels of SharePoint hierarchy. Some of this is buzword overload and some  has been brought about by inconsistent usage from Microsoft (and to be fair actually most of us in this industry).

So if you’ve ever wondered what things like Farm, WFE, NLB, Web Application, Site Collection and Top Level Site mean I am going to try and clarify the different terms without getting too technical as some of this stuff needs to be know by advanced, or power, users. I’ve missed out some of the more esoteric things like managed paths in the interests of readers sanity.

SharePoint Versions through the ages – Confused?

Date:June 28th, 2010 Author: Tags: ,
Category: General, SharePoint Ideas Comments:0 ;

Last year, when I first started having dealings with SharePoint, I was mightily confused by all this “MOSS”, “WSS”, “SPS” -stuff.   What did all these acronyms stand for? What was the difference between all these different versions of SharePoint? And did it really matter?

Well, one year on and I’m slightly less confused, but only slightly!  So I thought it might be useful, for me and for anyone else out there who suffers similar confusion, to list out the different versions of SharePoint, their usual acronyms and key distinguishing features – I hope it helps:

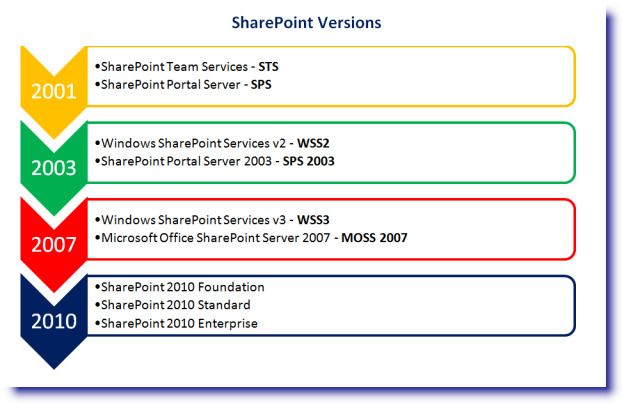
So, in the begining, back in 2001, SharePoint emerged as two distinct products.  SharePoint Team Services was a bottom up team collaboration product, SharePoint Portal Server was a top down, portal, search and document management product.

By 2003 Microsoft had gathered that although customers liked both products what they would really like was the capabilities of both, combined.  So in 2003 what most of us would recognise as SharePoint: collaboration, search, content management and portal capabilities all under one roof – was born.

WSS was the basic version, free with Windows Server OS. SPS, the premium version, built on the foundations of WSS, incorporating extra functionality primarily around the areas of search and document management. Jason Masterman and Ted Pattison writing in MSDN Magazine put it quite neatly:

In essence, WSS gives you a place to put all your content while SPS provides the means to navigate and search through your content when you need it.

In 2007 much the same formula was followed, with Windows SharePoint services as the free version for windows server users and Microsoft Office SharePoint Services the premium version.  The MOSS designation references the greater level of integration with the Office suite.

In SharePoint 2010 it’s all change again and Microsoft have dropped references to both Office and Windows, leaving SharePoint to stand alone in 3 basic flavours: foundation, the free version, Standard – the premium version, which adds lots of functionality primarily around the area of search, and Enterprise – super premium, where the extras are pricipally in the area of content management.

This is very much a whistle stop tour, not an attempt to give an all encompassing overview of what is in each of the many SharePoint versions we have seen over the years – but we hope it might help you to at least get the acronyms straight!

SharePoint Archive Round-up

Date:June 17th, 2010 Author: Tags: , , ,
Category: General, SharePoint Ideas Comments:0 ;

As you’ve probably noticed we have had a few changes on our SharePoint blog in recent weeks.  We’ve been doing some work on making it a little more user friendly and a bit nicer to look at (hope we haven’t spoiled it with the photos!)

Whilst I was working on the blog I noticed that we have quite a few little gems hidden away in the archives. Old posts – things that were written maybe a couple of years ago, that those of you who are new to the blog might not be aware of, but might find useful.  The useful ones fall into a few categories – general SharePoint tricks, tips and ideas, and ideas and tips for users of our web parts.  So here they are, I hope you find them useful.

SharePoint tricks tips and ideas

Extend and customise SharePoint Task lists

Task Lists are one of the best loved and most used features of SharePoint and this post shows you how to better tailor them to meet your particular needs.

Advanced SharePoint View and Filter techniques

This article explores some of the uses of SharePoint Views and Filters.

Working Days, Weekdays and Holidays in SharePoint Calculated Columns

SharePoint Out of the box doesn’t automatically distinguish between working days and weekends but if you are setting things like job duration or due dates you may need to – this article shows you how.

The Truth about using [Today] in SharePoint Calculated Columns

This article explains why the often repeated trick for using [Today] in SharePoint calculated columns does not work, and suggests workarounds.

The … ehem… Truth about using [Today] in SharePoint Filters

This one looks at the differences between SharePoint 2003 and 2007 when using [Today] in filters.

Setting a default duration for new SharePoint Calender Events

So you might be a medical receptionist scheduling appointments for doctors, appointments are always 45 minutes long unless the doctor tells you differently, how much easier would it be to just have SharePoint create an end time 45 minutes after the start time automatically?

How To Use Filters in SharePoint to show items in the current Calendar Month

It’s easy to think of occasions when you might want to filter a SharePoint list to show items falling in the current calendar month: “sales this month” springs to mind, or “subscriptions due for renewal this month”. This post shows you have to achieve this using calculated columns.

SharePoint Reminder Webpart Ideas

SharePoint Reminder Webpart – Setting a variable Due In or Overdue By time

Lots of people use Reminder to send an alert when a message is due soon or overdue.  Usually its fine for the message to go out at a fixed time before or after the event, for all list items, but there are occasions where you might want to vary the times at which you send your alerts.  For example, sending alerts for overdue helpdesk items: for high priority items you might want to send an alert when an item is 1 hour overdue, whereas for low priority an alert for items 1 day overdue might be fine.  This article shows you how.

Customize SharePoint Reminder Emails with Merge Data

Whilst SharePoint’s out of the box alert emails come in a standard format, with Reminder its possible to customize the alert emails you send by merging data from your list items.

Tip – don’t send SharePoint email alerts for old items.

There are some situations where, when you are setting up a Reminder for the first time, you could end up sending out alerts for a lot of very old list items, this post shows you how to avoid doing that.

Tip – Sending an SharePoint email Alert when a Task is completed

If you are using Reminder to drive simple workflow you may very well want to send an email when a task is completed – maybe when a holiday request form has been filled in for example.  This post shows you how.

SharePoint Planner Webpart Ideas

Tip – Showing multiple columns in SharePoint Planner Webpart

There may be times when you want to display timeline or category information from more than one list column in a gantt chart. For example in the chart below we have taken information from the “priority” and “title” columns of a list to populate the category labels.

5 things you never knew you couldn’t do with SharePoint Gantt Charts

Shows you a few of the things that aren’t possible with SharePoint OOTB gantt charts, but can be done with Planner.

How To setup a SharePoint view filter to compare 2 list fields

Date:June 1st, 2010 Author: Tags: ,
Category: Filter, SharePoint Ideas Comments:2 ;

There are many instances where you might want to view a set of SharePoint list records which have been filtered on a comparison between values in 2 columns.  You might want to view a list of all sales reps who have failed to hit their targets: Actual SalesCredit Limit, or employees who have not used their full vacation entitlement: Vacation Entitlement>Days taken.

A customer recently contacted me with just this type of question :-

They use a SharePoint list to keep track of orders waiting to be manufactured and delivered – so amongst other fields they have Scheduled Delivery Date (which they have promised to a customer) and the Estimated Delivery Date which is kept up to date with the latest estimate. Most of the time the two agree but sometimes for various reasons the delivery date slips.

They have been using Reminder to send out automated emails for upcoming orders and ones that had just been missed but they wanted to setup a view that would show only orders where the Estimated delivery date was later than the date they had told the customer. Account managers could then use this list to keep customers up to date – “There is a delay on that order we have scheduled for you for next month, we estimate it will be ready on the 17th”

Sounded pretty simple to me and I confidently told them how they could do it (more…)

SharePoint Calculated columns – Adding hours onto a date field

Date:May 18th, 2010 Author: Tags: , , ,
Category: General, SharePoint Ideas Comments:10 ;

A customer recently contacted me with an interesting question.

They were using a SharePoint task list to help schedule jobs for field engineers but rather than have a Start Date and End Date field they wanted to have a Start Date and Duration field and automatically work out the End Date.

So End Date = Start Date + Duration

They were then planning to display this using Planner in the By Category view which is idea for resource booking as it makes it easy to see when a resource is booked or free (SharePoints built in gantt chart can’t do this swimlane style of view and doesn’t support using calculated columns).

Now this is easy to do if the Duration is specified in days – in fact you just use the equation above – but what if Duration is in hours or minutes?

First port of call is this page from Microsoft showing examples of common date time formula you can use in SharePoint calculated columns hmmm, adding days OK… adding months Check… adding years OK too….but nothing about hours. Back to the drawing board.

(more…)