Archive for the ‘FilterPoint Web Part’ Category

SharePoint – wildcard / free text searching the List View web part

Date:May 30th, 2014 Author: Tags: , ,
Category: Filter, FilterPoint Web Part, SharePoint Development Comments:8 ;

It’s a common requirement to be able to do wildcard free text searches on SharePoint lists.

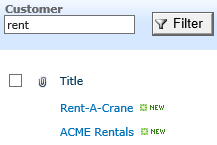
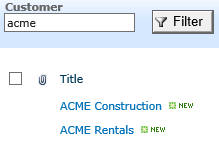
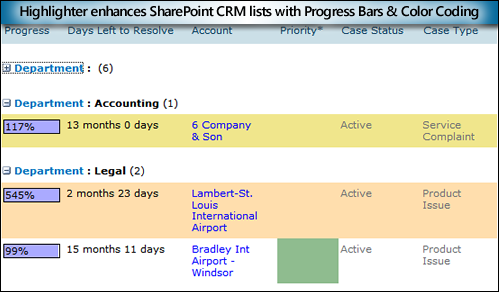
Whilst you can’t do wildcard or complex Boolean search (that’s what the search system is for) you can get close with a contains search. Thus searching for “Acme” will return “ACME Construction” and “Big ACME Rentals” but not “Rent-A-Crane”

It’s not easy though, and does require SharePoint Designer and a Filter Provider such as our FilterPoint product.

Filter Providers and Filter Consumers.

In SharePoint you have

  • Filter Providers (like FilterPoint or SharePoint Enterprises own filter web parts)
  • Filter Consumers (like the List View web part or other web parts such as our PivotPoint).

The Filter Provider sends the filter you’ve entered (e.g. “Customer” and “Acme”) but it’s entirely up to the Filter Consumer what it does with that filter.

This means that if you want to do things like Date Ranges, wildcard filtering using “Contains” operations you have to set those options on the Filter Consumer.

Our products (PivotPoint, Planner etc) have options to allow you to easily set what to do with the incoming filters, but SharePoints built in List View web part does not.

Using “Contains” filters to do free text search in FilterPoint.

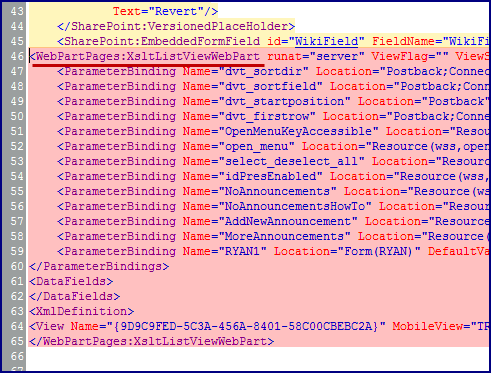
We’re going to use SharePoint Designer to setup Parameters and Filters in the List View Web Part (LVWP) so we can do wildcard type filtering.

(It’s a limitation of SharePoint that you can’t do this without SharePoint Designer – sorry!)

First go to the web part page that has your list (or create a new, empty web part page and add your list to it).

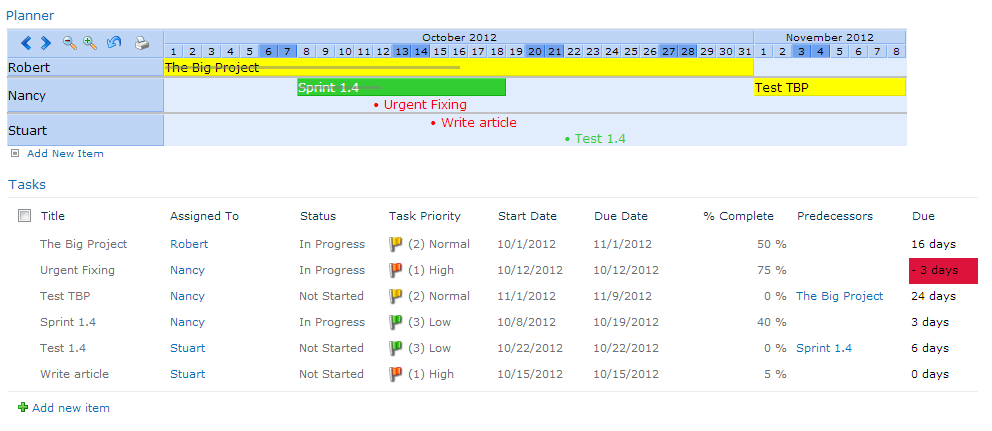
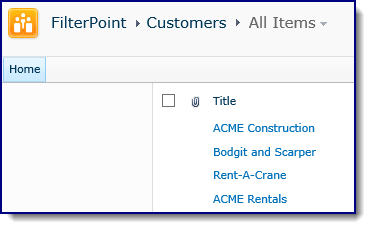
In our example we’ve got a list of Customers with the customer name in the Title field.

Customers List

  • Open this page in SharePoint Designers edit view.

(Depending on what type of page this is will invoice different steps – see these tips for more help on using SharePoint Designer or the online manual for SharePoint Designer)
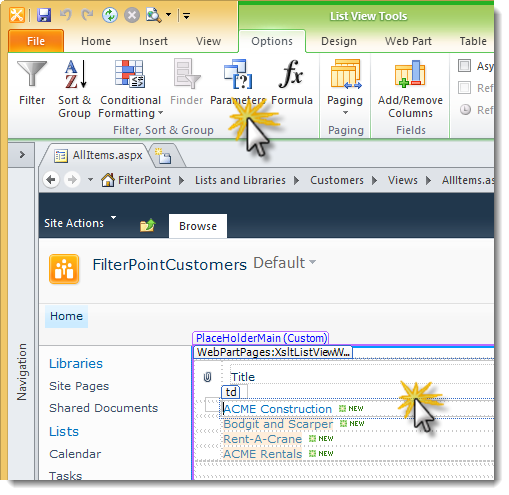
SharePoint Designer List Parameters

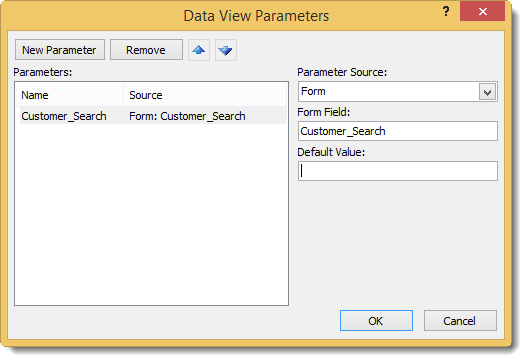
  • In the Data View Parameters window :-
    • Click New Parameter,
    • In the Name box put Customer_Search.
    • (You can use whatever name you want here but it needs to be consistent across the next few steps, also note an underscore, no spaces!)
    • Change Parameter Source to Form
    • Change Form Field to Customer_Search
    • Click OK

SharePoint Desinger - add parameter

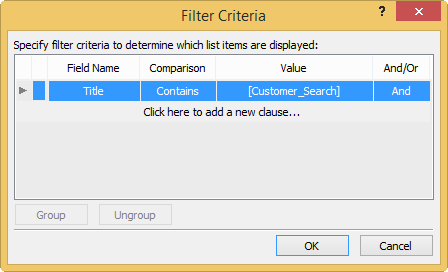
  • Now select Filter from the Ribbon (top left of the edit page view) to open the Filter Criteria window

SharePoint Designer - filter criteria

  • Choose
    • The field name you want to filter on – in our case the customers’ names are in the Title field.
    • Set the Comparison operator to Contains (this means that searching for ACME will return “ACME Corporation “or “Big ACME rentals” etc.)
    • Set Value to be the parameter we created above – Customer_Search.
    • Click OK

We’re done with SharePoint Designer (SPD) now so you can hit save and close SPD.

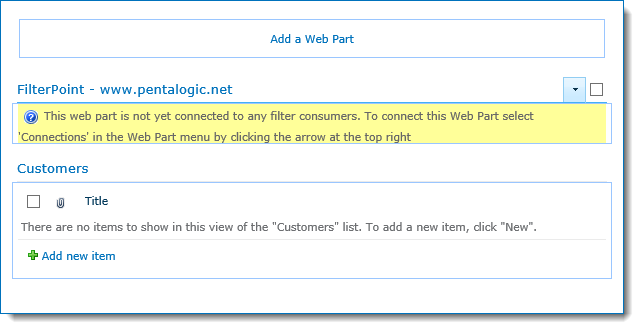
Open the page you’ve been working with in the browser – notice that the list won’t be displaying any results as we’re not passing in anything to our Contains Parameter.

Edit the page and add the Filter Point web part (or another FilterProvider web part of your choosing)

FilterPoint web part added

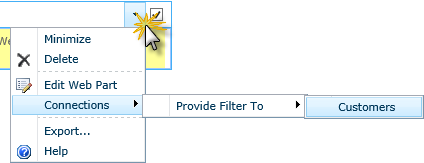
  • Select the Web Part menu (button on top right highlighted) and then Connections > Provide Filter To > Customers (or whatever your list is called.

Connect FilterPoint to customers list

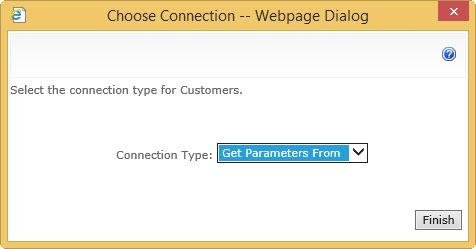
  • On the next dialog box select Get Parameters From and then Finish

Web Part Connection get parameters from

  • Right – we’ve added a Parameter and a Contains Filter to the List view and connected the FitlerPoint web part to the List View, nearly there!
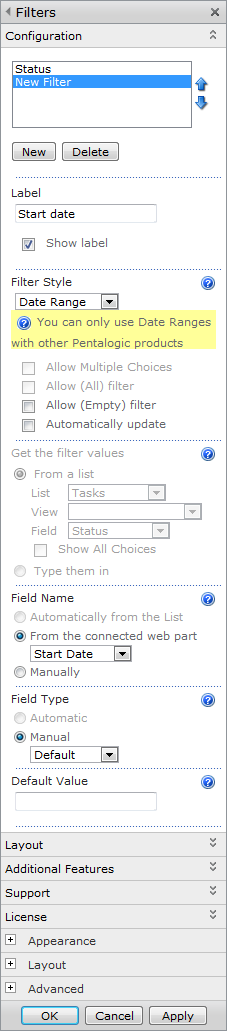
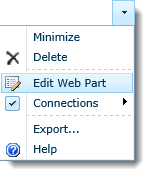
  • Next open FilterPoint’s configuration toolpane

FilterPoint - edit web part

    • Select New and enter a label such as Customer
    • Set the Filter Style to “Free Text”
    • Set the Field Name to From the connected web part and choose the parameter that you set above – in our case Customer_Search.
  • Click OK and you’re finally done.

(For more info on configuring FilterPoint see the manual)

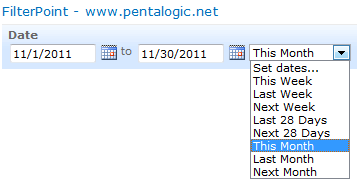
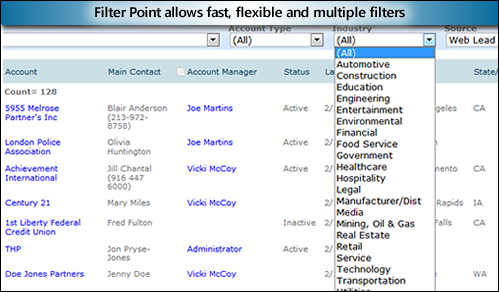
Searching for “acme” or “rent” will now return any customer that has that string in their name :-

search rent search acme

A couple of points to note :-

  • You can’t do complex searches like “acme AND rent” or “Rent*Crane” – just Contains or Begins With searches.
  • If you want to setup additional filters then once you’ve connected the web parts in “Get Parameters” mode (rather than the normal “Get Filter Values” mode) you will have to repeat the above steps to create Parameters and Filters in the List for each filter. It’s a pain but a limitation of SharePoint.
  • If you do add additional Parameters and Filters be sure to set the And/Or operator correctly – for most use cases you will want And.

#

SharePoint Designer 2013 – How to modify List View web part filters and parameters

Date:May 30th, 2014 Author: Tags: , , ,
Category: Filter, FilterPoint Web Part, General, SharePoint Development, SharePoint Ideas Comments:18 ;

SharePoint Designer is especially useful for things like setting up complex filters and parameters for List View web parts like ‘wildcard’ searches and ‘before or after a date’ filters.

In SharePoint Designer 2013 (SPD 2013) the “Design View” was (controversially) removed so now it’s a little harder to use as you have to wade through some X/HTML soup. There is also a bit of a wicked bug that’s going to trip you up as well so in this post I am going to give a few tips on how get to the Parameters and Filters options in the ribbon menu.

SharePoint Desinger 2013 - Filter and Parameters

Note –this post is NOT a tutorial on how to use SharePoint Designer (its complex and worth a whole book in itself) but just a few tips for those already familiar with using SPD on how to do use the 2013 version. It won’t put back all you’ve lost, just allow you to access the Parameter & Filter options.

Missing Designer View and finding the List View Web Part

When you edit a page the most obvious difference in SPD 2013 is that you don’t get a Design View (the WYSIWYG view that allows you to see how the page will look whilst editing it). Instead you’ve only got the code view and you’re going to have to work through some angle bracket gibberish!

You’re looking for the code that defines the list view – it starts with <WebPartPages:XsltListViewWebPart and ends with </WebPartPages:XsltListViewWebPart> (pink in the pic here).

SharePoint Designer 2013 - how to find List View Web Part LVWP in code view

But save your eyes! Just search (CTRL+F) for XsltListViewWebPart! If the cursor is between the two XsltListViewWebPart tags then this is the same as clicking on the List in the old Design / Split view.

(If there are more than one List View on the page you will have to figure out which is which by the position of the web part in the page or look for the URL listed in TitleUrl, DetailLink or Url)

Getting the List View Tools options to show in the Ribbon

After putting the text cursor (or clicking) in the code that makes up the List View web part the ribbon should show the List View Tools option.

Except… there is a wicked bug in SPD 2013 at the time of writing that means the Ribbon doesn’t update to show the Options menu (unless you’ve turned off Server Rendering).

The trick (given to me by MdMazzotti) is to right click on XsltListViewWebPart then select Tag Properties and then click OK without clicking anythingSPD - Tag Properties
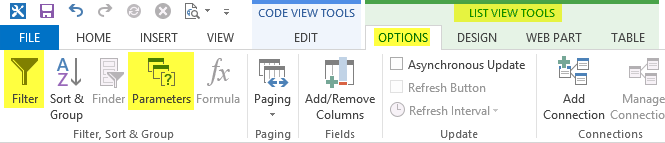
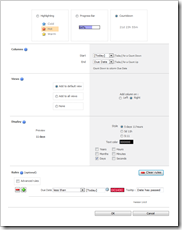
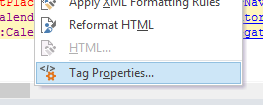
You will now have access to the List View Tools > Options ribbon and the Filter and Parameters button (see picture at the top of this page)
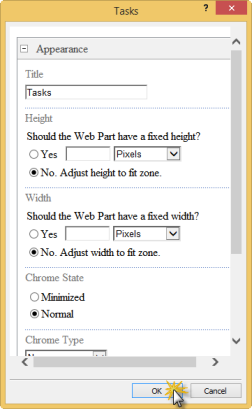
 SPD - Web Part Properties

You can view these steps in a video :-

Unable to display content. Adobe Flash is required.

New version of FilterPoint web part for SharePoint – configurable date ranges

Date:July 20th, 2013 Author: Tags: , ,
Category: FilterPoint Web Part Comments:0 ;

A new version of our FilterPoint web part for SharePoint is available – v1.3.3

This new version adds a configurable Date Range control.

More details are in the online manual.

You can download and upgrade to the latest version without losing any settings.

The Ultimate Flexible CRM solution for SharePoint

Date:March 5th, 2013 Author: Tags:
Category: FilterPoint Web Part, General, Highlighter, Partners, PivotPoint Web Part, SharePoint Reminder Comments:0 ;

The Ultimate Flexible CRM Solution for SharePoint

SharePoint is the platform millions of organizations use to manage various facets of their businesses.  However, in many cases, SharePoint’s built-in functions do not provide the ease of use and advanced functions that users need to work efficiently and effectively.

Some SharePoint consulting firms will recommend custom-built web parts to provide the necessary functionality required.  Before going this route, companies would be wise to evaluate pre-built applications and web parts to save significant time and money!  Evaluating and sourcing the right products however can be an overwhelming task – and falling prey to vendor hype a common outcome.  This is particularly true with CRM technology (Business/Customer Relationship Management).

Benefits of a 100% SharePoint- based CRM application:

A system that is designed to be highly configurable and evolve with the business’s ability to embrace change is the key to a successful implementation and a higher than average level of user acceptance.

  • Single point of user login where all business related information is stored
  • Maintenance of  sensitive customer data inside a controlled environment
  • Leverages existing technology investment

sharepoint-crm-dashboards

manage-leads-in-sharepoint

sharepoint-crm-outlook-plugin

Designed exclusively for SharePoint, SharePoint CRM by LookOut Software revs SharePoint up with dynamic, flexible and powerful features out of the box – yet is easy to personalize, scale, and upgrade as needed.

Rather than reinvent the wheel, LookOut Software partnered with one of the top Web Part developers in the industry to provide powerful, yet optional, enhanced functionality for its CRM application.

Pentalogic’s Filter Point, Pivot Point, Highlighter and Reminder  web parts enhance and further empower SharePoint CRM with easy to use, flexible and comprehensive interactive Charts, Graphs, Filters, Alerts and more.

Some examples:

filterpoint-sharepoint-filtering pivotpoint-sharepoint-crm-charting
highlighter-sharepoint-color-coding reminder-mini-workflow-sharepoint-crm

SharePoint CRM and Pentalogic’s simple- to-use and effective add-on web parts combine to create the ultimate Flexible CRM Solution for SharePoint.

FilterPoint web part is now compatible with SharePoint 2013

Date:January 22nd, 2013 Author: Tags:
Category: Filter, FilterPoint Web Part, General Comments:0 ;

Our FilterPoint web part is now compatible with SharePoint 2013 as of version 1.3.2.

You can download and install the latest version here.

If upgrading from SharePoint 2010 to SharePoint 2013 simply perform the upgrade then install the latest version – your old settings and license key will be picked up.

PivotPoint web part

This page will be updated as our other web parts are made SharePoint 2013 compatible

Turn A SharePoint Task List Into A Task Master

Date:October 19th, 2012 Author: Tags: , , , , , ,
Category: FilterPoint Web Part, Highlighter, PivotPoint Web Part, SharePoint Alert, SharePoint Planner, SharePoint Reminder, SharePoint webparts Comments:0 ;

Here’s how you can turn SharePoint’s built-in Task list into a powerful task tracking tool, using Pentalogic products.

These are just examples to get you started – we’re only scratching the surface here of what’s possible with our range of flexible SharePoint web parts.

To start, just create a new blank site and add a task list. Here’s one I made earlier:

start

Now just follow our guide for each section (or just the sections you want):

Each section has step-by-step instructions and a screenshot of the configuration to compare against.

Task list: Priority and Due Date highlighting

Uses Highlighter

To make the high-priority and upcoming tasks really stand out, we’re going to add a couple of highlighter columns.

Here’s what you will see on the All Tasks view – coloured flags to show priority, a column showing how long we’ve got left to complete items and a red highlight for things that are overdue.

highlighter_result

hl_priority

Highlight Priority

  • Create a new Pentalogic Highlighter column
  • Name the column Task Priority
  • Choose the column type Highlighting
  • Choose Show Icons
  • Click the Default icon, then click Clear
  • Change Base on column to Priority
  • Select Replace ‘Priority’ on all views
  • Under Rules click the Auto-create button
  • Click OK

Due Date Countdown

    • Create a new Pentalogic Highlighter column
    • hl_countdownName the column Due
    • Choose the column type Countdown
    • Change the Start option to [Today]
    • Change the End option to Due Date
    • Select Add to default view, on the Right
    • Uncheck all the display options except Days
    • Under Rules click the Auto-create button

Home page: Task calendar overview and summary

Uses Planner

On your site’s home page we’re going to add an at-a-glance overview of your tasks: A view of the task list (highlighted, if you did the previous section) and a task calendar.

Here’s what your home page will look like once we’ve finished:

mainpage

List view

  • Edit the page and add Tasks from the Existing Lists category
  • Edit the web part
  • Change the Selected view to All Tasks (to ensure Highlighter columns are displayed)
  • Click OK

Task calendarplanner_config

  • Edit the page and add Planner v2 from the Miscellaneous category
  • Set the Style to By Category
  • Set the Planner Source to Tasks
  • Set the Start Date to the column Start Date
  • Set the End Date to the column Due Date
  • Set the Category to Assigned To
  • Set the Label to Title
  • Set the Progress to % Complete
  • Set the Period to Auto
  • Change Set colour by column to Priority
  • Assign appropriate Colors to the priorities (e.g. High – Red)
  • Optional: Set a Fxed width under the Appearance section
  • Optional: Set the Font size to Medium

Analysis page: Graphs and granular reporting

Uses FilterPoint and PivotPoint

Now we’re going to create an Analysis page to produce some graphs and reporting data from your task list.

You will have an Analysis page that looks like this – showing  charts for each persons workload.

analysispage

Creating the page

  • From Site Actions choose New Document Library (to put the page in)
  • Call the library Pages
  • Set Quick Launch to Yes
  • Set Versioning to No
  • Change the Document Template to Web Part Page
  • Click Create
  • From Site Actions choose More options…
  • Under Page choose Web Part Page
  • Call the page Analysis
  • Change the Template to Full page, Vertical
  • Set the Document Library to Pagespivotpoint_pie_config

Graph and Report: Priority skew

Let’s add a graph to show us if tasks are being raised too often as “High priority”:

  • Edit the Analysis page
  • Add the PivotPoint web part from the Pentalogic.net category
  • Edit the web part
  • Set Display to Both
  • Set List to Tasks
  • Under Columns set Field to Priority
  • Under Chart options set Chart type to Pie
  • Click OK

Graph and Report: Status by Personpivotpoint_stack_config

Next we’ll add a graph to show the status of tasks assigned to everyone. That’ll show us if we have any bottlenecks in the team:

  • Edit the Analysis page
  • Add the PivotPoint web part from the Pentalogic.net category
  • Edit the web part
  • Set Display to Both
  • Set List to Tasks
  • Under Columns set Field to Status
  • Under Rows set Field to Assigned To
  • Under Chart options set Chart type to Bar
  • Set Color mappings to Automatic colors
  • Click OK

Filteringfilterpoint_config

Lastly, let’s add a filtering web part. this will allow us to drill down into our data by selecting certain statuses and date ranges:

  • Edit the Analysis page
  • Add the FilterPoint web part from the Pentalogic.net category
  • Connect the other web parts via the menu (Connections -> Provide filter to)
  • Edit the web part
  • Under Filters click New
  • Change the Label to Status
  • Set the Style to Drop Down
  • Under Get the filter values select From a list
  • Still under Get the filter values, the list Tasks and field Status
  • Under Filters click New
  • Change the Label to Start Date
  • Set the Style to Date Range
  • Set the Field name to From the connected web part and select Start Date
  • Click OK

You can display the page on the Quick Launch menu via Site Actions -> Site Settings and selecting the Quick Launch option under Look and Feel.

Alert page: Configure “Overdue” alerts

Uses Reminder

The last step is to configure Reminder to send email alerts to us when tasks are overdue. You’ll need to create the Pages document library if you skipped the previous section, and then continue with the instructions:

  • From Site Actions choose More options… reminder_config
  • Under Page choose Web Part Page
  • Call the page Reminder
  • Change the Template to Full page, Vertical
  • Set the Document Library to Pages
  • Edit the page
  • Add the Reminder web part from the Miscellaneous category
  • Edit the web part
  • Set Watch list to Tasks
  • Under Email to select Assigned To from the dropdown
  • Under Email CC enter the manager’s e-mail address in the text box
  • Next to Subject click “” and enter the following into the popup box:Overdue task ([Title])
  • Next to Message click “” and enter the following:This task is overdue: Title: [Title]
    Due date: [Due Date]
    Priority: [Priority]
  • Under Send When expand Overdue and choose by 1 Days
  • Click OK

You should hen see the following on the page:

reminderpage

You can also setup email alerts to remind you when tasks are due in a few days.

Finished!

Your mundane Tasks list is now an all-singing all-dancing Task Master!

This is just one example of the many possible solutions that can be achieved with our products. Please feel free to browse the product pages below to learn more or take advantage of our 30 day free trial:

Date Range filtering with the new version of FilterPoint, PivotPoint and Planner.

Date:December 13th, 2011 Author: Tags: , , ,
Category: Filter, FilterPoint Web Part, PivotPoint Web Part, SharePoint Planner, SharePoint webparts Comments:0 ;

FilterPoint has had the ability to send Date Filters but a common request has been Date Ranges – like showing everything this month, last year or between two arbitrary dates.

FilterPoint - Date Range Filtering

The good news is that we’ve added this in to FilterPoint as of version 1.2

The bad news is that this will only work with our other SharePoint products – Planner and PivotPoint – it won’t work with SharePoints built in List View web part (LVWP).

That’s disappointing!

Yes it is – it’s just a limitation of SharePoints filtering I am afraid, but all is not lost!

This page shows how you can do things like Month filtering using calculated columns and this blog article shows how you can setup “Current Month/Previous Month” views using nothing more than Calculated Columns and View filters.

Upgrading

As always you can upgrade without losing any settings by downloading and running the latest trial version and selecting “Upgrade” when prompted (don’t forget you need the a recent version of Planner (v2.6.9+) and PivotPoint (2.2.0+) to accept date range filters.

SharePoint FilterPoint New Version Release; now with personal defaults

Date:February 22nd, 2011 Author: Tags: , , ,
Category: Filter, FilterPoint Web Part, General Comments:0 ;

We’ve just released a new version (v1.1.3) of our FilterPoint web part for SharePoint. We have had plenty of user feedback over the past few weeks and this new version has some added features and functionality that we hope you will all find useful.

As you know, FilterPoint already gives you the ability to set default values globally, to help get users to the most relevant information quickly.

And now new functionality in v1.1.3 will help each user get to their own individual information more quickly too.

There are 2 ways FilterPoint does this.  First by re-loading the last used filter values when you revisit a page.  And secondly by looking for FilterPoints on different pages that filter on the same fields, and getting them to fetch records with the same values.

So how could this help you?

Well, let’s take the example of 2 national sales account managers.  Freda’s biggest client is Big Corp and Sophie’s most important customer is Enormous Inc.  They each want to know what is going on with their key accounts on a daily basis.

So Freda and Sophie both look at dashboards that show sales activity, financial account status, cases and help tickets etc.  Freda always filters to see the stuff on Big Corp and Sophie always filters to see what’s happening with Enormous Inc.

Because FilterPoint will now save filter values between visits to a page each account manager will see information on her main client account as soon as she opens a page – so long as that was the last thing she looked at when she last visited the page.

Even better, once one FilterPoint is set up to filter for “Client = Big Corp” by Sophie, all other FilterPoints on the site will also look for information on “Client = Big Corp” and display this for Sophie, so long as this field and value exist in the lists and web parts they have been applied to.

These two new features should be a real time saver for many users.

In addition, there are other new features in FilterPoint v1.1.3:

If you’re an existing customer or trial user you can download and upgrade to the latest version.

And if you haven’t yet tried FilterPoint why not download a 30 day free trial now?