Posts Tagged ‘SharePoint 2010’

Google Chrome v37+ causes problem changing user in TeamTime on SharePoint 2010

Date:November 24th, 2014 Author: Tags: ,
Category: SharePoint TeamTime Comments:1 ;

Google have controversially removed a feature (showModalDialog) from Chrome v37+ that has been included in most browsers since 1994 and is still part of the HTML5 specification.

This has caused problems with lots of web applications including companies internally developed apps, ‘3rd party apps’ and Microsoft products like Outlook Web Access, Dynamics and of course SharePoint.

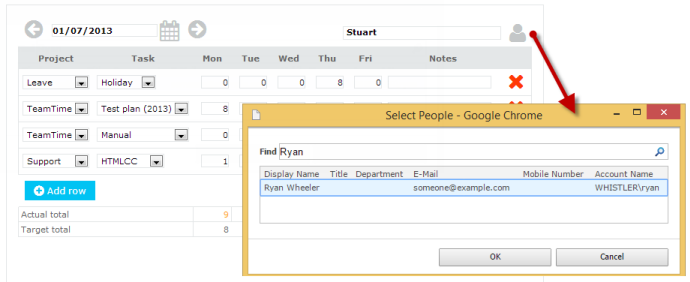
TeamTime (our timesheet app for SharePoint) has been effected by this too as we use SharePoints built in People Picker control in the Timesheet to allow you to view other users timesheets (if you’ve got the right permissions).


teamtime-people-picker

With Google Chrome v37 and above it will open up the people picker and let you select an individual, but when you click OK it won’t update the main page.

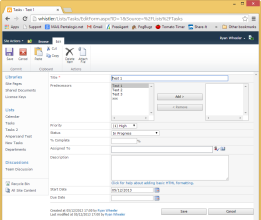
This is actually due to a bug in SharePoint 2010 and you can see the same problem if you edit a normal “Person or Group” field like the Assigned To field in any task list.

Interestingly (to us nerds anyway!) it works fine if the Edit Form opens as a dialog, but won’t work if it opens up full screen (which will happen if you right click Open In New Window, click on an edit link in an email or turn of Launch forms in a dialog in List Settings > Advanced Settings).

edit-form-in-popupEdit Form opens in dialog – people picker will work OK. edit-form-no-dialogEdit Form opened full screen, SharePoint 2010 people picker will not work in Google Chrome v37 or above

This isn’t something we can fix – the problem is a bug in Microsoft’s SharePoint 2010 javascript code which has been triggered by Google’s change to Chrome.

Nerd Alert – The bug is in init.js, function commonShowModalDialog. At the end of the function (in the branch that runs if showModalDialog is not available) you have the line

               if (window.frameElement != null)
                              window.fndlgClose = d

Where d is the ‘callback’ function to run when the user selects a person. The test if (window.frameElement != null) means this is only ran if its running in an iFrame – hence it working if the edit form opens up in a ‘popup’ itself.

What are my options?

  • Stop using Chrome in favour of another browser.
  • Temporarily use a registry hack to turn showModalDialog back on (but this will only work until the end of April 2015)
  • Upgrade to SharePoint 2013 (this only happens on SharePoint 2010, not 2007 or 2013)
  • Wait until either Microsoft fix this or Google come to their senses.

SharePoint Sandbox Solutions: The Good, The Bad, and The Ugly

Date:July 11th, 2012 Author: Tags: , , , ,
Category: General, SharePoint Development, SharePoint webparts, Training Comments:3 ;

Sandbox solutions are often seen as the cure-all for the worries of installing in-house or third party software on your SharePoint farm; but all is not as it seems.

This article aims to dispel some of the illusions around the safety of Sandbox Solutions, and cut through some of the fluff about what the sandbox should actually be used for and why.

  • The Good: What sandbox solutions do well
  • The Bad: What sandbox solutions don’t protect you from
  • The Ugly: The compromises you have to make to use them

What is a Sandbox Solution?

A Sandbox Solution is just like a normal Farm solution, except that it is deployed to a specific Site Collection (rather than the whole Farm), and has a limited set of tools it can use.

A full listing of what you can and can’t do in the sandbox can be found here:

Sandbox Solution Considerations (section “Capabilities and Elements in Sandboxed Solutions”)
Restrictions on Sandboxed Solutions in SharePoint 2010

It’s just like having a toddler in a sandbox in your garden (or yard): They can build sandcastles and dig holes using the tools you give them, but they can’t play with the chainsaw or ride-on mower you’ve left lying around (or dig enormous holes in your flower beds).

The Good

Sandbox Solutions are prevented from doing many things that could cause security or performance issues on your SharePoint server. Notable restrictions include:

  • No access to the network(s) your server is connected to
  • No access to the server’s registry
  • No access to the server’s filesystem
  • No access to e-mail via SMTP
  • Permissions cannot be elevated

There are also some additional features to help keep solutions in line:

  • Solutions can be installed at the Site Collection level by Site Collection administrators.
  • Resource Usage Limits are applied to solutions and can be monitored and limited by the administrator, preventing faulty or processor-hungry code from overwhelming the server.
  • Solutions can be automatically validated, and known troublemakers can be banned from the entire farm.

Notably, the main benefit to the Site Collection administrator is the ability to deploy their own solutions, but the majority of the other benefits are to the Farm administrator (and/or hosting company); although everyone benefits from the improved system stability these features help to ensure.

The Bad

There are a great many features to help with system stability and the prevention of security breaches; but there are limits to what the solutions are prevented from doing.

You should certainly never deploy untested third-party solutions to the sandbox “without fear of bringing down the entire farm”.

The best example of a danger to stability from within the sandbox is the lack of control over the Client Object Model, mentioned here: Sandboxed Solutions in SharePoint 2010

Pages, Web Parts, and controls that are deployed in sandboxed solutions can include code that runs against one of the SharePoint Foundation client-side object models … Code that runs on the client computer is not subject to any of the code execution or resource usage restrictions.

For example, a solution could contain malicious or badly written code executed via COM that requested all the items in a list an infinite number of times. If embedded into a web part, this would effectively turn the computer of every user that viewed it into a node of a DDoS attack on the server farm.

Rather less dramatically, it’s worth noting that there are no specific restrictions on actively malicious code within a Site Collection. It’s perfectly possible to:

  • Delete sites and sub-sites
  • Add COM calls to export data to an external site (much like Wictor’s data import)
  • Copy data added/edited in lists with item-levels permissions to unrestricted lists

The Ugly

Although sandboxing adds restrictions at every level of SharePoint, the feature wasn’t in the original platform design (in SharePoint 2007). In order to squeeze this feature in, some sacrifices had to be made.

Since there’s no access to the filesystem, the following aren’t possible:

  • Application Pages
  • Visual Web Parts (since they deploy a Control Template)

There are a some compromises due to Split Page Rendering; where sandboxed web parts are rendered separately from the rest of the page in a controlled thread:

  • No Script Manager to output/organise JavaScript
  • No web part connections
  • No access to the page Cache

Similar to the above: Because sandbox solution code needs to run in a controlled thread, the following functionality (that uses separate threads) had to be removed:

  • Workflows containing code
  • Timer jobs

Although most of these compromises are understandable, there are some features that are missing for no apparent reason:

  • You cannot use any of SharePoint’s own web controls (e.g. Date picker, User selection)
  • You cannot hide Custom Actions, or add Custom Action Groups

Conclusion

Sandboxing makes it less likely that you’ll accidentally destabilize a SharePoint farm with broken code, and make it easier to find and deal with trouble making solutions.

It’s also more difficult for malicious code to gain access to anything outside the Site Collection it’s deployed to, and slightly more difficult to destabilize the farm.

However, it doesn’t guarantee safety from either bad or malicious code and there are a large number of compromises to consider. Working around sandbox limitations will add overheads to most development projects, and many solutions will simply not fit into the sandbox model.

For example: FilterPoint and Highlighter are two of our own products that can never be made sandboxable, as they’re based on features that are simply not available in the sandbox.

Edit: Since the publishing of this post, we’ve discovered that sandbox solutions are now deprecated in SharePoint 15; as mentioned in the article SharePoint 2013 preview – Apps or Crapps?.
New-SharePoint TeamTime: SharePoint Timesheets to go

Date:September 22nd, 2011 Author: Tags: , ,
Category: SharePoint TeamTime Comments:0 ;

So here’s a new one for you.

SharePoint TeamTime: a nice and easy, ready to use timesheet and time tracking application for SharePoint.

We have been busy working on TeamTime all summer and now it’s very nearly ready to go.

TeamTime is a native SharePoint application pre-built for you to simply add to your SharePoint site and start using with your team.

It offers you two methods of time entry:

  • either a punch card, to let your record time as its happening by stopping and starting a timer,
  • or a traditional grid or timesheet if you prefer to enter all of your time at the end of the day or week.

The team dashboard lets you see who is working on what right now, and to approve time already logged.

Then powerful and customizable reports and analysis give you an overview of work over time to help you answer questions like:

  • What exactly has Bob been doing this month?
  • Who has been working on Project X?
  • How much time are we wasting on meetings?

TeamTime is a bit of a departure for us.  Up until now we have concentrated creating SharePoint components: tools that you can use to help you get more out of SharePoint when building your own sites, applications and dashboards.

One of the great things about SharePoint is the ability it give end users and power users to build their own applications.  It can be great fun to see just what you can achieve with SharePoint and create something that is exactly tailored to your needs and your processes.

But equally sometimes you just need to quickly get your hands on something that just works and instantly solves your business problem, with no time or effort required from you.

Our research into SharePoint End User Adoption showed us that getting a visible “quick win” with SharePoint: using SharePoint to rapidly and visibly address a business pain point can be one of the best ways of jump-starting user adoption of SharePoint.

Our experience with SharePoint Vacation Planner taught us that sometimes you prefer to have someone else map SharePoint functionality on to business processes for you, rather than having to make that journey yourself.

All this made us think that you might welcome a ready to go SharePoint application that addresses one of the most common issues in any business: time tracking.

TeamTime has been built using a combination of out of the box SharePoint functionality and customized versions of our own web parts: PivotPoint and FilterPoint.  The development has provided us with some new challenges, particularly in the area of user interface design where we have had far more scope to express our creativity that we normally get when building components.  Could be dangerous!

Working our own components in to TeamTime has also given us a fresh perspective on them and some improvements have resulted – watch this space for a new version of FilterPoint.

We are now in the final stages of development and testing with TeamTime and the final version will be released very soon.

If you’d like to give it a whirl with our 30 day free trial then sign up here.

SharePoint Planner – New Version Release, every minute counts!

Date:August 25th, 2011 Author: Tags: , , ,
Category: General, SharePoint Planner Comments:0 ;

We were recently contacted by a customer who was going to be responsible for organizing a visit from a Very, Very important person. The visit would only last a couple of hours, but would involve many people and needed to be planned down to the minute.

The client wanted an easy to use graphical representation of the project, in SharePoint, for everyone to refer to and update as the event progressed.

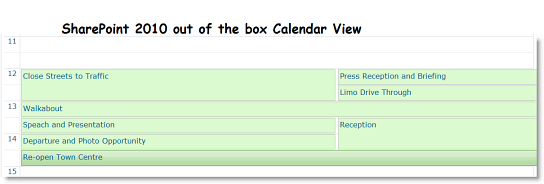
Let’s take a look at how the project might have looked in an out of the box calendar view:

Hmmm, don’t think that’s really giving us the kind of info we need.  We have 7 items here, scheduled over a 3 hour period from 12 noon to 3pm, items fall in to different categories and are assigned to different people.  We’re not really getting that from this view are we?

Actually, the view is quite misleading.  The first event “Close Streets to Traffic” looks as though it lasts for one hour from 12.00 to 13.00 right? Wrong, this is actually a 40 minute event, starting at 12 and finishing at 12.40.  This may not seem like a big deal but there are times when this kind of accuracy really matters – it’s easy to see how running 20 minutes late at a VIP event could lead to VIP tantrums!

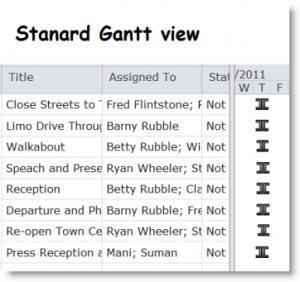
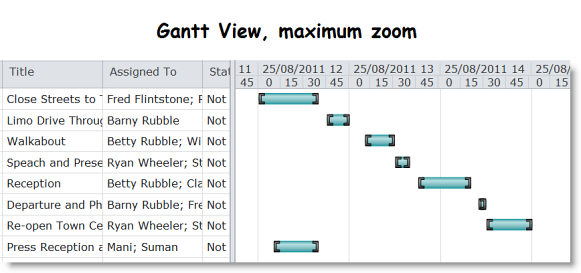
So how about the out of the box Gantt Chart? OK, so we have access to a little more info on who is doing what, but now we can see nothing at all on timings.

We can zoom though, and this is what we get when we do maximum zoom.

Well it’s certainly an improvement, but it’s not great is it?  We are on maximum zoom here are it’s still quite difficult to see the detail of what’s happening when.

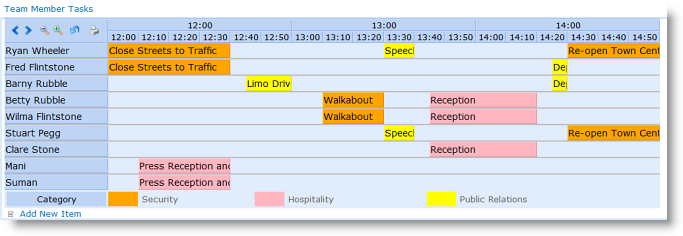
We thought we could do better.  So we added to SharePoint Planner the ability to set timescales to 10 or 15 minutes.  We think this gives a much clearer view for fast moving projects like this. Either in the classic Gantt view, most usually used for projects: Or in a category view for exactly what each of your team members should be doing at any one time:

The new 10 and 15 minute scheduling options allow you to schedule events more accurately and deploy resources more effectively.

This is a new feature in Planner version 2.6.6, so if you are using an older version of the software it would be worth upgrading now.

Or if you don’t yet use SharePoint Planner why not give it a try today with 30 day free trial?

SharePoint Highlighter – color coding date ranges based on [Today]

Date:August 17th, 2011 Author: Tags: , , ,
Category: General, Highlighter, SharePoint Ideas Comments:2 ;

It is sooo much easier to keep on top of your tasks if you can see at a glance what is due when.

Tasks Highlighted by due date


It’s easy to add this color coding to your SharePoint lists with SharePoint Highlighter in just a few clicks, but setting up the rules correctly is a bit of a mind-bender, so in this post we are going to show you how.

So above you can see:

  • Tasks due in less than 7 days highlighted in orange
  • Tasks due in 7-14 days highlighted in yellow.
  • Tasks due in more than 14 days highlighted in green.

So first add a Highlighter column to your list:

http://www.pentalogic.net/sharepoint-products/highlighter/h-manual/h-configuration

Give it a name – I’ve called mine “Due When”.

From the 3 Highlighting Styles choose Highlighting, and choose to Highlight Rows, though this method would work equally well with icons or cell highlighting.

As we are highlighting the whole row we don’t really need to see the actual Highlighter column, so choose to put this to the right of the view, out of the way.

If we were using Auto Setup Rules we would now base the Highlighter column on your Due Date column – this is where it would get its information from.  But what we want to do is a bit too complex for the Auto Setup, so you can leave this box blank and go straight to to the Advanced Rules – click Add Custom.

Scary!  Not really, we just need to think logically about when we are trying to achieve.

The main thing you need to remember is that Highlighter will apply the first rule it finds that is true.  Once it has applied one rule to a row, it will ignore all other rules.

So to get the Highlighting shown above we need this setup:

So, when Highlighter checks the list, first it checks to see if the item’s due date is less than 7 days after today, if it is Highlighter colors the row orange and moves on to check the next list item.  If this rule isn’t met Highlighter checks to see whether the item’s due date is less than 14 days after today, and so on.

It’s all a matter of getting your rules in the right order.  So for example, if we change the order of the rules so the 14 day rule comes first, like this:

This is what happens to the list:

As you can see we have lost our orange highlighting for items that are “Due in Less than 7 days”.  Because Due in less than 14 days is now at the top of our list of rules this is what Highlighter is checking for first, so it is missing the more urgent items.

It’s all about getting your rules in the right order, and as you can see, Highlighter gives you the ability to move items up and down the list with the up/down arrows, or insert or delete a rule at any point.

I hope this has helped to make sense of the advanced rules, and if you have any scenarios that you would like us to work through for you then we would love to hear from you.

SharePoint Pivot Charts and Pivot Tables with New PivotPoint v2

Date:July 8th, 2011 Author: Tags: ,
Category: General, PivotPoint Web Part Comments:0 ;

Eagerly awaited v2 of PivotPoint web part for SharePoint is now available for you to try, or buy.

We think you’re going to like this one.

Some of you will be familiar with PivotPoint already; it lets you summarize complex SharePoint list data by creating Pivot Tables.  These update dynamically, as your list data changes. So they are great to use in dashboards for things like keeping an eye on how sales are going, keeping tabs on how your helpdesk is performing, seeing who’s taking way too much sick leave.

People in the finance sector and statisticians have always been really keen on PivotPoint; they understand how useful Pivot Tables are and feel right at home looking at rows of figures all day.  For the rest of us  a nice colourful chart tends to make things easier to understand at a glance, so that’s what we have added to PivotPoint version 2.

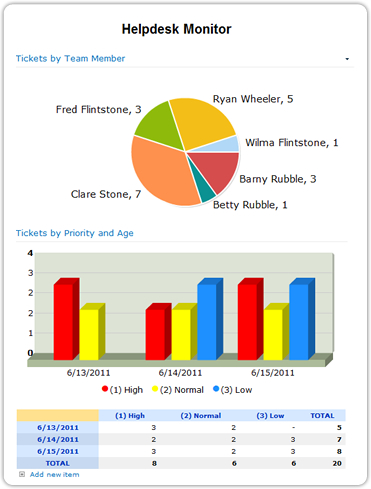
As well as creating Pivot Tables, which are linked directly to your SharePoint list data and therefore update automatically as your list data changes, you can also create Pivot Charts, which are also linked directly to the list.  You can choose bar charts, line charts, column charts, funnels, pies – the world’s your oyster!  Color code as you wish, and if you want the visualisation and the detail you can display a chart and a table together.

Another advantage of having the web part directly connected to the list is that we have been able to include drill down, from the chart or table, to a filtered view of the list.  So for example when I am looking at my “Sales by Product, This Month”, chart, I will be able to hover over the enormous, sky rocketing column which represents this month’s sales for PivotPoint version 2, click on it, and go directly to a list view showing just the sales records for all the people who have bought PivotPoint this month – how cool is that?

The new version also has other handy features, like export to excel, so that you can do more analysis on your figures if needed, and easy printing, because we know SharePoint generally isn’t all that print friendly.

If you are an existing customer you can upgrade to v2 without disrupting any of your existing settings.

If you’re not a customer yet, well what are you waiting for?  Take a free trial and see what your SharePoint deployment is missing!

SharePoint Calculated Column Cheat Sheet

Date:May 19th, 2011 Author: Tags: ,
Category: Calculated Columns, SharePoint Ideas Comments:15 ;

Calculated columns are a really useful feature of any SharePoint list.

Whether you want to automatically show the profit on a sale, or the financial year that a date falls in to, or tidy up sloppy user input by capitalising names.  There is a lot you can do it with a Calculated Column.

But remembering the formulas and functions needed is not always easy, especially before the first coffee of the morning.  I know there is a way to get rid of the decimal places on a number but is it TRUN, or TRUNC, or TRUNK – oh no, hang on, that last one is just to do with elephants!

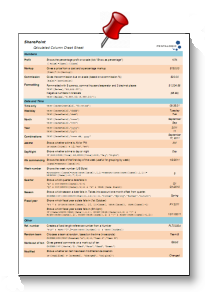
So, over the years we’ve gathered together a quick reference of some of the most commonly used functions and formulas – stuck on a wall above the desk it saves a lot of time and head scratching.  We’ve found ourselves sending it to clients from time to time, and they seem to find it quite handy too.

So we decided to tidy it up – clean off the coffee stains and make a nice PDF of it – and make it available to download, free – yes that’s right, FREE!

So why not download our free Calculated Column Cheat Sheet and save yourself some time and headaches?  This easy 3 page reference sheet gives you a selection of commonly used calculated column formulas, along with a pretty thorough reference of most of the functions and operators you are likely to need in your day to day work.

Download, print, stick it on the wall, and we hope you find it as handy as we do!

Simple SharePoint workflow use case with SharePoint Reminder – Invoice Approvals

Date:May 19th, 2011 Author: Tags: , , ,
Category: General, SharePoint Ideas, SharePoint Reminder Comments:0 ;

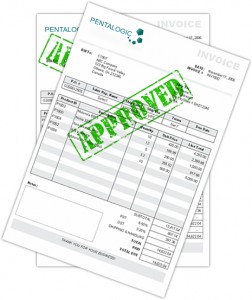
Simple SharePiont Workflow - Invoice ApprovalSharePoint Workflows are one of the magic parts of the solution – the bits when even the most cynical and sceptical end user gets to see the benefit.

Instead of emails and bits of paper flying round your organization, getting lost, forgotten and falling between the cracks, everything is managed and driven centrally by SharePoint.

There are a whole load of scenarios where you could use workflows:

SharePoint can handle all of these processes seamlessly and automatically.  Seeking appropriate approvals, escalating, notifying, referring back and reminding as needed, whilst keeping all documentation secure in one central location.

So, that’s the upside.  The downside is that to create a SharePoint workflow you need to use either SharePoint Designer or Visual Studio.  Whilst SharePoint Designer isn’t all that hard to master it is a very powerful tool and capable of doing serious damage in the wrong hands, for this reason many organizations keep it looked firmly away from most users.  Visual Studio on the other hand really is hard to master – strictly for the mega-brains in your IT department.  So this means that cooking up a bit of Workflow magic out of the box is out of the question for most SharePoint users.

The alternative is to use SharePoint Reminder to create your SharePoint workflows. Using SharePoint Reminder and some clever filtered list views you can easily create multi stage workflows to cover any of the scenarios listed above.

This use case walks you through how to create a 2 stage supplier invoice approval workflow, using SharePoint Reminder and a standard SharePoint document library.

Reminder only drives simple workflow, it doesn’t have the advanced logic of SharePoint OTTB Workflows and it won’t do things like automatically updating lists or other systems.  But for a lot of your day to day processes, you might find that it does just what you need.

Download SharePoint Reminder


SharePoint Reminder and Upgrading to 2010

Date:April 11th, 2011 Author: Tags: ,
Category: SharePoint Reminder Comments:0 ;

We have noticed that lots of you seem to be upgrading to SharePoint 2010 now.  And lots of you are asking what you need to do to upgrade Reminder.

We know the whole process of upgrading your whole SharePoint installation to a new SharePoint version can be quite stressful.  So we have put some work in to trying to make the bit of that upgrade that relates to Reminder as simple and painless as possible.

We have put together a step-by-step guide to painless Reminder upgrading, which you can see here.

In summary:

  • If you hold a commercial license for SharePoint Reminder there will be no charge for moving to 2010, unless you are adding additional servers to your installation.
  • You should be able to move to 2010 without losing any of your existing Reminder settings.
  • If you are moving to a new server we may need to issue you a new license key, there will be no charge for this as long as you are de-commissioning your old server.

Read the full guide to a smooth Reminder 2010 upgrade here.

And if you have any questions or queries please do let up know.

Use SharePoint Reminder to Email Your Customers

Date:April 4th, 2011 Author: Tags: , ,
Category: General, SharePoint Reminder Comments:0 ;

We all know how great SharePoint Reminder for sending internal reminders and driving simple workflow. But have you tried it yet for managing the bits of your processes that happen outside of your organization? Sending emails to customers, suppliers or other contacts who are not members of your SharePoint deployment, or even members of your organization.

This is really easy to do and there are lots of places you might use this. Let’s look at some of the issues you’ll need to bear in mind.

General Tips

When you are sending emails to people outside your organization you need to ensure that:

  • you can actually send external emails from SharePoint
  • the email comes with a recognizable “from” label.
  • any replies go to an address where they will be dealt with.
  • don’t send a hyperlink to the list item in your email

inbox from

First,  to be sure that your STMP server allows relaying to outside addresses then you may want to use the diagnostics tool to send a test email to a private email address. – http://www.pentalogic.net/sharepoint-products/reminder/reminder-manual?p=configurationtool%2Fdiagnostics.htm

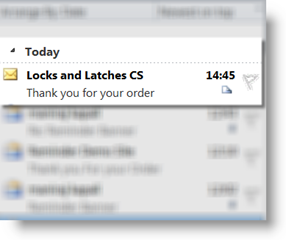
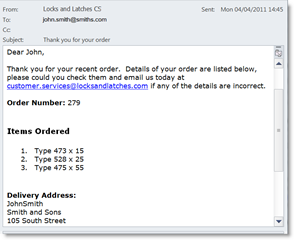
When sending emails to people outside your organization you will want to make sure that what shows up in the inbox is recognizably from you.  You don’t want your customers getting emails from “SP2010 Intranetxyz”, or some other random label. SharePoint automatically labels outgoing emails with the name of the site or subsite they have come from.  So for this example we are going to set up a sub site called “Locks and Latches CS” so that all of our emails to customers and suppliers will be clearly identifiable as coming from Locks and Latches Customer Services.

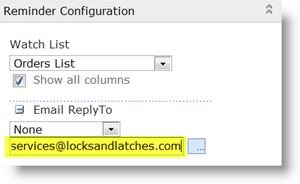
config reply toWhen a customer or other external contact replies to your email it’s important that that reply gets routed to an address where a real person is going to read it and deal with it.  You can write “please contact service@zyz.com in the body of your email until you are blue in the face – but you can be sure that a good percentage of customers who want to reply to you are just going to ignore that and click on “Reply”.  By default SharePoint will route all replies to emails it has generated to one central address – one address for the whole SharePoint deployment.  This address typically gets lots of mail, and often doesn’t get very closely monitored, so in Reminder we have the ability to override that and specify a “Reply To” address for each Reminder you set up.  For this example we are going to have all replies go to customer.services@locksandlatches.com.  If in your own set up particular people are responsible for their own order you might choose to have replies going to the person who created the order record “Created By” or maybe the account manager for that customer “Assigned To”.  The main thing is that you ensure replies go to an email address which is monitored, and where they will be responded to.

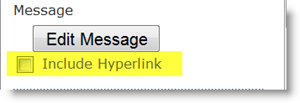
include HyperlinkDon’t send out dead end links or useless information. Both SharePoint’s built in Alert Me feature and SharePoint Reminder send out a hyperlink to the relevant list item in the alert/Reminder email by default.  If you are sending emails to external contacts this link will very likely be of no use, as the contact probably won’t have permissions to view your SharePoint site.  In SharePoint out of the box alerts you can’t customize your alert emails, but in Reminder you can, so when sending emails to an external contact remember to uncheck the “Include Hyperlink” box.

Reminder Set Up

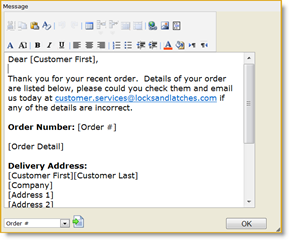
order conf email edit email

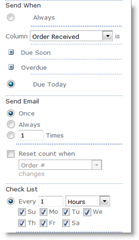
In this example we have used Reminder to send an email to a customer each time a new order is received.  The set up of a Reminder when sending an external email is really much the same as the set up of any other Reminder.order received config

In this example Reminder is set to watch our orders list.  It’s set to watch the “Order Received” column, and email the address in the “customer email” column when “Order Received” is “Due Today”  – or equal to today.  Reminder is checking the list every hour, which means customers should get a confirmation email within an hour of their order being received.

Because “customer email” is simply a text field, and not recognized by SharePoint as containing an email address you will need to check the “Show all fields” box.

Customize your emails with merge data from your list, just as you would with a Word Mail merge.

And away you go, SharePoint Reminder emails for your customers.

Where Else Might I Use This?

There are loads of places where you could use this with customers, suppliers or other external contacts:

  1. delivery notification emails for customers
  2. overdue invoice emails for customers
  3. stock re-order emails for suppliers.
  4. meeting reminders for contacts.

to name but a few.

And if you have other examples of using Reminder to send emails to external contacts we would love to hear them.

reminder-download