
We helped a custom recently with an interesting SharePoint question – how to identify if a List item is new or has been modified? In addition they also needed to be able to setup a View to show only New items and another to show Modified items.
Posts Tagged ‘Filter’
How to Identify New or Modified List Items (records) in SharePoint
Date:October 22nd, 2015 Author:Ryan Tags: Calculated Columns, Filter, TipCategory: Calculated Columns, Filter, SharePoint Reminder Comments:0 ;
SharePoint – wildcard / free text searching the List View web part
Date:May 30th, 2014 Author:Ryan Tags: Filter, SharePoint, SharePoint DesignerCategory: Filter, FilterPoint Web Part, SharePoint Development Comments:8 ;
It’s a common requirement to be able to do wildcard free text searches on SharePoint lists.
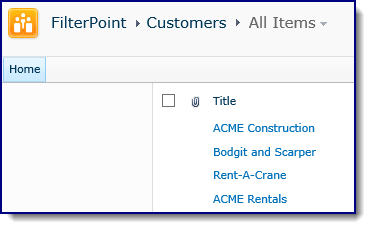
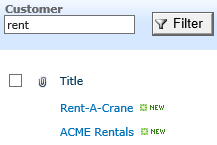
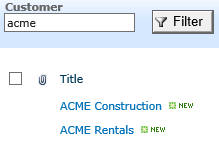
Whilst you can’t do wildcard or complex Boolean search (that’s what the search system is for) you can get close with a contains search. Thus searching for “Acme” will return “ACME Construction” and “Big ACME Rentals” but not “Rent-A-Crane”
It’s not easy though, and does require SharePoint Designer and a Filter Provider such as our FilterPoint product.
Filter Providers and Filter Consumers.
In SharePoint you have
- Filter Providers (like FilterPoint or SharePoint Enterprises own filter web parts)
- Filter Consumers (like the List View web part or other web parts such as our PivotPoint).
The Filter Provider sends the filter you’ve entered (e.g. “Customer” and “Acme”) but it’s entirely up to the Filter Consumer what it does with that filter.
This means that if you want to do things like Date Ranges, wildcard filtering using “Contains” operations you have to set those options on the Filter Consumer.
Our products (PivotPoint, Planner etc) have options to allow you to easily set what to do with the incoming filters, but SharePoints built in List View web part does not.
Using “Contains” filters to do free text search in FilterPoint.
We’re going to use SharePoint Designer to setup Parameters and Filters in the List View Web Part (LVWP) so we can do wildcard type filtering.
(It’s a limitation of SharePoint that you can’t do this without SharePoint Designer – sorry!)
First go to the web part page that has your list (or create a new, empty web part page and add your list to it).
In our example we’ve got a list of Customers with the customer name in the Title field.
- Open this page in SharePoint Designers edit view.
(Depending on what type of page this is will invoice different steps – see these tips for more help on using SharePoint Designer or the online manual for SharePoint Designer)
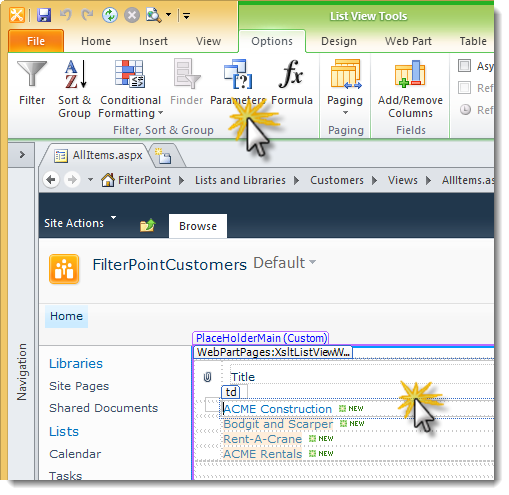
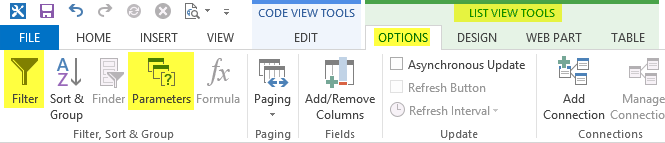
- Once in the edit view, click anywhere List, then click on the Parameters icon on the Ribbon (under Options)
- If you’re using SharePoint Designer 2013 you will have to select the List View web part differently as the design view has been removed – follow the instructions and then continue
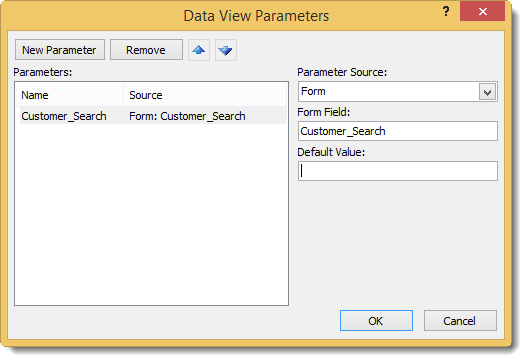
- In the Data View Parameters window :-
- Click New Parameter,
- In the Name box put Customer_Search.
- (You can use whatever name you want here but it needs to be consistent across the next few steps, also note an underscore, no spaces!)
- Change Parameter Source to Form
- Change Form Field to Customer_Search
- Click OK
- Now select Filter from the Ribbon (top left of the edit page view) to open the Filter Criteria window
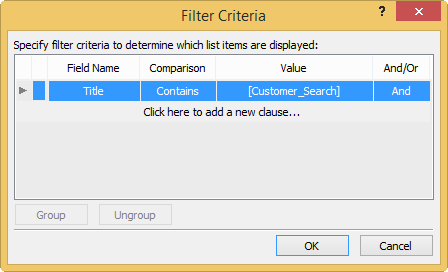
- Choose
- The field name you want to filter on – in our case the customers’ names are in the Title field.
- Set the Comparison operator to Contains (this means that searching for ACME will return “ACME Corporation “or “Big ACME rentals” etc.)
- Set Value to be the parameter we created above – Customer_Search.
- Click OK
We’re done with SharePoint Designer (SPD) now so you can hit save and close SPD.
Open the page you’ve been working with in the browser – notice that the list won’t be displaying any results as we’re not passing in anything to our Contains Parameter.
Edit the page and add the Filter Point web part (or another FilterProvider web part of your choosing)
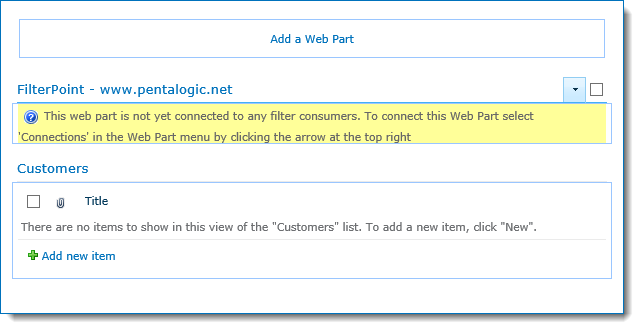
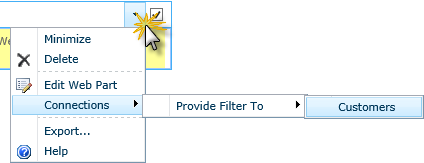
- Select the Web Part menu (button on top right highlighted) and then Connections > Provide Filter To > Customers (or whatever your list is called.
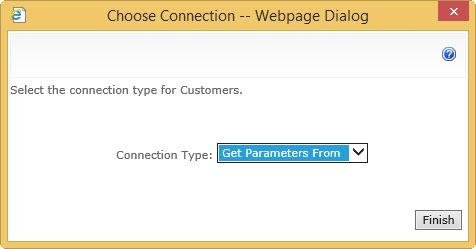
- On the next dialog box select Get Parameters From and then Finish
- Right – we’ve added a Parameter and a Contains Filter to the List view and connected the FitlerPoint web part to the List View, nearly there!
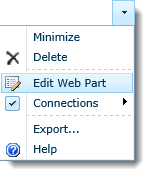
- Next open FilterPoint’s configuration toolpane
- Select New and enter a label such as Customer
- Set the Filter Style to “Free Text”
- Set the Field Name to From the connected web part and choose the parameter that you set above – in our case Customer_Search.
- Click OK and you’re finally done.
(For more info on configuring FilterPoint see the manual)
Searching for “acme” or “rent” will now return any customer that has that string in their name :-
 |
 |
A couple of points to note :-
- You can’t do complex searches like “acme AND rent” or “Rent*Crane” – just Contains or Begins With searches.
- If you want to setup additional filters then once you’ve connected the web parts in “Get Parameters” mode (rather than the normal “Get Filter Values” mode) you will have to repeat the above steps to create Parameters and Filters in the List for each filter. It’s a pain but a limitation of SharePoint.
- If you do add additional Parameters and Filters be sure to set the And/Or operator correctly – for most use cases you will want And.
#
SharePoint Designer 2013 – How to modify List View web part filters and parameters
Date:May 30th, 2014 Author:Ryan Tags: Filter, SharePoint, SharePoint 2013, SharePoint DesignerCategory: Filter, FilterPoint Web Part, General, SharePoint Development, SharePoint Ideas Comments:18 ;
SharePoint Designer is especially useful for things like setting up complex filters and parameters for List View web parts like ‘wildcard’ searches and ‘before or after a date’ filters.
In SharePoint Designer 2013 (SPD 2013) the “Design View” was (controversially) removed so now it’s a little harder to use as you have to wade through some X/HTML soup. There is also a bit of a wicked bug that’s going to trip you up as well so in this post I am going to give a few tips on how get to the Parameters and Filters options in the ribbon menu.
Note –this post is NOT a tutorial on how to use SharePoint Designer (its complex and worth a whole book in itself) but just a few tips for those already familiar with using SPD on how to do use the 2013 version. It won’t put back all you’ve lost, just allow you to access the Parameter & Filter options.
Missing Designer View and finding the List View Web Part
When you edit a page the most obvious difference in SPD 2013 is that you don’t get a Design View (the WYSIWYG view that allows you to see how the page will look whilst editing it). Instead you’ve only got the code view and you’re going to have to work through some angle bracket gibberish!
You’re looking for the code that defines the list view – it starts with <WebPartPages:XsltListViewWebPart and ends with </WebPartPages:XsltListViewWebPart> (pink in the pic here).
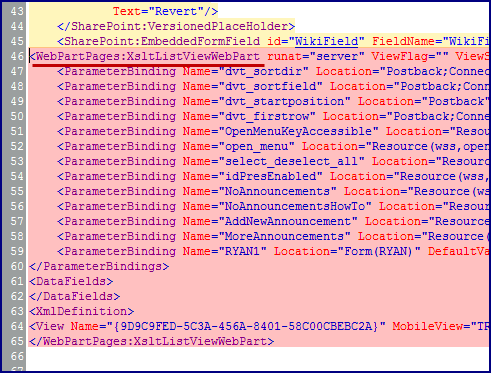
But save your eyes! Just search (CTRL+F) for XsltListViewWebPart! If the cursor is between the two XsltListViewWebPart tags then this is the same as clicking on the List in the old Design / Split view.
(If there are more than one List View on the page you will have to figure out which is which by the position of the web part in the page or look for the URL listed in TitleUrl, DetailLink or Url)
Getting the List View Tools options to show in the Ribbon
After putting the text cursor (or clicking) in the code that makes up the List View web part the ribbon should show the List View Tools option.
Except… there is a wicked bug in SPD 2013 at the time of writing that means the Ribbon doesn’t update to show the Options menu (unless you’ve turned off Server Rendering).
The trick (given to me by MdMazzotti) is to right click on XsltListViewWebPart then select Tag Properties and then click OK without clicking anything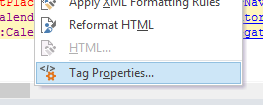 You will now have access to the List View Tools > Options ribbon and the Filter and Parameters button (see picture at the top of this page) You will now have access to the List View Tools > Options ribbon and the Filter and Parameters button (see picture at the top of this page) |
 |
You can view these steps in a video :-
New version of FilterPoint web part for SharePoint – configurable date ranges
Date:July 20th, 2013 Author:Ryan Tags: Filter, filterpoint, WebPartCategory: FilterPoint Web Part Comments:0 ;
A new version of our FilterPoint web part for SharePoint is available – v1.3.3
This new version adds a configurable Date Range control.
More details are in the online manual.
You can download and upgrade to the latest version without losing any settings.
Turn A SharePoint Task List Into A Task Master
Date:October 19th, 2012 Author:Stuart Pegg Tags: Countdown, Filter, Graphs, Highlighting, SharePoint, SharePoint alerts, Task listCategory: FilterPoint Web Part, Highlighter, PivotPoint Web Part, SharePoint Alert, SharePoint Planner, SharePoint Reminder, SharePoint webparts Comments:0 ;
Here’s how you can turn SharePoint’s built-in Task list into a powerful task tracking tool, using Pentalogic products.
These are just examples to get you started – we’re only scratching the surface here of what’s possible with our range of flexible SharePoint web parts.
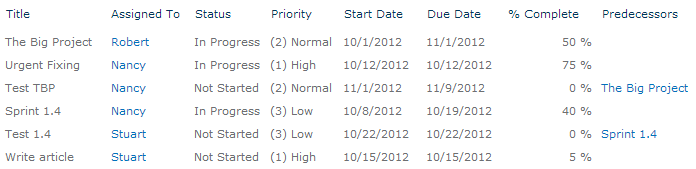
To start, just create a new blank site and add a task list. Here’s one I made earlier:
Now just follow our guide for each section (or just the sections you want):
- Task list: Priority and Due Date highlighting (uses Highlighter)
- Home page: Task calendar overview and summary (uses Planner)
- Analysis page: Dashboards, graphs and reporting (uses FilterPoint and PivotPoint)
- Alert page: Configure “Task Overdue” email alerts (uses Reminder)
Each section has step-by-step instructions and a screenshot of the configuration to compare against.
Task list: Priority and Due Date highlighting
Uses Highlighter
To make the high-priority and upcoming tasks really stand out, we’re going to add a couple of highlighter columns.
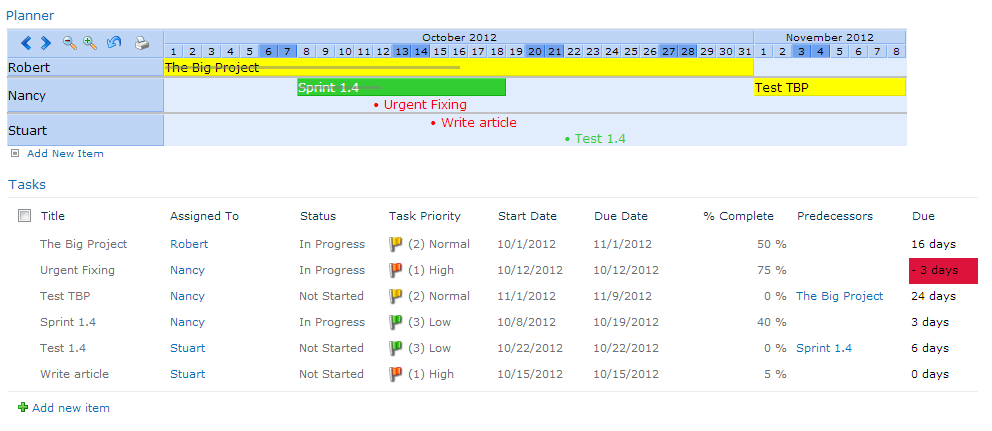
Here’s what you will see on the All Tasks view – coloured flags to show priority, a column showing how long we’ve got left to complete items and a red highlight for things that are overdue.

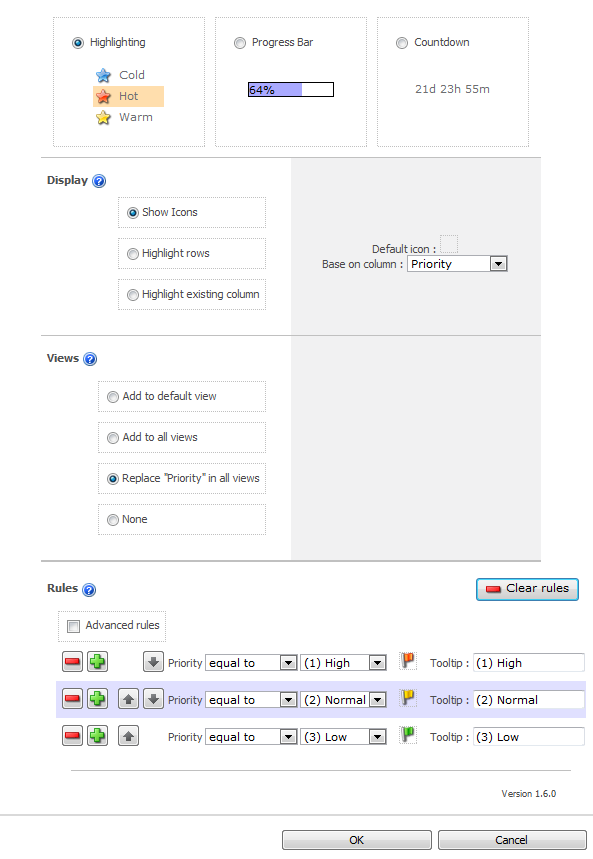
Highlight Priority
- Create a new Pentalogic Highlighter column
- Name the column Task Priority
- Choose the column type Highlighting
- Choose Show Icons
- Click the Default icon, then click Clear
- Change Base on column to Priority
- Select Replace ‘Priority’ on all views
- Under Rules click the Auto-create button
- Click OK
Due Date Countdown
- Create a new Pentalogic Highlighter column
 Name the column Due
- Choose the column type Countdown
- Change the Start option to [Today]
- Change the End option to Due Date
- Select Add to default view, on the Right
- Uncheck all the display options except Days
- Under Rules click the Auto-create button
 Name the column Due
Home page: Task calendar overview and summary
Uses Planner
On your site’s home page we’re going to add an at-a-glance overview of your tasks: A view of the task list (highlighted, if you did the previous section) and a task calendar.
Here’s what your home page will look like once we’ve finished:
List view
- Edit the page and add Tasks from the Existing Lists category
- Edit the web part
- Change the Selected view to All Tasks (to ensure Highlighter columns are displayed)
- Click OK
Task calendar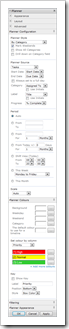

- Edit the page and add Planner v2 from the Miscellaneous category
- Set the Style to By Category
- Set the Planner Source to Tasks
- Set the Start Date to the column Start Date
- Set the End Date to the column Due Date
- Set the Category to Assigned To
- Set the Label to Title
- Set the Progress to % Complete
- Set the Period to Auto
- Change Set colour by column to Priority
- Assign appropriate Colors to the priorities (e.g. High – Red)
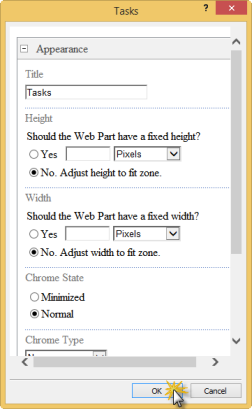
- Optional: Set a Fxed width under the Appearance section
- Optional: Set the Font size to Medium
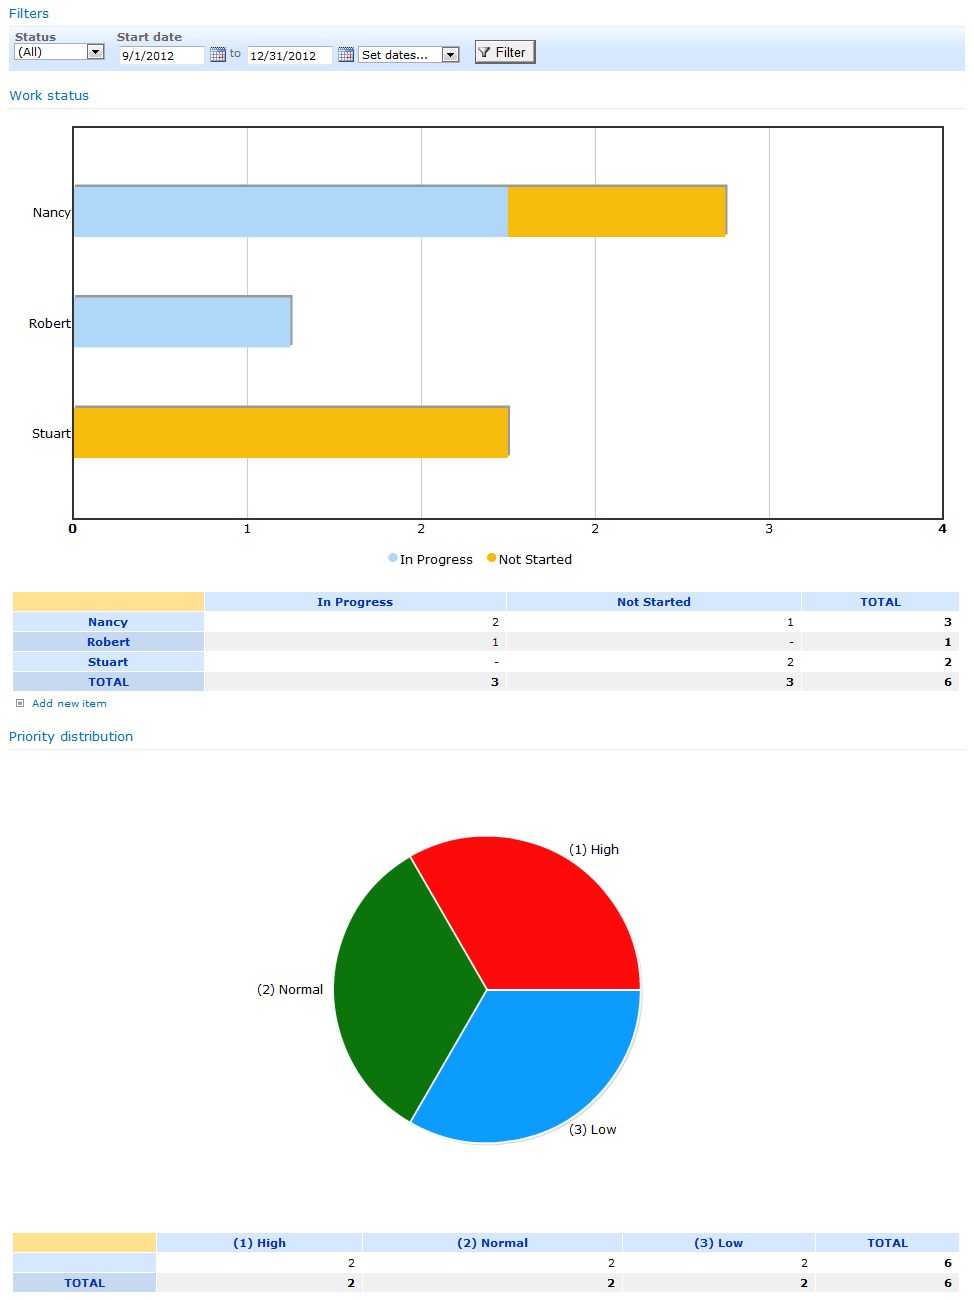
Analysis page: Graphs and granular reporting
Uses FilterPoint and PivotPoint
Now we’re going to create an Analysis page to produce some graphs and reporting data from your task list.
You will have an Analysis page that looks like this – showing charts for each persons workload.
Creating the page
- From Site Actions choose New Document Library (to put the page in)
- Call the library Pages
- Set Quick Launch to Yes
- Set Versioning to No
- Change the Document Template to Web Part Page
- Click Create
- From Site Actions choose More options…
- Under Page choose Web Part Page
- Call the page Analysis
- Change the Template to Full page, Vertical
- Set the Document Library to Pages
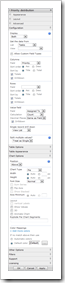

Graph and Report: Priority skew
Let’s add a graph to show us if tasks are being raised too often as “High priority”:
- Edit the Analysis page
- Add the PivotPoint web part from the Pentalogic.net category
- Edit the web part
- Set Display to Both
- Set List to Tasks
- Under Columns set Field to Priority
- Under Chart options set Chart type to Pie
- Click OK
Graph and Report: Status by Person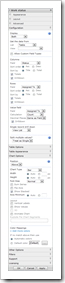

Next we’ll add a graph to show the status of tasks assigned to everyone. That’ll show us if we have any bottlenecks in the team:
- Edit the Analysis page
- Add the PivotPoint web part from the Pentalogic.net category
- Edit the web part
- Set Display to Both
- Set List to Tasks
- Under Columns set Field to Status
- Under Rows set Field to Assigned To
- Under Chart options set Chart type to Bar
- Set Color mappings to Automatic colors
- Click OK
Filtering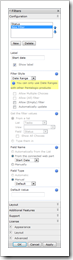
Lastly, let’s add a filtering web part. this will allow us to drill down into our data by selecting certain statuses and date ranges:
- Edit the Analysis page
- Add the FilterPoint web part from the Pentalogic.net category
- Connect the other web parts via the menu (Connections -> Provide filter to)
- Edit the web part
- Under Filters click New
- Change the Label to Status
- Set the Style to Drop Down
- Under Get the filter values select From a list
- Still under Get the filter values, the list Tasks and field Status
- Under Filters click New
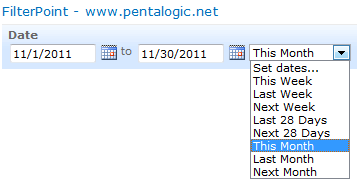
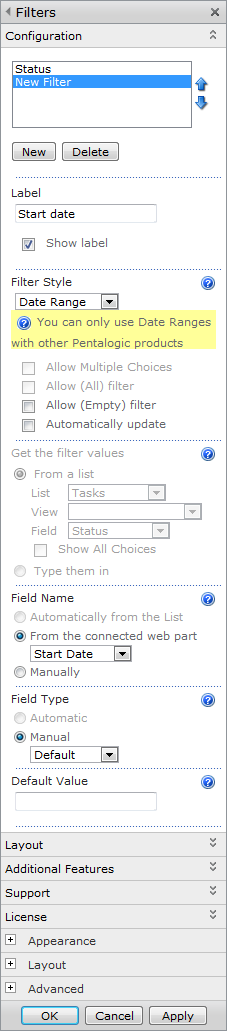
- Change the Label to Start Date
- Set the Style to Date Range
- Set the Field name to From the connected web part and select Start Date
- Click OK
You can display the page on the Quick Launch menu via Site Actions -> Site Settings and selecting the Quick Launch option under Look and Feel.
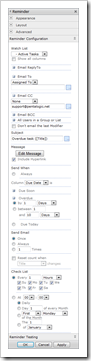
Alert page: Configure “Overdue” alerts
Uses Reminder
The last step is to configure Reminder to send email alerts to us when tasks are overdue. You’ll need to create the Pages document library if you skipped the previous section, and then continue with the instructions:
- From Site Actions choose More options…
- Under Page choose Web Part Page
- Call the page Reminder
- Change the Template to Full page, Vertical
- Set the Document Library to Pages
- Edit the page
- Add the Reminder web part from the Miscellaneous category
- Edit the web part
- Set Watch list to Tasks
- Under Email to select Assigned To from the dropdown
- Under Email CC enter the manager’s e-mail address in the text box
- Next to Subject click “…” and enter the following into the popup box:Overdue task ([Title])
- Next to Message click “…” and enter the following:This task is overdue: Title: [Title]
Due date: [Due Date]
Priority: [Priority] - Under Send When expand Overdue and choose by 1 Days
- Click OK

You should hen see the following on the page:
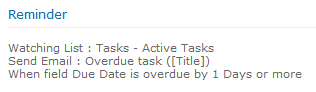
You can also setup email alerts to remind you when tasks are due in a few days.
Finished!
Your mundane Tasks list is now an all-singing all-dancing Task Master!
This is just one example of the many possible solutions that can be achieved with our products. Please feel free to browse the product pages below to learn more or take advantage of our 30 day free trial:
Date Range filtering with the new version of FilterPoint, PivotPoint and Planner.
Date:December 13th, 2011 Author:Ryan Tags: Filter, PivotPoint, Planner, SharePointCategory: Filter, FilterPoint Web Part, PivotPoint Web Part, SharePoint Planner, SharePoint webparts Comments:0 ;
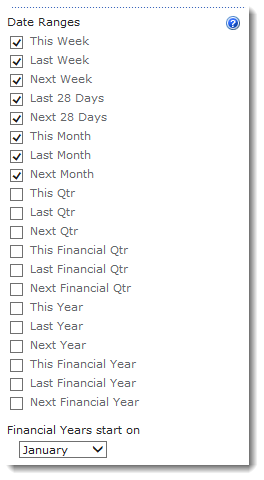
FilterPoint has had the ability to send Date Filters but a common request has been Date Ranges – like showing everything this month, last year or between two arbitrary dates.
The good news is that we’ve added this in to FilterPoint as of version 1.2
The bad news is that this will only work with our other SharePoint products – Planner and PivotPoint – it won’t work with SharePoints built in List View web part (LVWP).
That’s disappointing!
Yes it is – it’s just a limitation of SharePoints filtering I am afraid, but all is not lost!
This page shows how you can do things like Month filtering using calculated columns and this blog article shows how you can setup “Current Month/Previous Month” views using nothing more than Calculated Columns and View filters.
Upgrading
As always you can upgrade without losing any settings by downloading and running the latest trial version and selecting “Upgrade” when prompted (don’t forget you need the a recent version of Planner (v2.6.9+) and PivotPoint (2.2.0+) to accept date range filters.
SharePoint FilterPoint New Version Release; now with personal defaults
Date:February 22nd, 2011 Author:Clare Tags: Filter, filterpoint, filters, SharePoint 2010Category: Filter, FilterPoint Web Part, General Comments:0 ;
We’ve just released a new version (v1.1.3) of our FilterPoint web part for SharePoint. We have had plenty of user feedback over the past few weeks and this new version has some added features and functionality that we hope you will all find useful.
As you know, FilterPoint already gives you the ability to set default values globally, to help get users to the most relevant information quickly.
And now new functionality in v1.1.3 will help each user get to their own individual information more quickly too.
There are 2 ways FilterPoint does this. First by re-loading the last used filter values when you revisit a page. And secondly by looking for FilterPoints on different pages that filter on the same fields, and getting them to fetch records with the same values.
So how could this help you?
Well, let’s take the example of 2 national sales account managers. Freda’s biggest client is Big Corp and Sophie’s most important customer is Enormous Inc. They each want to know what is going on with their key accounts on a daily basis.
So Freda and Sophie both look at dashboards that show sales activity, financial account status, cases and help tickets etc. Freda always filters to see the stuff on Big Corp and Sophie always filters to see what’s happening with Enormous Inc.
Because FilterPoint will now save filter values between visits to a page each account manager will see information on her main client account as soon as she opens a page – so long as that was the last thing she looked at when she last visited the page.
Even better, once one FilterPoint is set up to filter for “Client = Big Corp” by Sophie, all other FilterPoints on the site will also look for information on “Client = Big Corp” and display this for Sophie, so long as this field and value exist in the lists and web parts they have been applied to.
These two new features should be a real time saver for many users.
In addition, there are other new features in FilterPoint v1.1.3:
- Allow you to send multiple filter options to list view web parts when using multi-choice fields.
- Allows you to use vertical as well as horizontal orientation and
- Adds better error handling for situations where a List, Field or View that FilterPoint is using is later deleted.
If you’re an existing customer or trial user you can download and upgrade to the latest version.
And if you haven’t yet tried FilterPoint why not download a 30 day free trial now?
FilterPoint Web Part – on sale now!
Date:January 27th, 2011 Author:Clare Tags: Filter, filters, SharePoint, SharePoint 2010, Web PartCategory: Filter, General Comments:0 ;
![]()
After many months of work we are delighted to announce that FilterPoint is now available to purchase.
Filtering is one of the things that any serious SharePoint user is going to need to do at some point. As you put more data into SharePoint lists become longer and you will need a quick and easy way to get to the items you are looking for.
When you create applications and dashboards, bringing together information from different data sources and displaying it in different ways with Web Parts adding filters will make your applications and dashboards dynamic – giving users the information they need, when they need it.
But when you start filtering you are going to quickly come across things that you wish you could do with SharePoint’s built in filters, but frustratingly just can’t.
So in the same way that we built Reminder to improve on the functionality of SharePoint Alerts, and Planner to improve on Gantt charts and calendars, we have built FilterPoint to give a little more power to your SharePoint filtering.
If you are working with SharePoint 2010 Foundation or WSS your filtering options are limited to static filtered views. Filtered views are great for getting at data sets that you want to see regularly – like “this month’s sales” for example. Set the view up once and it’s there whenever you need it.
But what if you have 100 clients and want to be able to look at “this client’s sales” for any of them? Setting up a filtered view for each client, and navigating to it is going to be quite a drag.
With FilterPoint your filter can be set up in seconds, allowing users to flip between the different data sets they need with just a couple of clicks.
With MOSS and 2010 Enterprise you get more filter power. But we still felt there were some things missing. So for example even with MOSS filters you can’t:
- Set up several Filters within one filter web part
- In 2007, send many filters to one filter consumer list or Web Part (e.g. filter on both customer and product).
- Use different styles of filter, like Free Text, drop down lists or Radio Buttons
- Clear filters with a single click.
So even though MOSS offers more filtering options, there are still some significant gaps and we believe that FilterPoint goes a long way towards filling these.
Of course FilterPoint isn’t the only 3rd party filtering web part on the market and you can see how we match up to the competition by taking a look at our comparison chart here.
When we were looking at the competition one thing we noticed was that some of the most useful filter Web Parts – the ones offering the most functionality – were incredibly complex to set up. You would need the patience of a saint and a PhD in SharePoint (if such a thing existed!) So we have worked very hard to keep the setup of FilterPoint quick and simple. Take a look at our short on-line demo here, and let us know whether we have succeeded.
We’ve also tried to keep the prices competitive. Our Single Server License is $595.
And of course, like all of our products FilterPoint comes with a 30 day free trial and a no quibble money back guarantee.

And for existing customers we are offering a 25% discount for purchases made by 31st March 2011. Email [email protected] for your discount code.
So why not give it a try today?
As FilterPoint is our new baby we are very keen to know what you think of it – so please let us have your comments and feedback.

FilterPoint Update
Date:November 30th, 2010 Author:Clare Tags: Beta, Filter, filters, SharePoint, SharePoint 2010, WebPartCategory: Filter, General, SharePoint Development, SharePoint Ideas Comments:0 ;
![]() We have spent a lot of time over the past month working on the beta version of FilterPoint. Our team of professional testers have been working hard to check for compatibility with all versions of SharePoint 2007 and 2010 and a wide range of browsers, as well as looking for bugs and challenging us on some aspects of the usability of the UI.
We have spent a lot of time over the past month working on the beta version of FilterPoint. Our team of professional testers have been working hard to check for compatibility with all versions of SharePoint 2007 and 2010 and a wide range of browsers, as well as looking for bugs and challenging us on some aspects of the usability of the UI.
And we also owe a huge vote of thanks to our beta volunteers who have been testing out the product in the real world. Our volunteers and not only uncovered some bugs, but also come up with suggestions for additional things that we could include in the first release. Some of these we have already added and they include:
SharePoint Archive Round-up
Date:June 17th, 2010 Author:Clare Tags: Filter, Planner, SharePoint, WebPartCategory: General, SharePoint Ideas Comments:0 ;
 As you’ve probably noticed we have had a few changes on our SharePoint blog in recent weeks. We’ve been doing some work on making it a little more user friendly and a bit nicer to look at (hope we haven’t spoiled it with the photos!)
Whilst I was working on the blog I noticed that we have quite a few little gems hidden away in the archives. Old posts – things that were written maybe a couple of years ago, that those of you who are new to the blog might not be aware of, but might find useful. The useful ones fall into a few categories – general SharePoint tricks, tips and ideas, and ideas and tips for users of our web parts. So here they are, I hope you find them useful.
SharePoint tricks tips and ideas
Extend and customise SharePoint Task lists
Task Lists are one of the best loved and most used features of SharePoint and this post shows you how to better tailor them to meet your particular needs.
Advanced SharePoint View and Filter techniques
This article explores some of the uses of SharePoint Views and Filters.
Working Days, Weekdays and Holidays in SharePoint Calculated Columns
SharePoint Out of the box doesn’t automatically distinguish between working days and weekends but if you are setting things like job duration or due dates you may need to – this article shows you how.
The Truth about using [Today] in SharePoint Calculated Columns
This article explains why the often repeated trick for using [Today] in SharePoint calculated columns does not work, and suggests workarounds.
The … ehem… Truth about using [Today] in SharePoint Filters
This one looks at the differences between SharePoint 2003 and 2007 when using [Today] in filters.
Setting a default duration for new SharePoint Calender Events
So you might be a medical receptionist scheduling appointments for doctors, appointments are always 45 minutes long unless the doctor tells you differently, how much easier would it be to just have SharePoint create an end time 45 minutes after the start time automatically?
How To Use Filters in SharePoint to show items in the current Calendar Month
It’s easy to think of occasions when you might want to filter a SharePoint list to show items falling in the current calendar month: “sales this month” springs to mind, or “subscriptions due for renewal this month”. This post shows you have to achieve this using calculated columns.
SharePoint Reminder Webpart Ideas
SharePoint Reminder Webpart – Setting a variable Due In or Overdue By time
Lots of people use Reminder to send an alert when a message is due soon or overdue. Usually its fine for the message to go out at a fixed time before or after the event, for all list items, but there are occasions where you might want to vary the times at which you send your alerts. For example, sending alerts for overdue helpdesk items: for high priority items you might want to send an alert when an item is 1 hour overdue, whereas for low priority an alert for items 1 day overdue might be fine. This article shows you how.
Customize SharePoint Reminder Emails with Merge Data
Whilst SharePoint’s out of the box alert emails come in a standard format, with Reminder its possible to customize the alert emails you send by merging data from your list items.
Tip – don’t send SharePoint email alerts for old items.
There are some situations where, when you are setting up a Reminder for the first time, you could end up sending out alerts for a lot of very old list items, this post shows you how to avoid doing that.
Tip – Sending an SharePoint email Alert when a Task is completed
If you are using Reminder to drive simple workflow you may very well want to send an email when a task is completed – maybe when a holiday request form has been filled in for example. This post shows you how.
SharePoint Planner Webpart Ideas
Tip – Showing multiple columns in SharePoint Planner Webpart
There may be times when you want to display timeline or category information from more than one list column in a gantt chart. For example in the chart below we have taken information from the “priority” and “title” columns of a list to populate the category labels.
5 things you never knew you couldn’t do with SharePoint Gantt Charts
Shows you a few of the things that aren’t possible with SharePoint OOTB gantt charts, but can be done with Planner.


