
We helped a custom recently with an interesting SharePoint question – how to identify if a List item is new or has been modified? In addition they also needed to be able to setup a View to show only New items and another to show Modified items.
Archive for the ‘Filter’ Category
How to Identify New or Modified List Items (records) in SharePoint
Date:October 22nd, 2015 Author:Ryan Tags: Calculated Columns, Filter, TipCategory: Calculated Columns, Filter, SharePoint Reminder Comments:0 ;
SharePoint – wildcard / free text searching the List View web part
Date:May 30th, 2014 Author:Ryan Tags: Filter, SharePoint, SharePoint DesignerCategory: Filter, FilterPoint Web Part, SharePoint Development Comments:8 ;
It’s a common requirement to be able to do wildcard free text searches on SharePoint lists.
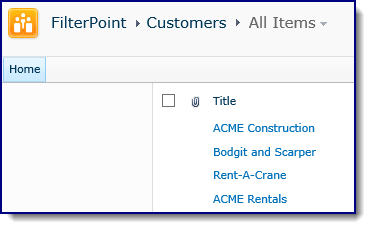
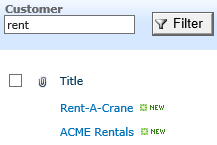
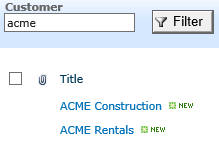
Whilst you can’t do wildcard or complex Boolean search (that’s what the search system is for) you can get close with a contains search. Thus searching for “Acme” will return “ACME Construction” and “Big ACME Rentals” but not “Rent-A-Crane”
It’s not easy though, and does require SharePoint Designer and a Filter Provider such as our FilterPoint product.
Filter Providers and Filter Consumers.
In SharePoint you have
- Filter Providers (like FilterPoint or SharePoint Enterprises own filter web parts)
- Filter Consumers (like the List View web part or other web parts such as our PivotPoint).
The Filter Provider sends the filter you’ve entered (e.g. “Customer” and “Acme”) but it’s entirely up to the Filter Consumer what it does with that filter.
This means that if you want to do things like Date Ranges, wildcard filtering using “Contains” operations you have to set those options on the Filter Consumer.
Our products (PivotPoint, Planner etc) have options to allow you to easily set what to do with the incoming filters, but SharePoints built in List View web part does not.
Using “Contains” filters to do free text search in FilterPoint.
We’re going to use SharePoint Designer to setup Parameters and Filters in the List View Web Part (LVWP) so we can do wildcard type filtering.
(It’s a limitation of SharePoint that you can’t do this without SharePoint Designer – sorry!)
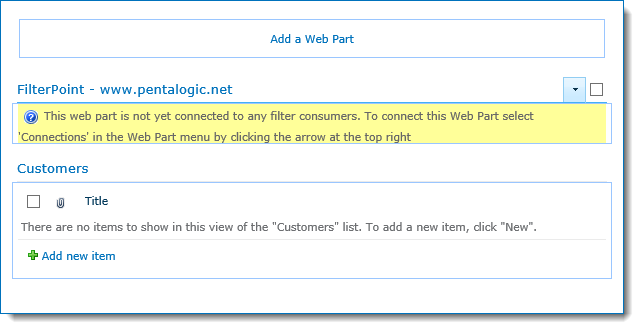
First go to the web part page that has your list (or create a new, empty web part page and add your list to it).
In our example we’ve got a list of Customers with the customer name in the Title field.
- Open this page in SharePoint Designers edit view.
(Depending on what type of page this is will invoice different steps – see these tips for more help on using SharePoint Designer or the online manual for SharePoint Designer)
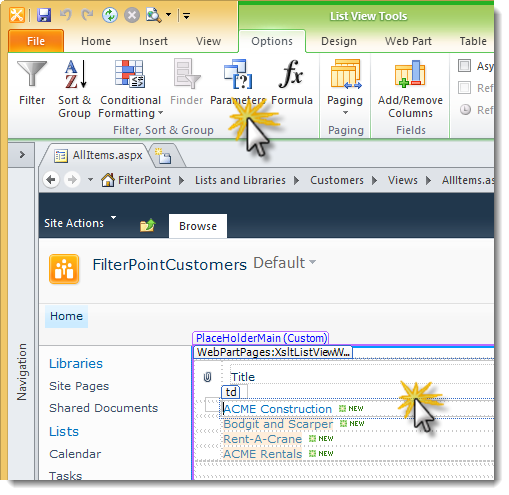
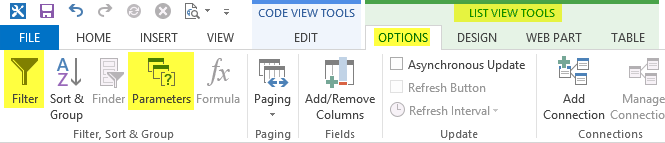
- Once in the edit view, click anywhere List, then click on the Parameters icon on the Ribbon (under Options)
- If you’re using SharePoint Designer 2013 you will have to select the List View web part differently as the design view has been removed – follow the instructions and then continue
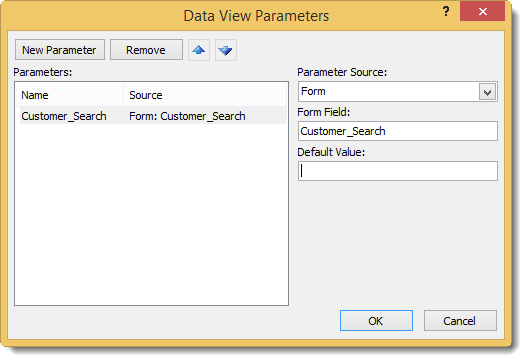
- In the Data View Parameters window :-
- Click New Parameter,
- In the Name box put Customer_Search.
- (You can use whatever name you want here but it needs to be consistent across the next few steps, also note an underscore, no spaces!)
- Change Parameter Source to Form
- Change Form Field to Customer_Search
- Click OK
- Now select Filter from the Ribbon (top left of the edit page view) to open the Filter Criteria window
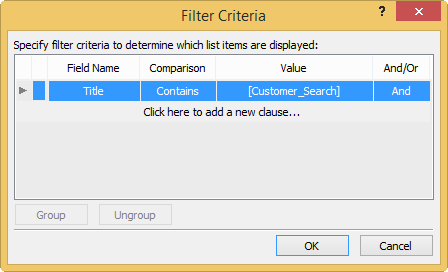
- Choose
- The field name you want to filter on – in our case the customers’ names are in the Title field.
- Set the Comparison operator to Contains (this means that searching for ACME will return “ACME Corporation “or “Big ACME rentals” etc.)
- Set Value to be the parameter we created above – Customer_Search.
- Click OK
We’re done with SharePoint Designer (SPD) now so you can hit save and close SPD.
Open the page you’ve been working with in the browser – notice that the list won’t be displaying any results as we’re not passing in anything to our Contains Parameter.
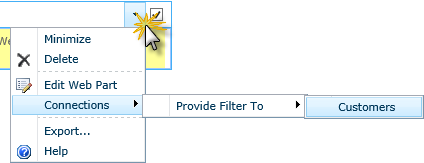
Edit the page and add the Filter Point web part (or another FilterProvider web part of your choosing)
- Select the Web Part menu (button on top right highlighted) and then Connections > Provide Filter To > Customers (or whatever your list is called.
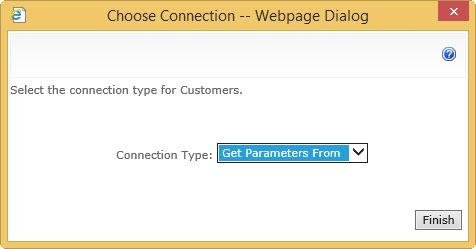
- On the next dialog box select Get Parameters From and then Finish
- Right – we’ve added a Parameter and a Contains Filter to the List view and connected the FitlerPoint web part to the List View, nearly there!
- Next open FilterPoint’s configuration toolpane
- Select New and enter a label such as Customer
- Set the Filter Style to “Free Text”
- Set the Field Name to From the connected web part and choose the parameter that you set above – in our case Customer_Search.
- Click OK and you’re finally done.
(For more info on configuring FilterPoint see the manual)
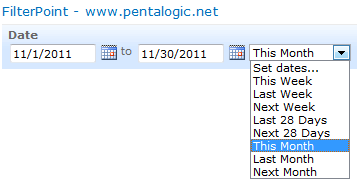
Searching for “acme” or “rent” will now return any customer that has that string in their name :-
 |
 |
A couple of points to note :-
- You can’t do complex searches like “acme AND rent” or “Rent*Crane” – just Contains or Begins With searches.
- If you want to setup additional filters then once you’ve connected the web parts in “Get Parameters” mode (rather than the normal “Get Filter Values” mode) you will have to repeat the above steps to create Parameters and Filters in the List for each filter. It’s a pain but a limitation of SharePoint.
- If you do add additional Parameters and Filters be sure to set the And/Or operator correctly – for most use cases you will want And.
#
SharePoint Designer 2013 – How to modify List View web part filters and parameters
Date:May 30th, 2014 Author:Ryan Tags: Filter, SharePoint, SharePoint 2013, SharePoint DesignerCategory: Filter, FilterPoint Web Part, General, SharePoint Development, SharePoint Ideas Comments:18 ;
SharePoint Designer is especially useful for things like setting up complex filters and parameters for List View web parts like ‘wildcard’ searches and ‘before or after a date’ filters.
In SharePoint Designer 2013 (SPD 2013) the “Design View” was (controversially) removed so now it’s a little harder to use as you have to wade through some X/HTML soup. There is also a bit of a wicked bug that’s going to trip you up as well so in this post I am going to give a few tips on how get to the Parameters and Filters options in the ribbon menu.
Note –this post is NOT a tutorial on how to use SharePoint Designer (its complex and worth a whole book in itself) but just a few tips for those already familiar with using SPD on how to do use the 2013 version. It won’t put back all you’ve lost, just allow you to access the Parameter & Filter options.
Missing Designer View and finding the List View Web Part
When you edit a page the most obvious difference in SPD 2013 is that you don’t get a Design View (the WYSIWYG view that allows you to see how the page will look whilst editing it). Instead you’ve only got the code view and you’re going to have to work through some angle bracket gibberish!
You’re looking for the code that defines the list view – it starts with <WebPartPages:XsltListViewWebPart and ends with </WebPartPages:XsltListViewWebPart> (pink in the pic here).
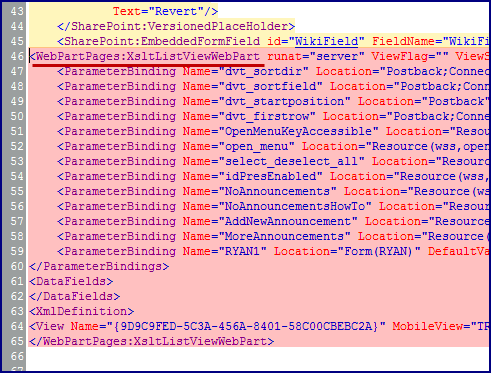
But save your eyes! Just search (CTRL+F) for XsltListViewWebPart! If the cursor is between the two XsltListViewWebPart tags then this is the same as clicking on the List in the old Design / Split view.
(If there are more than one List View on the page you will have to figure out which is which by the position of the web part in the page or look for the URL listed in TitleUrl, DetailLink or Url)
Getting the List View Tools options to show in the Ribbon
After putting the text cursor (or clicking) in the code that makes up the List View web part the ribbon should show the List View Tools option.
Except… there is a wicked bug in SPD 2013 at the time of writing that means the Ribbon doesn’t update to show the Options menu (unless you’ve turned off Server Rendering).
The trick (given to me by MdMazzotti) is to right click on XsltListViewWebPart then select Tag Properties and then click OK without clicking anything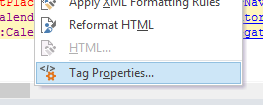 You will now have access to the List View Tools > Options ribbon and the Filter and Parameters button (see picture at the top of this page) You will now have access to the List View Tools > Options ribbon and the Filter and Parameters button (see picture at the top of this page) |
 |
You can view these steps in a video :-
FilterPoint web part is now compatible with SharePoint 2013
Date:January 22nd, 2013 Author:Ryan Tags: SharePoint 2013Category: Filter, FilterPoint Web Part, General Comments:0 ;
Our FilterPoint web part is now compatible with SharePoint 2013 as of version 1.3.2.
You can download and install the latest version here.
If upgrading from SharePoint 2010 to SharePoint 2013 simply perform the upgrade then install the latest version – your old settings and license key will be picked up.

This page will be updated as our other web parts are made SharePoint 2013 compatible
Complete guide to filtering SharePoint lists by the current week.
Date:September 17th, 2012 Author:Ryan Tags: Calculated Columns, Guide, TipCategory: Calculated Columns, Filter, SharePoint Ideas Comments:7 ;
A common requirement in SharePoint is to filter lists so you’re only showing the current week, month, quarter etc. If you only want to see the last X number of days (e.g. last 30 days) then it’s simple enough.
If you want setup a SharePoint view to see the current calendar week then its a little more complex – especially if you define your week differently from the standard Sunday to Saturday or Monday to Sunday.
First you must look at and really understand the method for setting up SharePoint views to filter the current calendar month or week as it’s not really obvious.
Long story short – here are the steps :-
- Use one of the calculated column formula below to find the “Start of week“
- Use a calculated column formula of “End of Week“
= [Start of Week] + 6
- Setup a View Filter showing items when [Today] is in that range.
Start of Week <= [Today] AND End Of Week >= [Today]
Again – see this post for showing the method in step-by-step detail.
If your week goes Sunday to Saturday or Monday to Sunday then use :-
| Start of week | End of week | |
| Sunday to Saturday |
=[Due Date] - WEEKDAY([Due Date]) +1 |
=[Start of Week] + 6 |
| Monday to Sunday |
=[Due Date] – WEEKDAY([mydate],2) + 1 |
=[Start of Week] + 6 |
Obviously you will replace [Due Date] with your own particular date field.(Check out the WEEKDAY function to understand what the 2nd argument does)
The other options are a bit more complex to find the start of the week (again end of week = start + 6)
| Start of week | |
| Tuesday to Monday |
=[Due Date]-WEEKDAY([Due Date])+IF(WEEKDAY([Due Date])<3,-4,3) |
| Wednesday to Tuesday |
=[Due Date]-WEEKDAY([Due Date])+IF(WEEKDAY([Due Date])<4,-3,4) |
| Thursday to Wednesday |
=[Due Date]-WEEKDAY([Due Date])+IF(WEEKDAY([Due Date])<5,-2,5) |
| Friday to Thursday |
=[Due Date]-WEEKDAY([Due Date])+IF(WEEKDAY([Due Date])<6,-1,6) |
| Saturday to Friday |
=[Due Date]-WEEKDAY([Due Date])+IF(WEEKDAY([Due Date])<7,0,7) |
See this picture for some test data, its in a strange order (Thursday to Wednesday if first) but check it out on your desk calendar if you’re not convinced!
Date Range filtering with the new version of FilterPoint, PivotPoint and Planner.
Date:December 13th, 2011 Author:Ryan Tags: Filter, PivotPoint, Planner, SharePointCategory: Filter, FilterPoint Web Part, PivotPoint Web Part, SharePoint Planner, SharePoint webparts Comments:0 ;
FilterPoint has had the ability to send Date Filters but a common request has been Date Ranges – like showing everything this month, last year or between two arbitrary dates.
The good news is that we’ve added this in to FilterPoint as of version 1.2
The bad news is that this will only work with our other SharePoint products – Planner and PivotPoint – it won’t work with SharePoints built in List View web part (LVWP).
That’s disappointing!
Yes it is – it’s just a limitation of SharePoints filtering I am afraid, but all is not lost!
This page shows how you can do things like Month filtering using calculated columns and this blog article shows how you can setup “Current Month/Previous Month” views using nothing more than Calculated Columns and View filters.
Upgrading
As always you can upgrade without losing any settings by downloading and running the latest trial version and selecting “Upgrade” when prompted (don’t forget you need the a recent version of Planner (v2.6.9+) and PivotPoint (2.2.0+) to accept date range filters.
How to Create a SharePoint “Does Not Begin With” Filtered List View
Date:September 9th, 2011 Author:Clare Tags: Calculated Columns, filters, SharePoint, ViewCategory: Calculated Columns, Filter Comments:7 ;
Wonderful though SharePoint is most of the time, occasionally it just lets you down at the most unexpected moment.
So, last week, I wanted to look at a list of all of our sales that were not made to organizations in the USA.
Simple I thought, since all our sale reference numbers start with a 3 letter country code I shall just create a view for all records where Reference Number does not begin with “USA”
So, create a new view, off we go:

Oh dear, we have an option for “begins with” and “contains” but nothing for “does not begin with” or “does not contain”. How disappointing!
So, quick call to Ryan, the king of the calculated column, and we have a handy workaround which seemed worth sharing with you.
Create a calculated column using the following formula which will just display the first 3 letters of the reference code – call it something like “First 3 letters”.
=LEFT([Reference Number],3)

Then create a view with a filter:
WHERE “First 3 Letters” “Is not equal to” “USA”

Easy as that!
You can use this method to create a view for:
- Does not begin with
- Does not end with (using the RIGHT instead of LEFT function)
“Does not contain” is a tad more complicated but can be achieved by using the SEARCH function. So in our example
SEARCH("USA",[Reference #],1)
Will return the first position of USA in an entry in the Reference Number field, or an error if it can’t be found.
So combining this calculated column:
=ISERR(SEARCH("USA",[Reference #],1))
Which gives “Yes” where it returns an error ( “does not contain”) and “No” where “USA” is found, with a filtered view with shows only “Yes” results, will give you records which do not contain USA.
See our Calculated Column Cheat Sheet for these and other useful formulas.
Hope this helps, and if you have any suggestions for other calculated column ninja moves we would love to hear them.
 |
SharePoint FilterPoint New Version Release; now with personal defaults
Date:February 22nd, 2011 Author:Clare Tags: Filter, filterpoint, filters, SharePoint 2010Category: Filter, FilterPoint Web Part, General Comments:0 ;
We’ve just released a new version (v1.1.3) of our FilterPoint web part for SharePoint. We have had plenty of user feedback over the past few weeks and this new version has some added features and functionality that we hope you will all find useful.
As you know, FilterPoint already gives you the ability to set default values globally, to help get users to the most relevant information quickly.
And now new functionality in v1.1.3 will help each user get to their own individual information more quickly too.
There are 2 ways FilterPoint does this. First by re-loading the last used filter values when you revisit a page. And secondly by looking for FilterPoints on different pages that filter on the same fields, and getting them to fetch records with the same values.
So how could this help you?
Well, let’s take the example of 2 national sales account managers. Freda’s biggest client is Big Corp and Sophie’s most important customer is Enormous Inc. They each want to know what is going on with their key accounts on a daily basis.
So Freda and Sophie both look at dashboards that show sales activity, financial account status, cases and help tickets etc. Freda always filters to see the stuff on Big Corp and Sophie always filters to see what’s happening with Enormous Inc.
Because FilterPoint will now save filter values between visits to a page each account manager will see information on her main client account as soon as she opens a page – so long as that was the last thing she looked at when she last visited the page.
Even better, once one FilterPoint is set up to filter for “Client = Big Corp” by Sophie, all other FilterPoints on the site will also look for information on “Client = Big Corp” and display this for Sophie, so long as this field and value exist in the lists and web parts they have been applied to.
These two new features should be a real time saver for many users.
In addition, there are other new features in FilterPoint v1.1.3:
- Allow you to send multiple filter options to list view web parts when using multi-choice fields.
- Allows you to use vertical as well as horizontal orientation and
- Adds better error handling for situations where a List, Field or View that FilterPoint is using is later deleted.
If you’re an existing customer or trial user you can download and upgrade to the latest version.
And if you haven’t yet tried FilterPoint why not download a 30 day free trial now?
FilterPoint Web Part – on sale now!
Date:January 27th, 2011 Author:Clare Tags: Filter, filters, SharePoint, SharePoint 2010, Web PartCategory: Filter, General Comments:0 ;
![]()
After many months of work we are delighted to announce that FilterPoint is now available to purchase.
Filtering is one of the things that any serious SharePoint user is going to need to do at some point. As you put more data into SharePoint lists become longer and you will need a quick and easy way to get to the items you are looking for.
When you create applications and dashboards, bringing together information from different data sources and displaying it in different ways with Web Parts adding filters will make your applications and dashboards dynamic – giving users the information they need, when they need it.
But when you start filtering you are going to quickly come across things that you wish you could do with SharePoint’s built in filters, but frustratingly just can’t.
So in the same way that we built Reminder to improve on the functionality of SharePoint Alerts, and Planner to improve on Gantt charts and calendars, we have built FilterPoint to give a little more power to your SharePoint filtering.
If you are working with SharePoint 2010 Foundation or WSS your filtering options are limited to static filtered views. Filtered views are great for getting at data sets that you want to see regularly – like “this month’s sales” for example. Set the view up once and it’s there whenever you need it.
But what if you have 100 clients and want to be able to look at “this client’s sales” for any of them? Setting up a filtered view for each client, and navigating to it is going to be quite a drag.
With FilterPoint your filter can be set up in seconds, allowing users to flip between the different data sets they need with just a couple of clicks.
With MOSS and 2010 Enterprise you get more filter power. But we still felt there were some things missing. So for example even with MOSS filters you can’t:
- Set up several Filters within one filter web part
- In 2007, send many filters to one filter consumer list or Web Part (e.g. filter on both customer and product).
- Use different styles of filter, like Free Text, drop down lists or Radio Buttons
- Clear filters with a single click.
So even though MOSS offers more filtering options, there are still some significant gaps and we believe that FilterPoint goes a long way towards filling these.
Of course FilterPoint isn’t the only 3rd party filtering web part on the market and you can see how we match up to the competition by taking a look at our comparison chart here.
When we were looking at the competition one thing we noticed was that some of the most useful filter Web Parts – the ones offering the most functionality – were incredibly complex to set up. You would need the patience of a saint and a PhD in SharePoint (if such a thing existed!) So we have worked very hard to keep the setup of FilterPoint quick and simple. Take a look at our short on-line demo here, and let us know whether we have succeeded.
We’ve also tried to keep the prices competitive. Our Single Server License is $595.
And of course, like all of our products FilterPoint comes with a 30 day free trial and a no quibble money back guarantee.

And for existing customers we are offering a 25% discount for purchases made by 31st March 2011. Email [email protected] for your discount code.
So why not give it a try today?
As FilterPoint is our new baby we are very keen to know what you think of it – so please let us have your comments and feedback.

FilterPoint Update
Date:November 30th, 2010 Author:Clare Tags: Beta, Filter, filters, SharePoint, SharePoint 2010, WebPartCategory: Filter, General, SharePoint Development, SharePoint Ideas Comments:0 ;
![]() We have spent a lot of time over the past month working on the beta version of FilterPoint. Our team of professional testers have been working hard to check for compatibility with all versions of SharePoint 2007 and 2010 and a wide range of browsers, as well as looking for bugs and challenging us on some aspects of the usability of the UI.
We have spent a lot of time over the past month working on the beta version of FilterPoint. Our team of professional testers have been working hard to check for compatibility with all versions of SharePoint 2007 and 2010 and a wide range of browsers, as well as looking for bugs and challenging us on some aspects of the usability of the UI.
And we also owe a huge vote of thanks to our beta volunteers who have been testing out the product in the real world. Our volunteers and not only uncovered some bugs, but also come up with suggestions for additional things that we could include in the first release. Some of these we have already added and they include:


