Archive for the ‘SharePoint Ideas’ Category

SharePoint governance #2: The final frontier

Date:November 5th, 2010 Author: Tags:
Category: General, SharePoint Ideas Comments:4 ;

uss_enterpriseI started looking at SharePoint governance a few weeks ago and wow, is there a whole heap of information out there about it! And with the advent of SharePoint 2010, it’s clear that tightening up your policies is vital. The new social media enhancements mean that you’ll have to set some hard and fast rules about how your employees are going to handle this software at work – and make sure they behave themselves while using it!

I mentioned three points to guide your SharePoint governance plan in my last blog – roles, rules and routes – and in this one I’ll explore them further and give you more tips on what to start looking at when forming your plan.

Ultimately, there is no such thing as ‘one size fits all’ when it comes to creating your policy. In fact, you’ll probably find that the Microsoft guides on this are too laborious for you. The only thing you can do to create your own plan is dive in and get super involved with the whole process, from forming a good SharePoint team to gauging user feedback and making revisions to the policy. Brace yourself; we’re going through the final frontier…

(more…)

Editing The SharePoint List Item Menu (Part 2: Using Javascript)

Date:November 4th, 2010 Author: Tags: , ,
Category: SharePoint Development, SharePoint Ideas, SharePoint webparts, Training Comments:6 ;

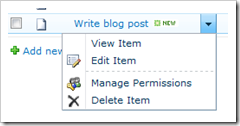
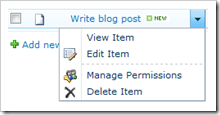
MenuBeforeFollowing on from Part 1 of this series which covered Editing the SharePoint List Item Menu Using Elements, I thought it would valuable to reproduce the same results without using Visual Studio or SharePoint designer (Part 4 will be to do it without a monitor). This method will allow non-developers with view edit access to customise the List Item Menu.

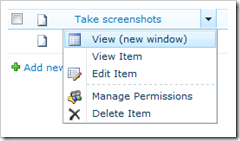
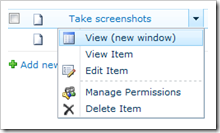
In this example, a ‘View (new window)’ option will once MenuAfteragain be added to each item’s context menu to avoid the modal box, as illustrated to the right. Although as Christophe helpfully pointed out in response to Part 1, the modal boxes can be banished under the list’s Advanced settings. Fortunately there are many other uses for these techniques, as we will see in Part 3.

This example uses a Content Editor web part, which means the Javascript can be added on a view-by-view basis. This allows a more targeted release and can be added by any user with permissions to edit the view. However, it makes widespread distribution more difficult; putting the function in a master page can overcome this but will implement it for every item menu on every list.

(more…)

Editing The SharePoint List Item Menu (Part 1: Using Elements)

Date:November 4th, 2010 Author: Tags: , , , ,
Category: SharePoint Development, SharePoint Ideas, Training Comments:2 ;

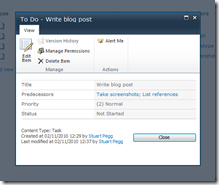
The lovable modal boxWhile copying my rapidly lengthening scribbled to do list into a SharePoint Tasks list, my unconscious habit of middle-clicking items to come back to was being constantly foiled. Instead of opening a new tab the modal box kept popping up in the middle of my screen (new to 2010 I hear).

The drop-down menu options did exactly the same, leaving no alternative but to right-click the item, copy the link, manually open a new tab, paste it in, and switch back; much too much like hard work. So I decided to add an option to open the item in a new window… in retrospect probably harder work than just putting up with it.

The default item menu
The modified item menu

As a result, this is a brief run-through of how to add options to the context menu of list items in SharePoint, using a CustomAction in Visual Studio. For using JavaScript to the same ends, see Part 2: Using JavaScript (coming soon).

(more…)

Sharepoint Governance #1 – aim for the sky

Date:October 18th, 2010 Author: Tags: ,
Category: General, SharePoint Ideas Comments:2 ;

So you’ve got your hands on SharePoint and you’re excited. Some might say we’re biased over here at the Pentalogic blog, but we definitely wouldn’t blame you for itching to deploy this user friendly and incredibly powerful server side software across your whole organization super quickly.

But wait a moment! Have you set out who will be in charge of migrating your shared drives to SharePoint, authorising new sites to be created and setting out an information lifecycle to manage your data? What about indexing information so it can be easily searched should you need an answer to be at your fingertips? If any or all of this sounds like a minefield to you, let me assure you that you’re definitely not alone.

Regulating SharePoint affects many users and most of us will look for guidance about managing our use of it at some point. With this in mind, we’ve put together a quick guide to explain why it’s vital to set out protocol for using SharePoint in your organisation sooner rather than later and have added some useful resources for you at the end.

(more…)

SharePoint 2010 – the Wikis are Everywhere!

Date:September 29th, 2010 Author: Tags:
Category: General, SharePoint Ideas Comments:3 ;

Sometimes opening up SharePoint 2010 makes me come over all Star Trek: I feel like I’m on a mission, to explore strange new worlds: to seek out new life  . . . . . OK someone slap me now!

But seriously, there are some funky new features in 2010 and wikis seem to have come on quite a long way. Last week we looked at working with Sharepoint wikis and explored the functionality that is common to 2007 and 2010.

This week we are going to look at the new 2010 features – most of which look great with a couple of exceptions which are frankly a little confusing.

So – set Phasers to stun – lets boldly go!

(more…)

Working With SharePoint Wikis

Date:September 23rd, 2010 Author: Tags: ,
Category: General, SharePoint Ideas Comments:1 ;

SharePoint wikis get quite a bit of flack from Wiki enthusiasts – who think they are way too basic and rather a lame example of a wiki.  We disagree:  we quite like SharePoint wiki’s – yes they are very simple and easy to use, but isn’t this kind of the point?  That they should allow you to add and share content quickly and easily?

So we have 2 articles for you here.  This first one is Wiki basics – why and how you would use a SharePoint wiki – and these apply to both SharePoint 2007 and 2010.

And the second installment will take a spin through the new wiki features which are available in SharePoint 2010 – and some of these should be exciting enough to shut up even the most hard core sceptic.

So first up SharePoint Wiki basics.

Why use a Wiki?

Basically a wiki is a bit like a big, on-line, shareable notepad or whiteboard. So if you want your very busy and important subject matter experts to share their pearls of wisdom with the rest of the organization a wiki is probably a great way for them to do that – because its quick and its easy and they can get their point across without having faff around with formatting or worry about where there are going to save the thing. . It’s also really easy for the original author, or others to add, amend and cross reference.  So wikis are also great as team project workspaces, for sharing ideas, gathering information and discussing issues.

You wouldn’t want to use a wiki for structured data (Tasks/Issues/Invoices etc) that would be better in a List and likewise the very unstructured and easy to edit nature of a wiki means that they are probably not the best place for dealing with content that needs a lot of authentication or protection – so for example you might not want your company pay scales, or disciplinary procedures stored in a wiki – as these are things that you want to put a bit of structure around, and that you don’t want every Tina, Deidre and Harriet editing.

Set up your SharePoint Wiki

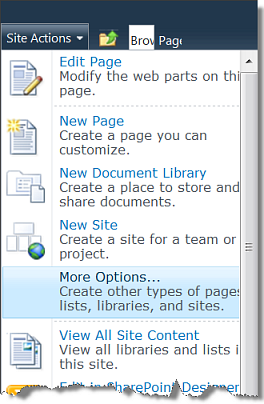
This is a 30 second job. From the top left of your screen choose Site Actions and then More Options:

From the next screen scroll right the way down to the bottom and choose Wiki Page Library, give it a name, and press the Create button – Job done – you have a Wiki.
Create SharePoint wiki

You can see straight away that the wiki is a friendly and intuitive place to be.  First and best you have the nice big easy to read navigation bread crumbs at the top of the page. Then in the body of the page an introduction to wikis and a link to instructions on how to use them. Finally, a link to your wiki will have appeared on your quick launch menu.
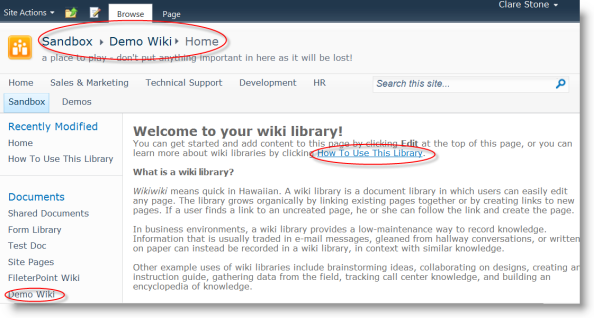
SharePoint wiki home page


So, lets add some Content.

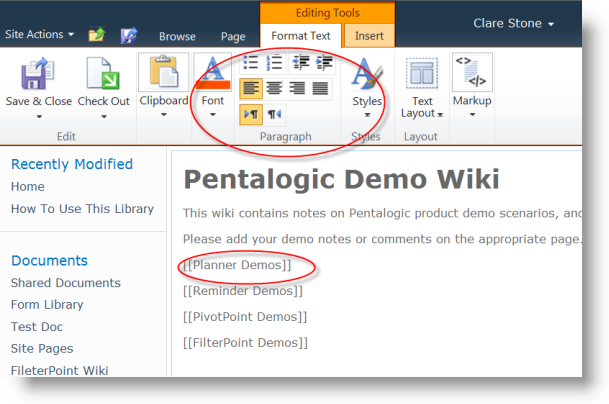
Edit SharePoint Wiki

So as you can see the Wiki page comes with a very Word-like rich text editor, and you can treat adding text to a Wiki page in pretty much the same way as you would add text to a Word document. Just click the Edit link to start and the Save and Close icon when you are finished.

But what are all those square brackets about?

Well, square brackets are how we add a link to a page in a SharePoint wiki library.

Add New Pages

In wikis you are encouraged not to create orphans (pages that are all alone in the world with no links to any other pages) so best practice is first to create a page, then put some content in it.  You created the first page of your wiki library automatically when you created the library.

To create other pages, simply type the name of the page [[surrounded by double square brackets]]

Click “Save and Close” and your pages are created.

Once you’re out of Edit mode – after clicking “Save and Close” you will see that your square brackets have vanished, and you are left with links.  The headings with dotted underlining are for pages with no content yet.  The normal looking links are pages which have content.  So in this example our Planner Demos page has content, but the others have yet to be created.
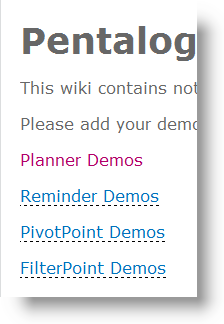
Sharepoint wiki with links

Just click on one of the dotted links to go to a new page a create content.

This system of page creation is also a great method of getting people started, and keeping them on track with minimal effort.  We all know how getting started is the biggest challenge in any writing project – and keeping on trakc the next.  So say you wanted your subject matter experts to create a wiki on environmental awareness at work you might create pages titled something like:  “recycling”, “power saving”, “car sharing” which might help to steer your environmental experts in the right direction, and stop them wastings hours on things you didn’t want like “windfarms”, “biofuel” and “international environmental policy”.

Add other Links

Using our square brackets we can add different links.

Linking to an existing page is just the same as creating a new page – just enter the page name, surrounded by square brackets:

[[existing page name]]

no need to fiddle around with addresses and / forward slashes.  Wiki pages are not arranged in a “tree” like traditional website pages – it’s all much more laid back and informal (they come from Hawaii remember?).  So just type the name of any page within your wiki and the wiki will find it for you and create the link.  The wiki won’t allow you to create duplicate pages with the same name, try and do that and it will simply link you back to your existing page.

and to link to an external webpage:

[[http://www.yourpage.com]]

To display a link where the link text is different to the destination page name use the pipe character | . So if we wanted to link to the Planner Demos page, but wanted our link to be called “latest demo”:

[[Planner Demos|latest demo]]

Check Revisions and Revert to Previous Version

Need to see who added that really dumb comment? No problem:
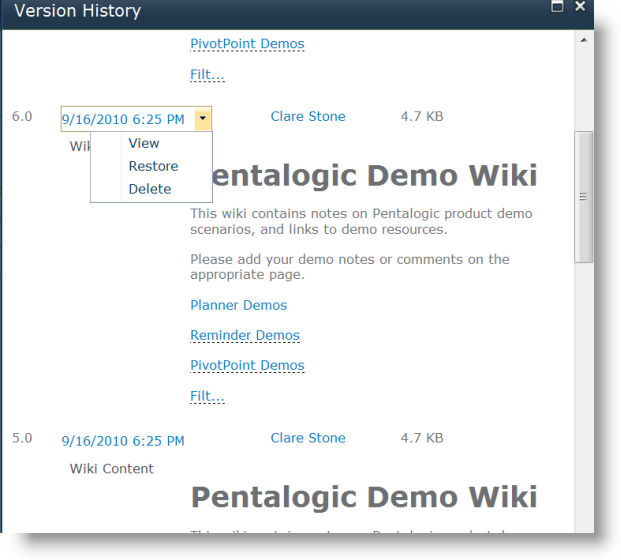
SharePoint Wiki Revision HistoryOh . . . looks like that was me!

To get to the revision history choose Page/View All Pages, then click on the arrow next to the page you want to see and choose Version History.  You can see exactly how and when the wiki page changed and who has made the changes.  You can then choose to delete a version, or revert back to an previous version if you wish.

So that’s the basics of working with wikis.

Do you have any other tips and tricks to share?

Next time:  What’s new in SharePoint 2010 wikis.

SharePoint Staff Vacation Planner – DIY Guide part 5 – the system in action and Out of the box options.

Date:August 9th, 2010 Author: Tags: , ,
Category: PivotPoint Web Part, SharePoint Ideas, SharePoint Planner, SharePoint Reminder, SharePoint webparts Comments:0 ;

This is Part 5 of the SharePoint Staff Vacation Planner – DIY Guide

See the System In Action

So, now let’s reap the rewards for all of our hard work and see the system in action.

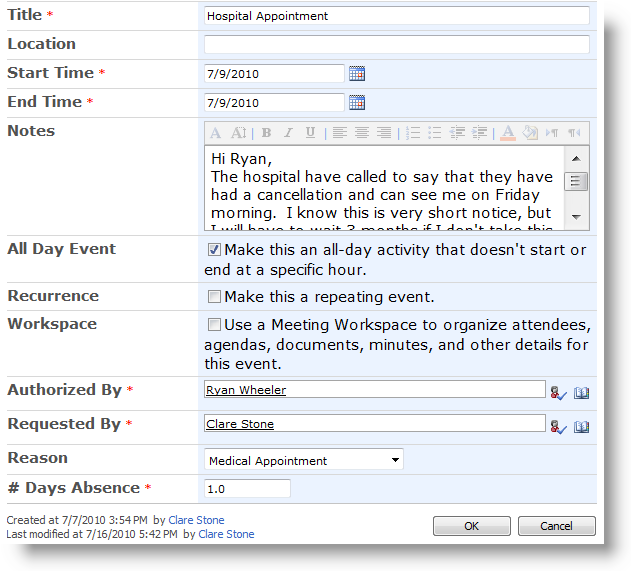
I need to book a day off for a hospital appointment on Friday 9th of July.  I can see all the absence bookings for my department and the number of days I have had off this year on the absence dashboards above. I’ve only had 1 day off for Medical Appointments so far this year and I am allowed 3 so that’s fine – but 3 people are off on that day already, it’s going to be tough, but I really need to go to that appointment.

So, as you can see, I can add a new item to the planner straight from the link in the webpart, I don’t need to go to the list.

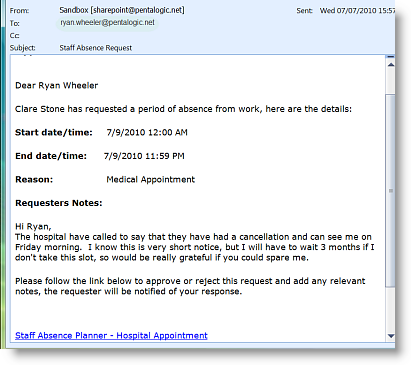
Ryan receives the absence request email and from looking at his dashboards he can see that although I am well within my Medical Appointments entitlement approving this absence is going to leave him really short staffed on Friday – but he can’t face the thought of listening to me moaning about my in-growing toenail for another 3 months, so he approves the request.

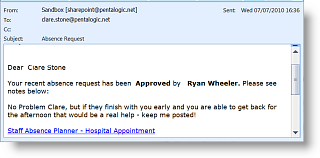
Once the request is approved I get an email notifying me, and the status of the absence changes from “pending” to “approved” on the absence planner.

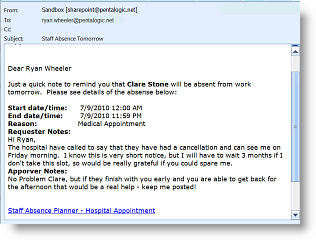
And for the final step in the process, is the email to Ryan on Thursday, to remind him that I am off the next day, giving him chance to make sure all my work is covered.

So now we should have no excuse for messing up staff absence planning ever again!

So Can’t I do this with SharePoint out of the Box?

Well some of it. Clearly, your basic list and filtered views are all set up in SharePoint out of the box.

When it comes to your dashboard views there are some limitations.

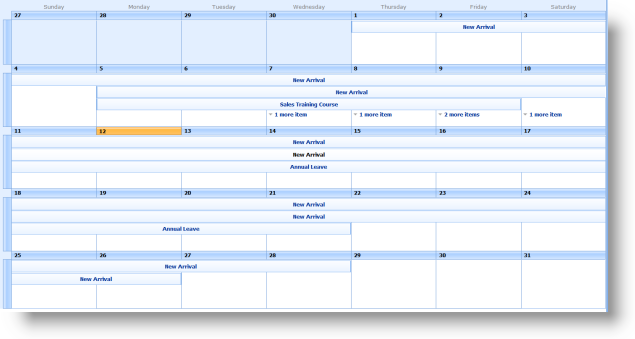
This is how your Vacation Planner Wall Chart looks out of the box:

or as a Gantt view:

We have lost all of our color coding, it’s not possible to show the name of the person who is absent, unless you make this the title of the event, and we have no way of distinguishing between approved and pending items.

For the “Absences to Date” and “My Absences” dashboards we can achieve something similar, if a bit clunky, out of the box.  From the settings tab in your Staff Absence Planner list, choose edit current view.

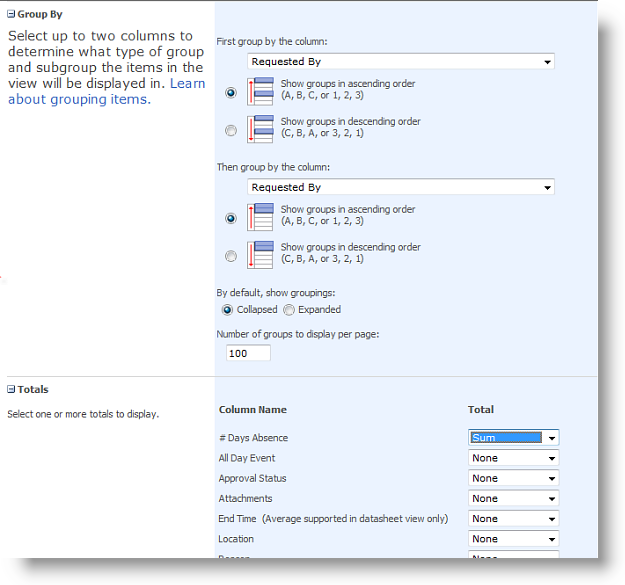
Head down to Group By and choose Requested By and Reason.  Then expand the Totals section and choose # Days Absence and sum.


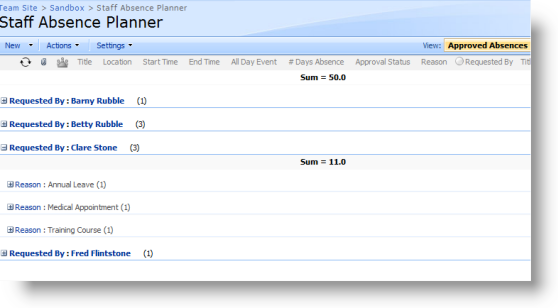
This will give you a view like this:

The information is all there, but I have to work to get at it.  For example Ryan can see that I have had 11 days off this year, covering 3 separate occasions, but he is going to have to drill into each individual event and get his calculator out to figure out how many of my days off have been annual leave, training or Medical.

Then on to the workflow emails. It is possible to generate email alerts for the absence request and the request approval, but the solution isn’t perfect.  For absence requests an administrator can set the list up to email all line managers within your company or department, every time a new request is added to the list.  This means that managers will get absence requests from their own staff, but also from all other staff as well.  The only way to avoid this would be to set up a separate absence request list for each line manager.

For the request approved/rejected email the requester will need to set up an alert on each request as they create it, asking to be alerted any time anything changes on that list item.

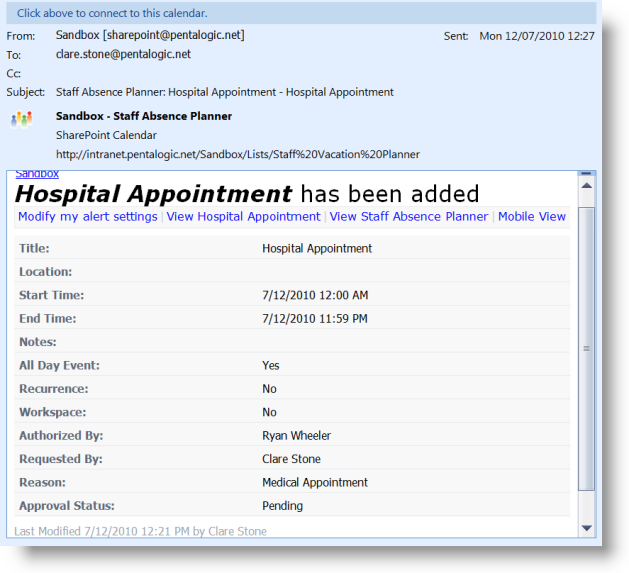
When the alert emails arrive, this is how they look:

There is no way to edit the email, and give the recipient clues on what they are supposed to do with it.

The final “John Smith is off work tomorrow” email, cannot be generated in SharePoint out of the box, as it doesn’t do date based alerts.

You could do this with Workflow and Event Receivers, but that means having some technical knowledge and breaking out SharePoint Designer and/or Visual Studio.

So – can you build a staff absence planning system with SharePoint out of the box?  I guess the answer is “kind of”. It is possible to build a basic system but it’s going to lack some useful functionality and may now be enormously user friendly.

We hope you’ve found this useful.

If you would like to try the Vacation planning system you can download a 30 day free trial version here.

And as always, if you have any questions or comments, we would love to hear them.

SharePoint Staff Vacation Planner part 4 – create an absence approval workflow

Date:August 5th, 2010 Author: Tags: , ,
Category: General, SharePoint Ideas, SharePoint Reminder Comments:0 ;

This is Part 4 of the SharePoint Staff Vacation Planner – DIY Guide

In parts 1 through 3 of this series we have laid the foundations for our tailor made Staff Vacation and absence planning system.  We have set up the basic SharePoint list, defined a number of list views, and set up dashboards using SharePoint Planner and PivotPoint webparts.

Now we are going to add the “moving parts” to the system and set up a simple approval email workflow using SharePoint Reminder webpart.

We are going to have 3 steps in our system :-

  • One email to a staff member’s line manager when a new request for absence has been submitted.
  • One email to the staff member and let them know whether their request has been approved or rejected.
  • One email to the line manager the day before a staff member is due to be absent from work as a reminder.

(more…)

SharePoint Staff Vacation Planner – DIY Guide part 3 – set up an Absences to Date Dashboard

Date:August 4th, 2010 Author: Tags: , , ,
Category: General, PivotPoint Web Part, SharePoint Ideas Comments:0 ;

This is Part 3 of the SharePoint Staff Vacation Planner – DIY Guide

So having set up our basic SharePoint list with filtered views, and our “Wall Chart” dashboard, using SharePoint Planner webpart, we are now ready to get up our “Staff Absences to date” and “My Absences” dashboards.  This is the bit that allows managers to monitor the amount of absence each of their team members has had:

Or for individual staff members to monitor their own absences:

(more…)

SharePoint Staff Vacation Planner – DIY Guide part 2 – set up a “Wall Chart” Dashboard

Date:August 3rd, 2010 Author: Tags: , ,
Category: General, SharePoint Ideas, SharePoint Planner Comments:1 ;

This is Part 2 of the SharePoint Staff Vacation Planner – DIY Guide

So having set up our Vacation and Absence list yesterday, we can now apply Planner webpart, to create a vacation and absence dashboard like this:

So staff and managers can easily see who is off when, and when it will be possible to request leave.

(more…)