Archive for the ‘SharePoint Development’ Category

Finding where Highlighter is used in a SharePoint site

Date:June 20th, 2019 Author: Tags: ,
Category: Highlighter, SharePoint Development, SharePoint HTML Calculated Column Comments:0 ;

Highlighter allows you to easily apply conditional formatting to your SharePoint lists.

A customer recently asked us how to find out where it had been used (which sites, lists and columns).

We wrote this Powershell script to do just that – but it can be adapted to find any custom field type (or even built in fields with certain attributes like name & type).

Note – it’s commonly suggested on the ‘internets to use the SPField.ListFieldUsedIn method but that will only find where a Site Column has been added to a List, not where a custom field has been directly put into a List column. (see an explanation of the difference between Site Columns and List Columns)

You can download the script here – unzip and open in a text editor for instructions.

Run it from the SharePoint Administration Shell with the URL of your site – e.g.

.\FindWhereHighligherUsed.ps1 https://yoursiteurl/

And it will search all sub-sites and lists and return any fields that use Highlighter :-


SharePoint – wildcard / free text searching the List View web part

Date:May 30th, 2014 Author: Tags: , ,
Category: Filter, FilterPoint Web Part, SharePoint Development Comments:8 ;

It’s a common requirement to be able to do wildcard free text searches on SharePoint lists.

Whilst you can’t do wildcard or complex Boolean search (that’s what the search system is for) you can get close with a contains search. Thus searching for “Acme” will return “ACME Construction” and “Big ACME Rentals” but not “Rent-A-Crane”

It’s not easy though, and does require SharePoint Designer and a Filter Provider such as our FilterPoint product.

Filter Providers and Filter Consumers.

In SharePoint you have

  • Filter Providers (like FilterPoint or SharePoint Enterprises own filter web parts)
  • Filter Consumers (like the List View web part or other web parts such as our PivotPoint).

The Filter Provider sends the filter you’ve entered (e.g. “Customer” and “Acme”) but it’s entirely up to the Filter Consumer what it does with that filter.

This means that if you want to do things like Date Ranges, wildcard filtering using “Contains” operations you have to set those options on the Filter Consumer.

Our products (PivotPoint, Planner etc) have options to allow you to easily set what to do with the incoming filters, but SharePoints built in List View web part does not.

Using “Contains” filters to do free text search in FilterPoint.

We’re going to use SharePoint Designer to setup Parameters and Filters in the List View Web Part (LVWP) so we can do wildcard type filtering.

(It’s a limitation of SharePoint that you can’t do this without SharePoint Designer – sorry!)

First go to the web part page that has your list (or create a new, empty web part page and add your list to it).

In our example we’ve got a list of Customers with the customer name in the Title field.

Customers List

  • Open this page in SharePoint Designers edit view.

(Depending on what type of page this is will invoice different steps – see these tips for more help on using SharePoint Designer or the online manual for SharePoint Designer)

SharePoint Designer List Parameters

  • In the Data View Parameters window :-
    • Click New Parameter,
    • In the Name box put Customer_Search.
    • (You can use whatever name you want here but it needs to be consistent across the next few steps, also note an underscore, no spaces!)
    • Change Parameter Source to Form
    • Change Form Field to Customer_Search
    • Click OK

SharePoint Desinger - add parameter

  • Now select Filter from the Ribbon (top left of the edit page view) to open the Filter Criteria window

SharePoint Designer - filter criteria

  • Choose
    • The field name you want to filter on – in our case the customers’ names are in the Title field.
    • Set the Comparison operator to Contains (this means that searching for ACME will return “ACME Corporation “or “Big ACME rentals” etc.)
    • Set Value to be the parameter we created above – Customer_Search.
    • Click OK

We’re done with SharePoint Designer (SPD) now so you can hit save and close SPD.

Open the page you’ve been working with in the browser – notice that the list won’t be displaying any results as we’re not passing in anything to our Contains Parameter.

Edit the page and add the Filter Point web part (or another FilterProvider web part of your choosing)

FilterPoint web part added

  • Select the Web Part menu (button on top right highlighted) and then Connections > Provide Filter To > Customers (or whatever your list is called.

Connect FilterPoint to customers list

  • On the next dialog box select Get Parameters From and then Finish

Web Part Connection get parameters from

  • Right – we’ve added a Parameter and a Contains Filter to the List view and connected the FitlerPoint web part to the List View, nearly there!
  • Next open FilterPoint’s configuration toolpane

FilterPoint - edit web part

    • Select New and enter a label such as Customer
    • Set the Filter Style to “Free Text”
    • Set the Field Name to From the connected web part and choose the parameter that you set above – in our case Customer_Search.
  • Click OK and you’re finally done.

(For more info on configuring FilterPoint see the manual)

Searching for “acme” or “rent” will now return any customer that has that string in their name :-

search rent search acme

A couple of points to note :-

  • You can’t do complex searches like “acme AND rent” or “Rent*Crane” – just Contains or Begins With searches.
  • If you want to setup additional filters then once you’ve connected the web parts in “Get Parameters” mode (rather than the normal “Get Filter Values” mode) you will have to repeat the above steps to create Parameters and Filters in the List for each filter. It’s a pain but a limitation of SharePoint.
  • If you do add additional Parameters and Filters be sure to set the And/Or operator correctly – for most use cases you will want And.

#

SharePoint Designer 2013 – How to modify List View web part filters and parameters

Date:May 30th, 2014 Author: Tags: , , ,
Category: Filter, FilterPoint Web Part, General, SharePoint Development, SharePoint Ideas Comments:18 ;

SharePoint Designer is especially useful for things like setting up complex filters and parameters for List View web parts like ‘wildcard’ searches and ‘before or after a date’ filters.

In SharePoint Designer 2013 (SPD 2013) the “Design View” was (controversially) removed so now it’s a little harder to use as you have to wade through some X/HTML soup. There is also a bit of a wicked bug that’s going to trip you up as well so in this post I am going to give a few tips on how get to the Parameters and Filters options in the ribbon menu.

SharePoint Desinger 2013 - Filter and Parameters

Note –this post is NOT a tutorial on how to use SharePoint Designer (its complex and worth a whole book in itself) but just a few tips for those already familiar with using SPD on how to do use the 2013 version. It won’t put back all you’ve lost, just allow you to access the Parameter & Filter options.

Missing Designer View and finding the List View Web Part

When you edit a page the most obvious difference in SPD 2013 is that you don’t get a Design View (the WYSIWYG view that allows you to see how the page will look whilst editing it). Instead you’ve only got the code view and you’re going to have to work through some angle bracket gibberish!

You’re looking for the code that defines the list view – it starts with <WebPartPages:XsltListViewWebPart and ends with </WebPartPages:XsltListViewWebPart> (pink in the pic here).

SharePoint Designer 2013 - how to find List View Web Part LVWP in code view

But save your eyes! Just search (CTRL+F) for XsltListViewWebPart! If the cursor is between the two XsltListViewWebPart tags then this is the same as clicking on the List in the old Design / Split view.

(If there are more than one List View on the page you will have to figure out which is which by the position of the web part in the page or look for the URL listed in TitleUrl, DetailLink or Url)

Getting the List View Tools options to show in the Ribbon

After putting the text cursor (or clicking) in the code that makes up the List View web part the ribbon should show the List View Tools option.

Except… there is a wicked bug in SPD 2013 at the time of writing that means the Ribbon doesn’t update to show the Options menu (unless you’ve turned off Server Rendering).

The trick (given to me by MdMazzotti) is to right click on XsltListViewWebPart then select Tag Properties and then click OK without clicking anythingSPD - Tag PropertiesYou will now have access to the List View Tools > Options ribbon and the Filter and Parameters button (see picture at the top of this page) SPD - Web Part Properties

You can view these steps in a video :-

Unable to display content. Adobe Flash is required.

Is Conditional Formatting in SharePoint 2013 dead?

Date:January 25th, 2013 Author: Tags: , ,
Category: Highlighter, SharePoint Development Comments:1 ;

With the release of the controversial new SharePoint Designer 2013, has the ever-popular Conditional Formatting option died a death?

Why is SharePoint Designer 2013 controversial?

The bee in everyone’s bonnet is SPD 2013’s lack of a Design View; one of the staple tools of every Designer user. The place to get up to speed on this topic is Marc Anderson’s article: SharePoint Designer 2013’s Missing Design View

How does this effect the Conditional Formatting option?

I asked the same question myself, so I installed SPD 2013 and gave it a try. After clicking, selecting, choosing, and swearing at pretty much every component I came to the conclusion that I was clearly missing something.

I posted on SPSE expecting a quick helpful pointer. Instead I was met by a resounding silence. After a suitable pause, I reposted onto MSDN, only to find that Conditional Formatting on list view web parts doesn’t seem to be supported anymore! Please feel free mock me mercilessly if this isn’t the case.

Of course it’s still possible to use it for other purposes, but formatting list views is the major purposes of that feature; it seems kind of pointless without it.

Is SharePoint Designer 2013 dead too?

It may still be early days, but when initially searching around for an answer, I was struck by how hard it was to find any blog posts about SPD 2013 (other than complaints about the Design View). For comparison, with the release of SPD 2010, the community was positively frothing over with articles and praise.

The same was true when posting on the forums: I leapt into the middle of the mainstream SharePoint 2013 river, expecting to be swept away by all the keen Designer users already trying out all the features. Instead I found myself sat in a rather shallow puddle.

So how can we apply Conditional Formatting in 2013?

Instead of wildly speculating on the popularity of SharePoint 2013’s tools, here are a couple of methods for working around the problem:

XSLT: It’s possible to create your own XSLT template by customising the default main.xsl, and then assigning it to the LVWP. I’ve searched high and low for a guide on how to apply conditional formatting using this method, with no success. Please let me know if you’ve seen such a thing.

Buying a solution: Inevitably the vulturous SharePoint software vendors have swept down on SPD 2013’s dying form, hoping to profit from its misfortune…

Oh! On an unrelated note; did I mention a new 2013-compatible version of SharePoint Highlighter has just been released? 😉

SharePoint Sandbox Solutions: The Good, The Bad, and The Ugly

Date:July 11th, 2012 Author: Tags: , , , ,
Category: General, SharePoint Development, SharePoint webparts, Training Comments:3 ;

Sandbox solutions are often seen as the cure-all for the worries of installing in-house or third party software on your SharePoint farm; but all is not as it seems.

This article aims to dispel some of the illusions around the safety of Sandbox Solutions, and cut through some of the fluff about what the sandbox should actually be used for and why.

  • The Good: What sandbox solutions do well
  • The Bad: What sandbox solutions don’t protect you from
  • The Ugly: The compromises you have to make to use them

What is a Sandbox Solution?

A Sandbox Solution is just like a normal Farm solution, except that it is deployed to a specific Site Collection (rather than the whole Farm), and has a limited set of tools it can use.

A full listing of what you can and can’t do in the sandbox can be found here:

Sandbox Solution Considerations (section “Capabilities and Elements in Sandboxed Solutions”)
Restrictions on Sandboxed Solutions in SharePoint 2010

It’s just like having a toddler in a sandbox in your garden (or yard): They can build sandcastles and dig holes using the tools you give them, but they can’t play with the chainsaw or ride-on mower you’ve left lying around (or dig enormous holes in your flower beds).

The Good

Sandbox Solutions are prevented from doing many things that could cause security or performance issues on your SharePoint server. Notable restrictions include:

  • No access to the network(s) your server is connected to
  • No access to the server’s registry
  • No access to the server’s filesystem
  • No access to e-mail via SMTP
  • Permissions cannot be elevated

There are also some additional features to help keep solutions in line:

  • Solutions can be installed at the Site Collection level by Site Collection administrators.
  • Resource Usage Limits are applied to solutions and can be monitored and limited by the administrator, preventing faulty or processor-hungry code from overwhelming the server.
  • Solutions can be automatically validated, and known troublemakers can be banned from the entire farm.

Notably, the main benefit to the Site Collection administrator is the ability to deploy their own solutions, but the majority of the other benefits are to the Farm administrator (and/or hosting company); although everyone benefits from the improved system stability these features help to ensure.

The Bad

There are a great many features to help with system stability and the prevention of security breaches; but there are limits to what the solutions are prevented from doing.

You should certainly never deploy untested third-party solutions to the sandbox “without fear of bringing down the entire farm”.

The best example of a danger to stability from within the sandbox is the lack of control over the Client Object Model, mentioned here: Sandboxed Solutions in SharePoint 2010

Pages, Web Parts, and controls that are deployed in sandboxed solutions can include code that runs against one of the SharePoint Foundation client-side object models … Code that runs on the client computer is not subject to any of the code execution or resource usage restrictions.

For example, a solution could contain malicious or badly written code executed via COM that requested all the items in a list an infinite number of times. If embedded into a web part, this would effectively turn the computer of every user that viewed it into a node of a DDoS attack on the server farm.

Rather less dramatically, it’s worth noting that there are no specific restrictions on actively malicious code within a Site Collection. It’s perfectly possible to:

  • Delete sites and sub-sites
  • Add COM calls to export data to an external site (much like Wictor’s data import)
  • Copy data added/edited in lists with item-levels permissions to unrestricted lists

The Ugly

Although sandboxing adds restrictions at every level of SharePoint, the feature wasn’t in the original platform design (in SharePoint 2007). In order to squeeze this feature in, some sacrifices had to be made.

Since there’s no access to the filesystem, the following aren’t possible:

  • Application Pages
  • Visual Web Parts (since they deploy a Control Template)

There are a some compromises due to Split Page Rendering; where sandboxed web parts are rendered separately from the rest of the page in a controlled thread:

  • No Script Manager to output/organise JavaScript
  • No web part connections
  • No access to the page Cache

Similar to the above: Because sandbox solution code needs to run in a controlled thread, the following functionality (that uses separate threads) had to be removed:

  • Workflows containing code
  • Timer jobs

Although most of these compromises are understandable, there are some features that are missing for no apparent reason:

  • You cannot use any of SharePoint’s own web controls (e.g. Date picker, User selection)
  • You cannot hide Custom Actions, or add Custom Action Groups

Conclusion

Sandboxing makes it less likely that you’ll accidentally destabilize a SharePoint farm with broken code, and make it easier to find and deal with trouble making solutions.

It’s also more difficult for malicious code to gain access to anything outside the Site Collection it’s deployed to, and slightly more difficult to destabilize the farm.

However, it doesn’t guarantee safety from either bad or malicious code and there are a large number of compromises to consider. Working around sandbox limitations will add overheads to most development projects, and many solutions will simply not fit into the sandbox model.

For example: FilterPoint and Highlighter are two of our own products that can never be made sandboxable, as they’re based on features that are simply not available in the sandbox.

Edit: Since the publishing of this post, we’ve discovered that sandbox solutions are now deprecated in SharePoint 15; as mentioned in the article SharePoint 2013 preview – Apps or Crapps?.

10 things developers should know about SharePoint

Date:May 4th, 2012 Author: Tags: , , , ,
Category: Community, General, SharePoint Development, Training Comments:1 ;

Many developers walk into the world of SharePoint unaware of the strange and interesting journey of discovery they’re about to begin.

It’s often difficult to know where to being, so here’s the top 10 most useful things I’ve learned since I joined Pentalogic back in 2010.

Pitfalls

1. Know your Editions
2. Don’t even look at the database
3. Get to know the front-end
4. Dispose of your disposables

Building your Knowledge

5. Learn the language
6. Get a good book
7. Love the MSDN documentation
8. Find a SharePoint community that suits you

General advice

9. Learn to live with CAML
10. Remember that SharePoint is enormous
Conclusion

1. Know your Editions

SharePoint comes in many flavours, each of which has it’s own features and shortcomings. Here’s a quick run down of the notable versions:

Release Cheap Expensive MS Hosted
2007 WSS3 MOSS BPOS
2010 Foundation Standard/Enterprise SharePoint Online
/ Office 365

It’s useful to get to know these for when you’re searching for solutions, as you’ll sometimes come across those that are edition specific (e.g. the Standard Edition’s ContentIterator class for querying large lists).

There are few things more frustrating than finding the perfect solution, and then discovering you have the wrong Edition.

2. Don’t even look at the database

To those new to SharePoint this is entirely baffling: Why wouldn’t you want to get data from the database? There are two good reasons for this:

a) Microsoft is very touchy about their database. They will not support any installation with software on it that modifies the SharePoint database.

b) The structure will give you nightmares. At some point in almost every database developer’s career they say: “Why don’t we abstract the table structure, and just have one massive generic table of text data?”

They’re then hit in the head by whatever small throwable object happened to be nearby, and their colleagues point out that although it would be very flexible, it would also be fantastically slow and unwieldy.

Unfortunately either the SharePoint team operated a clean desk policy, or they put an extraordinary value on flexibility, and the result is lurking in the darkness of the SharePoint database.

3. Get to know the front-end

It’s very tempting to dive straight into the code side of things, but when you’re trying to orientate yourself in the API it helps to have a good understanding of what you’re looking at from the front-end.

It’ll also give you a good feel for the site’s design, and hence what sort of layout the users will expect to see.

Many of the actions you perform in code will correlate to actions in the front-end, as well as the structure.

For example, to find a particular list’s view in the front-end, you would:

  • Open the site using the URL
  • Open the sub site
  • Select the list
  • Select the view

The code version of which is very similar in structure and information needed:

    using (SPSite site = new SPSite(http://site))
     {
         using (SPWeb web = site.OpenWeb("subsite"))
         {
             SPList list = web.Lists["List name"];
             SPView view = list.Views["View name"];
         }
     }

4. Dispose of your disposables

Some SharePoint objects (in particular SPWeb and SPSite) won’t automatically dispose of themselves when they’re no longer used. If you’re unaware of this, then you may easily run into post-deployment problems caused by the ensuing memory leaks.

The code in the previous section shows one method of dealing with this problem, and here is Microsoft’s advice on the subject: Disposing Objects

Interestingly, you shouldn’t always dispose of these objects; for example you shouldn’t dispose of  SPContext.Current.Web. As a general rule of thumb:

If you made it, dispose of it. If you were given it, leave it.

5. Learn the language

There is a huge amount of SharePoint-specific terminology, and some of it can be inconsistent and often misleading. For example, a Site Collection is an SPSite object, but a Site is an SPWeb object.

Another example that caught me off guard at first was that there’s a difference between the Object Model (the server-side SharePoint API) and the Client Object Model (client-side API). Whereas I was under the impression that one was an abbreviated form of the other.

Microsoft has published an enormous glossary, which seems to cover quite a lot of it: Glossary for SharePoint 2010. Although as with any jargon or language, most of it is learned along the way.

6. Get a good book

A good reference guide is infinitely more useful than an enormous glossary when getting to know the components of SharePoint. It’s vitally important that you get an overview of all of these components, to avoid inadvertently reinventing the wheel.

There are two I can personally recommend (having read them both cover-to-cover):

Building the SharePoint User Experience (Furuknap): Written for 2007, but still covers the mainstay of SharePoint. An easy and interesting read: If you’re quickly bored by dry textbooks, then this is definitely the book for you.

Inside Microsoft SharePoint 2010 (Various): A good follow-on from Furuknap’s book. A solid foundation of 2010 knowledge, and a good one to refer to now and again. Don’t start with this book though, or you’ll find yourself climbing a pretty steep cliff.

As your SharePoint knowledge grows, revisiting the books can also be quite useful. Parts you may have glossed over previously will suddenly start to make more sense, and you may find some useful tips you missed first time.

7. Love the MSDN documentation

Having developed and worked with a great many third party APIs and interfaces in the past, I can say with considerable confidence that the MSDN documentation is phenomenal.

Every class, method, and property is documented. Even the most obscure properties have at least a placeholder page, which in itself offers more information than many specifications. On top of this is the community comments on each page add clarification and often links to useful related articles.

However, there are two minor shortcomings. The first is that the background documentation (such as “Disposing Objects” mentioned above) is usually painfully boring to read and often skims around subjects rather than getting to the point.

The second is that the CAML documentation is very bizarrely structured: Elements used for almost completed different things share the same page just because they have the same name. There is also missing documentation where the CAML is more obscure, such as the elements used in SPWeb.ProcessBatchData().

8. Find a SharePoint community that suits you

Sometimes no amount of Googling or searching of MSDN’s documentation will find you the answer to the problem that’s been bugging you. In these circumstances it’s good to have a community of like-minded SharePoint developers to help you with your problem.

Being an active member of a community will also help you to expand your knowledge of SharePoint in general.

Here are a couple of the more notable SharePoint developer-friendly communities:

I’ve previously discussed the differences between the two in the following article: SharePoint Questions: MSDN versus Stack Exchange

9. Learn to live with CAML

Collaborative Application Markup Language (CAML) is another example where flexibility seemed to take precedence over usability. In certain circumstances you’ll be forced to write unserializable and poorly validated XML to perform seemingly simple tasks, such as importing comparatively small quantities of data (a few thousand rows).

However, it isn’t all bad: As I mentioned, CAML does allow a great deal of flexibility, and also has very easily readable syntax. The core resource for CAML can be found here: Collaborative Application Markup Language Core Schemas

When querying data you can avoid CAML by using LINQ, which is reputedly faster and easier to use. If you have no fear of CAML (or are working on 2007), the following tool may be of use to you: U2U CAML Query Builder

P.S. While we’re talking about tools, I should mention the extensive and impressive list of SharePoint development tools found here: List of SharePoint 2007 development tools

10. Remember that SharePoint is enormous

It’s important to bear in mind that SharePoint is a mind bogglingly large framework, with dark corners that even the SharePoint Development Team themselves haven’t visited in years.

This is important because occasionally you’ll find an area that’s poorly documented or has strange known issues, and it helps to have a little perspective on the scale of the system you’re dealing with.

You also need to be aware that there’s an awful lot you don’t know, and some of which you may never know. Getting a good overview of the components is essential. I wouldn’t recommend designing a project to use a component (such as a Custom Field Type or Site Template) until you’ve at least made a prototype in that area; to appreciate the depth of what you’re tackling.

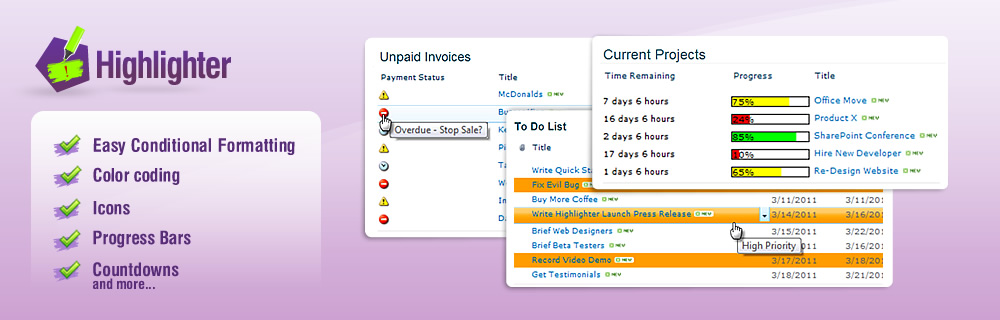
The variety of customizable components in SharePoint also means that there is almost always more than one solution to a problem, as you can see in some of my previous posts: How to do list highlighting in SharePoint

Conclusion

The first challenge in SharePoint is discovering the existence of all the things you don’t understand yet. Once you’ve got a vague idea of all the different components, then you can really start to learn what each is about.

To borrow Mr Rumsfeld’s turn of phrase: Once all your unknown unknowns are known unknowns, you can start learning known knowns.
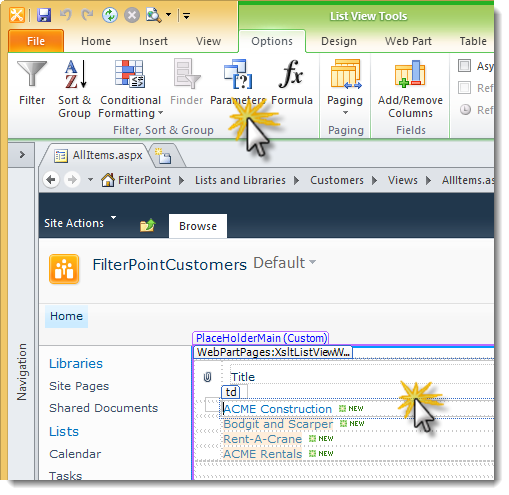
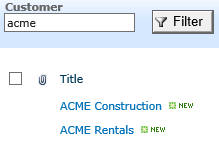
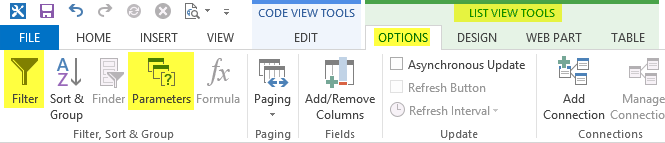
How to create a Countdown in a SharePoint list

Date:May 17th, 2011 Author: Tags: , , , , ,
Category: Highlighter, SharePoint Development, SharePoint Free Tools, Training Comments:0 ;

countdown

If you’ve got a list containing important dates (such as the above example), it’s very useful to be able to easily see how long is left before that date, or how long since it has passed. Unfortunately basing a calculated column on the current date isn’t supported by SharePoint natively, as discussed in my previous article: How to use [Today] in a SharePoint list

So how can we work around this shortcoming without having to wave signs and shout outside Microsoft’s offices? The are a few options available to us:

  • JavaScript: Use a Content Editor Web Part.
  • Designer: Create a custom view in SharePoint Designer.
  • Code: Make your own custom field type from scratch.
  • SharePoint Highlighter: Buy our custom field type.

JavaScript document_into83

Since SharePoint is so uncooperative about using the current date on the server side (i.e. with a calculated column), we can wait until the information gets to our browser and fix it there with JavaScript.

We can get JavaScript onto a page using a Content Editor Web Part, which is added just like any other web part. Christophe at Path to SharePoint has put together a script that displays the date difference on hover, that can be modified slightly to display just the countdown: Countdowns – A second method

Adding a CEWP to each page your list is displayed on can become quite arduous if it’s displayed in a lot of places. In addition to this, information in a CEWP is quite vulnerable to accidental edits, as they are accessible to any user that can edit page content.

Designer designer3013

SharePoint Designer is a free and powerful tool from Microsoft for customizing SharePoint. Unfortunately, because it can do so much, its use is often frowned upon by site administrators (and sometimes even banned).

If you’re lucky enough to be allowed to use it, then (in an unusual twist) Christophe may once again be the person to look to. In a break from his many and various JavaScript solutions he’s put together a Designer solution for this problem too: A countdown for tasks lists

As with the JavaScript solution above, the Designer changes will have to be made on each view web part you want to see the countdown on, but fortunately the changes can only be overridden by someone else using Designer, or an administrator.

Code studio63

If you already have the backbone of a custom field type coded, then adding the XSLT to display this in 2010 should be reasonably straightforward. Alternatively this can be done within the custom field type class.

If you’re using 2007, then CAML rendering unfortunately fails you here, and it’s necessary to use a JavaScript workaround in one form or another.

Creating a custom field type from scratch for this sole purpose is probably going to be remarkably costly (in terms of time). Actually making the foundations of a custom field type is a bit of an investment, but thankfully Microsoft has put together a walkthrough to at least help you get started.

The benefit of using this method is that columns created from a field type are displayed on every page without having to add any additional code to the page itself.

SharePoint Highlighter currency_dollar43

Of course, it is possible to get all the benefits of a custom field type with much less pain: Buy a commercial solution.

If you have a glance at out handy product comparison, you can see the wealth of products we managed to find that offer this functionality. So far that grand total is… One: SharePoint Highlighter.

So if you’re looking for a commercial solution it looks like we’re the only option. If you know otherwise then please do tell us; but for the time being we’ll cheerfully carry on being the front-runner in this one horse race.

How to create a SharePoint KPI column

Date:May 12th, 2011 Author: Tags: , , , , , , , ,
Category: Highlighter, SharePoint Development, SharePoint Free Tools Comments:0 ;

icon

Whether you call it a KPI, an Indicator, or a Data Visualization Asset, the chances are that you immediately understand the purpose of the icons in the picture above. The beauty of adding icons to a list is harnessing this instant recognition to make your users work more efficiently with their data.

So how do we add icons to our list? This depends very much on how complex and configurable you want he results to be, so let me give you a run down of the options:

Do It Yourself

  • JavaScript: Do the work on the client-side with a Content Editor Web Part
  • Designer: Customise the list view using SharePoint Designer
  • Download: Download an open source Custom Field Type
  • Code: Create a custom field type from scratch

Buy It

  • Enterprise Edition: Use the Out of The Box Enterprise Edition functionality
  • Buy: Buy a pre-made Custom Field Type

JavaScript document_into8[6]

By adding a Content Editor Web Part to each page you want the icon to display on, you can add JavaScript that will insert icons once the page has been rendered.

Christophe at Path to SharePoint uses his signature HTML Calculated Column to do most of the hard work in his article: Apply color coding to your SharePoint lists. In this instance JavaScript is used solely to render the HTML correctly, as SharePoint renders the output of calculated columns as text normally.

Designer designer30

If you don’t mind spending a little time dabbling with SharePoint Designer, and you can convince your Site Administrator you’re probably not going to do anything too damaging; then Microsoft’s free tool may be the solution for you.

Toni Frankola has risked the wrath of Microsoft and written an article on how to use Designer reproduce Enterprise edition’s KPI columns without having to upgrade: Visual Indicators for the Masses: KPIs in WSS.

As with the JavaScript solution, you’ll have to make this change on every page you want to see the icons on.

Download arrow_down_green4

If you’re and end-user looking for a quick solution, or a developer interested in further developing an existing Custom Field Type, then the IconSet CodePlex project may be of interest to you.

I have enormous respect for those that donate their efforts to the community, such as the developers of this project. Unfortunately open source developers often have a day job and other commitments, so expecting rapid free support from them can be a tall order.

Code studio6

It’s entirely possible to create a Custom Field Type yourself. This is by far the most time-consuming of the options listed on this page, and hence also probably one of the most expensive. However, if you want to avoid some of the initial investment, you could use the IconSet CodePlex project mentioned above as a good starting point (or reference guide).

Fortunately, as the icons are directly rendered onto the page you can avoid the majority of the JavaScript rendering problems I mentioned in How to do list highlighting in SharePoint. If you also avoid [Today] then you can avoid some of the related trouble.

A benefit of all three of the Custom Field Type options is that the results are shown wherever the column is shown in a view, avoiding page-by-page additions.

Enterprise Edition sharepoint

SharePoint Enterprise edition allows you to add KPI information to your site, along with many other additional features. If you’re working with Enterprise edition then take a look at Mark Miller’s article: KPIs for the Masses.

Since use of this functionality is prolific and directly supported by Microsoft it’s very a good option for those that have this version of SharePoint. Unfortunately the functionality isn’t available to those working with Foundation or Standard edition.

Buy currency_dollar4

Many companies don’t have Enterprise edition, and feel that upgrading solely to use the KPI functionality is perhaps not the best use of resources. As a result, the functionality has been reproduced by a great many products (not least our own: SharePoint Highlighter).

Because we have our own product in this area, we’ve created a product comparison to demonstrate the available functionality, and associated cost.

How to use [Today] in a SharePoint list

Date:May 12th, 2011 Author: Tags: , , , , , ,
Category: Calculated Columns, Highlighter, SharePoint Development, Training Comments:0 ;

today

Quite frequently we see questions about using the current date to display messages on a list when a date or time is (or will soon be) overdue. Most of these queries are from frustrated users who are trying to use [Today] in a calculated column, but find it missing.

I’ll quickly outline why this option is missing from calculated columns, and hence why the notorious [Today] trick is quite so controversial. But most importantly, I’ll run you through ways to actually display the information you want.

Why is [Today] missing from calculated columns?

When we look at a SharePoint list, the vast majority of us are instantly reminded of Excel (or Grandfather Excel, if you prefer). Because of this we quite reasonably expect it to act like Excel, and hence expect it to reconsider every formula and data item on the page each time we view it.

Unfortunately because of the much larger amount of information SharePoint has to pass back and forth, it takes a different approach to updating the data items. It will only update calculated values when the related item is added or edited.

Consider SharePoint as an overworked secretary; if you ask for a file to be updated they’ll find it in the filing cabinet, update the information, and correct anything else that’s awry on the paperwork while they’re there. If you ask for all the files for people named “Smith” to be put on your desk, unless you specifically say “And update the information on every single one while you’re at it”, it’s not likely they’ll do the extra work for no reason.

Because of this change in records-keeping, Microsoft had to skip functionality that would make this lower-maintenance updating method obvious. Since having a [Today] option would cause unedited items to go out of date every day, they had to leave it out. The [Me] option was another casualty, as it would require checking the current user every time the data was displayed.

So how do we get our files updated without further flustering our imaginary secretary? There are several options:

  • JavaScript: Use a Content Editor Web Part. Also known as “Do it yourself.”.
  • Designer: Create a custom view in SharePoint Designer. “Ask the secretary really nicely”.
  • Code: Make your own custom field type from scratch. “Get your own team to do it”.
  • SharePoint Highlighter: Our own solution to the problem. “Hire an extra secretary”.

JavaScript document_into8

Of course there’s always a JavaScript solution, and this one in particular from Paul Grenier uses jQuery to help with the process. This will mean adding the jQuery libraries to your site, and it’s also necessary to add a Content Editor Web Part to each page you want the feature to work on.

A little JavaScript knowledge will probably be necessary to make it fit your requirements, and as with any code tweaking, the more you know the better the result will be.

Designer designer30

SharePoint Designer is a free and powerful (and hence often banned) tool from Microsoft for modifying your SharePoint site. Using Designer it’s possible to alter a view so that it uses Today when rendering the data on the page. This done by modifying the view’s XSLT (the template the view uses to decide what data goes where).

If you’d like a dabble to test the water of such changes, MSDN has a nice tutorial on how to get started.

However, if you already have some experience with Designer (or you’d like to just jump straight in), Greg Osimowicz has an article on using Today in XSLT to calculate holidays accrued to date (scroll down to “Below are the steps I followed:”).

Code studio6

There are a number of possible different methods to solving this problem using a custom field type. As always this comes with my standard disclaimer that developing a custom field type from scratch for a single purpose requires a disproportionate investment of time for the results.

In 2010 it’s possible to do the calculations in the custom field type class (with some light persuasion), however this is not possible with 2007 as it does not use the class to render its information on list views.

Unfortunately not even CAML can save us in this instance, as the View Schema doesn’t provide the current date in a usable form. But if you’re using 2010 you may be able to create a workaround with XSLT and Greg’s Designer XSLT solution in the section above.

The last option is to use the field type to get JavaScript onto the page instead of using a CEWP. This has the benefit that you don’t need to put the CEWP on each page, but as I mentioned in my previous article it can be very troublesome to do so: How to do list highlighting in SharePoint

SharePoint Highlighter currency_dollar4

Normally this is the section where I’d talk about the benefits of a commercial solution, and try to avoid mentioning SharePoint Highlighter too much (I might even link to our product comparison page). However, it’s very difficult to talk in general terms about commercial products on the market that have this functionality when yours is the only one that does.

So I’m not going to beat around the bush: If you want to buy a commercial solution to change your list view display based on today’s date, then SharePoint Highlighter is the only (and hence best) solution. It does much more than just this, but I’m not going to blow my trumpet too much.

If you want to see a real life problem and its solution using SharePoint Highlighter; have a look at this SharePoint Overflow question.

How to do list highlighting in SharePoint

Date:May 11th, 2011 Author: Tags: , , , , , ,
Category: Highlighter, SharePoint Development, SharePoint Free Tools Comments:1 ;

highlight

Lists can often look a little bland, and attempting to impatiently skim read them can often lead to missing important information. This is why a bit of well-placed color can really help users with their day-to-day work.

In my last post How to create a progress bar in SharePoint I covered the various methods of displaying a progress bar on your SharePoint list view. For this article I’m going to do the same for row and cell highlighting, as I’ve spent a rather considerable time wrestling with this particular feature in SharePoint Highlighter:

Client based

  • JavaScript: Put some JavaScript code into a Content Editor Web Part
  • Designer: Use SharePoint Designer to set up Conditional Formatting

Custom Field Type

  • Code it yourself: Make your own custom field type from scratch
  • Buy: Purchase a pre-made solution

JavaScript document_into8

If you need a free solution that doesn’t require farm administrator permissions, then using JavaScript in a Content Editor Web Part may be the solution for you. As always with this method, Christophe at Path to SharePoint has a great example.

Alternatively, there’s a slightly off-topic walkthrough by Boris Gomiunik which avoids having to use an HTML calculated column. It has a great deal of useful information, and would only require minor tweaking to do cell or row coloring instead of text.

The JavaScript and CEWP method should avoid having to trouble your IT department to make the change, which I’m almost certain you’ll both be happy about.

Although you’ll have to implement the CEWP on every page you want the highlighting to display (which may cause your view drop-down to disappear), you may not have to copy the full JavaScript into every CEWP, as discussed in my previous article’s comments.

Designer designer30

If you’re lucky enough to have a generous (or inattentive) IT department, you may be able to use SharePoint Designer; a free tool from Microsoft. SharePoint Designer allows you to add Conditional Formatting to your list views in a manner very similar to Excel. This has to be added to each of the views you want to see the highlighting on.

You’ll need a little time to become familiar with Designer, and to set it up for your needs, but once you have done so it can be a powerful tool. Unfortunately it is often regarded by administrators as a dangerous tool for this very reason.

There’s a useful step-by-step guide to setting up conditional formatting in SPD 2010 by Frederique Harmsze at Macaw, and a more straight-laced 2007 version on the Microsoft Office site.

Code studio6

Creating a custom field type to perform highlighting on a list view is in many ways like trying to type on a keyboard on the other side of a crowded the room with a pole (which sometimes gets stolen by the janitor if you leave it out overnight). That might be a slight exaggeration, but it is very awkward.

This is mostly because there is no way to programmatically interact with the row and cell color from server-side code (the distance across the room in my analogy). So you’ll need to get JavaScript onto the page in order to do the highlighting (the metaphorical pole).

The crowd represents SharePoint’s own JavaScript (all 0.5MB of it), which may interfere with yours; an example of this would be the use of AJAX to render Group By views.

Finally, SharePoint seems to passive-aggressively object to script elements, and silently removes them from HTML text stored in the database; the metaphorical janitor. This can be worked around by rendering using XSL (in 2010) or CAML (in 2007).

Buy currency_dollar4

If you want to avoid the unpredictable cost of time spent creating a solution, then you’re better off paying the money up front for a pre-made solution. As a bonus it won’t be you that has to test it to death or maintain and support it.

By some enormous coincidence, we happen to have recently released a product called SharePoint Highlighter that can do this kind of highlighting very easily. Of course, there are other similar products on the market, which we’ve listed on this handy comparison matrix.