
We helped a custom recently with an interesting SharePoint question – how to identify if a List item is new or has been modified? In addition they also needed to be able to setup a View to show only New items and another to show Modified items.
Archive for the ‘SharePoint Reminder’ Category
How to Identify New or Modified List Items (records) in SharePoint
Date:October 22nd, 2015 Author:Ryan Tags: Calculated Columns, Filter, TipCategory: Calculated Columns, Filter, SharePoint Reminder Comments:0 ;
New version of SharePoint Reminder – corrects a problem caused by Chrome v37
Date:October 27th, 2014 Author:Ryan Tags: Chrome v37, New Version, Reminder, SharePoint, Web PartCategory: SharePoint Reminder Comments:0 ;
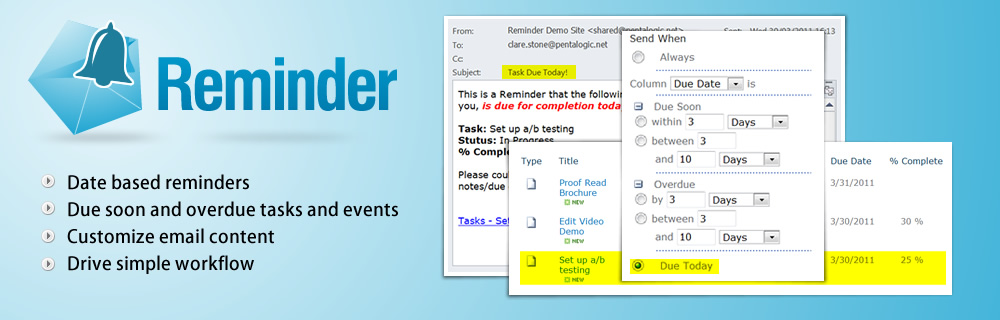
A new version (1.9.6) of Reminder for SharePoint which enables date based email Alerts is available.
The main change in this version is to make it compatible with Google Chrome v37. Controversially Google removed a feature (showModalDialog) that has been included in most browsers since 1994 and is still part of the latest HTML5 specification.
We’ve also added
- Improved compatibility with custom master pages or other controls that use jQuery and the ability stop reminder including jQuery on a page that already has it. (options under the Support tab).
- Reduced storage requirements for state data to support large lists
- Configurable Web Part processing timeouts (for large lists)
- A correction to an error that occurred if you use List and View name with angle brackets in the title.
To upgrade simply download and install the latest trial version – your license key will be picked up during the upgrade and all your settings will be saved.
Warning – Once you’ve upgraded to v1.9.6 or above you can’t rollback to a version older than 1.9.6.
Reminder 365: Date-based alerts for Office 365
Date:April 26th, 2013 Author:Stuart Pegg Tags: Alert summaries, Office 365, Overdue alerts, Reminder, Reminder 365, SharePoint alerts, SharePoint OnlineCategory: SharePoint Alert, SharePoint Online / 365 / Cloud, SharePoint Reminder Comments:0 ;

Reminder 365 is now available! Sign up today for your free account!
What is it?
Our Reminder web part has been extremely popular for those using the on-premises version of SharePoint but its not been available for those of you on Office 365 / SharePoint Online. Now we have a version of Reminder especially for SharePoint Online customers.
Reminder 365 builds on SharePoint Online’s built-in alerts, so you can get more from Office 365:
 Create alerts for due or overdue items Customize alert e-mails Send daily, weekly, or monthly summaries Free to use: Upgrade if and when you want No installation: Just sign up and go
What’s it for?
Here are some of the things our beta testers used Reminder 365 for:
- Sending contract renewal reminders
- Making it easier to get today’s follow-ups
- Reminding attendees about meetings
Why not see what it could do for you:

How to configure email alerts to review Documents in SharePoint
Date:March 13th, 2013 Author:Ryan Tags: ReminderCategory: General, SharePoint Reminder Comments:2 ;
I am going to walk through an example showing how you can use our SharePoint Reminder software to send out date based email alerts reminding authors to review and update old documents.
Perhaps you’ve got contracts that will expire at a certain time and need to be renewed. Perhaps you’ve got policies that need to be checked for accuracy at least once per year.
Reminder can help with this and many other scenarios requiring you to setup email alerts to be sent on certain dates – and it’s much easier than working with workflow.
Scenario 1 – Email to author asking for a document to be reviewed once per year.
In this simple example we’re just going to send out an email to an author if a document hasn’t been updated in a year.
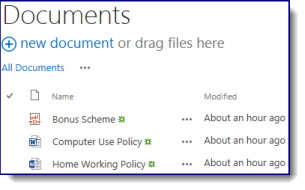
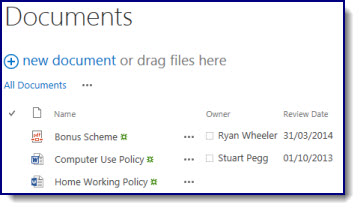
Start with a standard SharePoint Document Library (or even a normal list with document attachments).
Create a new wiki page (or web part page if you’re using SharePoint 2007) somewhere in the same site. The location is not important as long as it’s in the same site.
Add a new web part to the page (Insert > Web Part > Miscellaneous > Reminder)
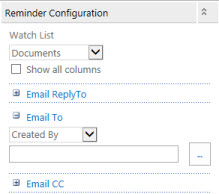
Edit the web part and in the toolpane (the settings on the right) configure it like this :-
| Set the watch list to Documents (or whatever your document library or list is called)
Set the Email To : Created By Tip – you don’t have to use the Created By column (who is the first person to upload the document) you could use
|
|
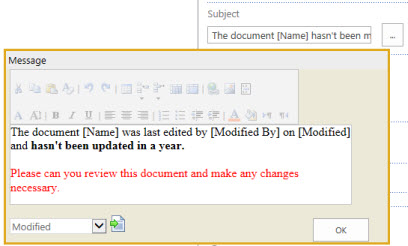
Setup a subject and message – remember you can include details from the document library such as [Name] and [Modified By] and any other metadata fields from the list. The email will also contain a link to the document record.
 |
|
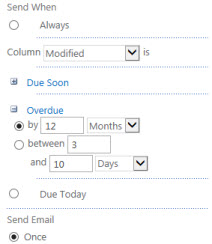
| Under Send When set the Reminder email to be sent when the Modified field is Overdue by 12 months – this will trigger an email when a document’s last modified date is a year old. (If someone edits a document half way through a year the alert email will be ‘moved back’ to be a full 12 months since the last modification) |
 |
| In the Send Email section set this list to be checked at 7am every weekday (or whatever makes sense to your organisation). | 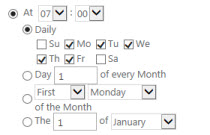 |
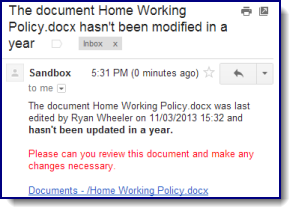
And that’s it! In a years’ time the person who created the document will get emails like this – notice the ‘mail merge’ of information from the document library / list being put into the subject and message
Scenario 2 – Email to an Account Manager to ensure a contract is renewed.
Building up on the previous example we’re going to
- Add an Owner field into the document library as who initially uploads a document may not be the person who is later responsible for it.
- Add a Review Date field – just sending an email in a year’s time isn’t precise enough for our well organised office!
So add these fields using Library > Create Column
- Owner is a Person or Group Field
- Expiration Date is a Date and Time field and defaults to a Calculated Value of [Today]+365 so by default documents are due for review 1 year after they were created, but this can be changed
(Note – you can use [Today] in default values and filters, just not calculated columns!)
It will look something like this :-
| Email To : Owner
Subject : The document [Name] is due for review on [Review Date] Send When : Review Date is Due Soon within 5 days.
|
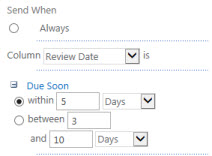 |
And you’re done! 5 days before the Review Date comes around an email will be sent to the Document Owner.
Further ideas
- You can have multiple Reminders for different time periods, e.g.
- The first email 6 months after it was created, the second 24 months after or
- One email 2 weeks before a review date saying “Due Soon” and another email once the Review Date has passed by a month saying “Overdue – get on with it!” – let the computer be the team nag!
- Email CC – perhaps the ‘due soon’ email can go to just the document owner but the “overdue” email can be cc’d to the team leader
- Dynamic Review Dates – perhaps HR documents need to be reviewed every year, but health and safety documents very 2 years. You can set different rules and emails by setting up Views to filter different types of documents and setup different Reminder web parts for different views.
Reminder web part is now compatible with SharePoint 2013
Date:March 7th, 2013 Author:Ryan Tags: New Version, Reminder, SharePoint 2013Category: General, SharePoint Alert, SharePoint Reminder Comments:0 ;
Our Reminder web part (which gives date based “Due Soon” and “Overdue” email alerts) is now compatible with SharePoint 2013 as of version 1.8.0
If upgrading from SharePoint 2010 to SharePoint 2013 simply perform the upgrade then install the latest version – your old settings and license key will be picked up. Full instructions for upgrading Reminder to SharePoint 2013 are in the online manual.
Reminder is the last of our commercial web parts to be made SharePoint 2013 compatible.
The Ultimate Flexible CRM solution for SharePoint
Date:March 5th, 2013 Author:Ryan Tags: SharePoint CRMCategory: FilterPoint Web Part, General, Highlighter, Partners, PivotPoint Web Part, SharePoint Reminder Comments:0 ;
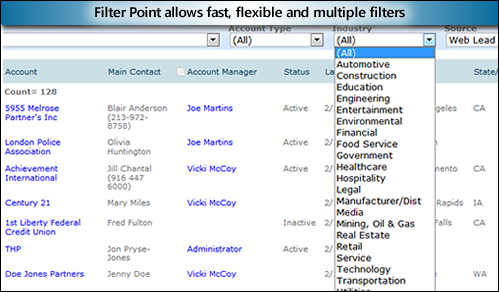
The Ultimate Flexible CRM Solution for SharePoint
SharePoint is the platform millions of organizations use to manage various facets of their businesses. However, in many cases, SharePoint’s built-in functions do not provide the ease of use and advanced functions that users need to work efficiently and effectively.
Some SharePoint consulting firms will recommend custom-built web parts to provide the necessary functionality required. Before going this route, companies would be wise to evaluate pre-built applications and web parts to save significant time and money! Evaluating and sourcing the right products however can be an overwhelming task – and falling prey to vendor hype a common outcome. This is particularly true with CRM technology (Business/Customer Relationship Management).
Benefits of a 100% SharePoint- based CRM application:
A system that is designed to be highly configurable and evolve with the business’s ability to embrace change is the key to a successful implementation and a higher than average level of user acceptance.
- Single point of user login where all business related information is stored
- Maintenance of sensitive customer data inside a controlled environment
- Leverages existing technology investment

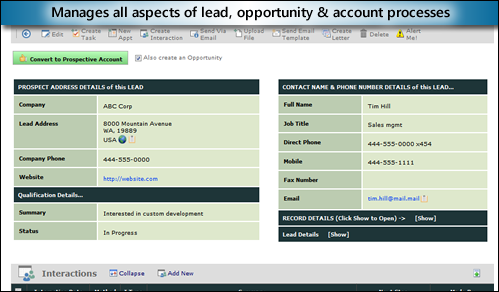
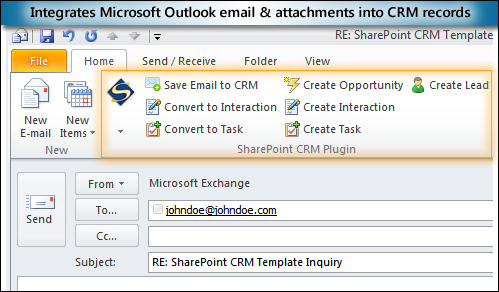
Designed exclusively for SharePoint, SharePoint CRM by LookOut Software revs SharePoint up with dynamic, flexible and powerful features out of the box – yet is easy to personalize, scale, and upgrade as needed.
Rather than reinvent the wheel, LookOut Software partnered with one of the top Web Part developers in the industry to provide powerful, yet optional, enhanced functionality for its CRM application.
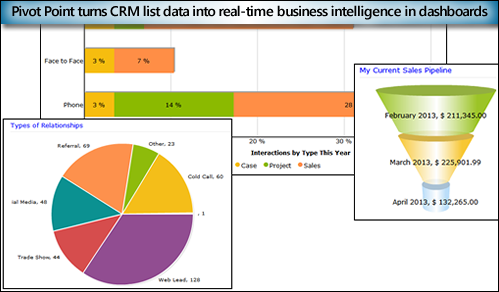
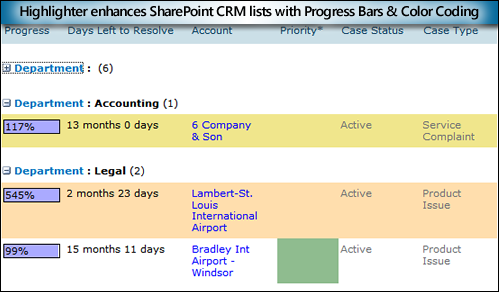
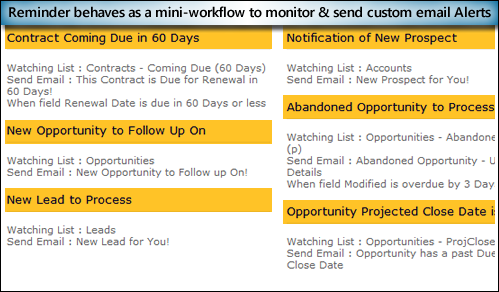
Pentalogic’s Filter Point, Pivot Point, Highlighter and Reminder web parts enhance and further empower SharePoint CRM with easy to use, flexible and comprehensive interactive Charts, Graphs, Filters, Alerts and more.
Some examples:
 |
 |
 |
 |
SharePoint CRM and Pentalogic’s simple- to-use and effective add-on web parts combine to create the ultimate Flexible CRM Solution for SharePoint.
Turn A SharePoint Task List Into A Task Master
Date:October 19th, 2012 Author:Stuart Pegg Tags: Countdown, Filter, Graphs, Highlighting, SharePoint, SharePoint alerts, Task listCategory: FilterPoint Web Part, Highlighter, PivotPoint Web Part, SharePoint Alert, SharePoint Planner, SharePoint Reminder, SharePoint webparts Comments:0 ;
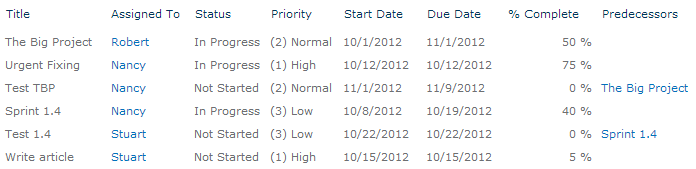
Here’s how you can turn SharePoint’s built-in Task list into a powerful task tracking tool, using Pentalogic products.
These are just examples to get you started – we’re only scratching the surface here of what’s possible with our range of flexible SharePoint web parts.
To start, just create a new blank site and add a task list. Here’s one I made earlier:
Now just follow our guide for each section (or just the sections you want):
- Task list: Priority and Due Date highlighting (uses Highlighter)
- Home page: Task calendar overview and summary (uses Planner)
- Analysis page: Dashboards, graphs and reporting (uses FilterPoint and PivotPoint)
- Alert page: Configure “Task Overdue” email alerts (uses Reminder)
Each section has step-by-step instructions and a screenshot of the configuration to compare against.
Task list: Priority and Due Date highlighting
Uses Highlighter
To make the high-priority and upcoming tasks really stand out, we’re going to add a couple of highlighter columns.
Here’s what you will see on the All Tasks view – coloured flags to show priority, a column showing how long we’ve got left to complete items and a red highlight for things that are overdue.

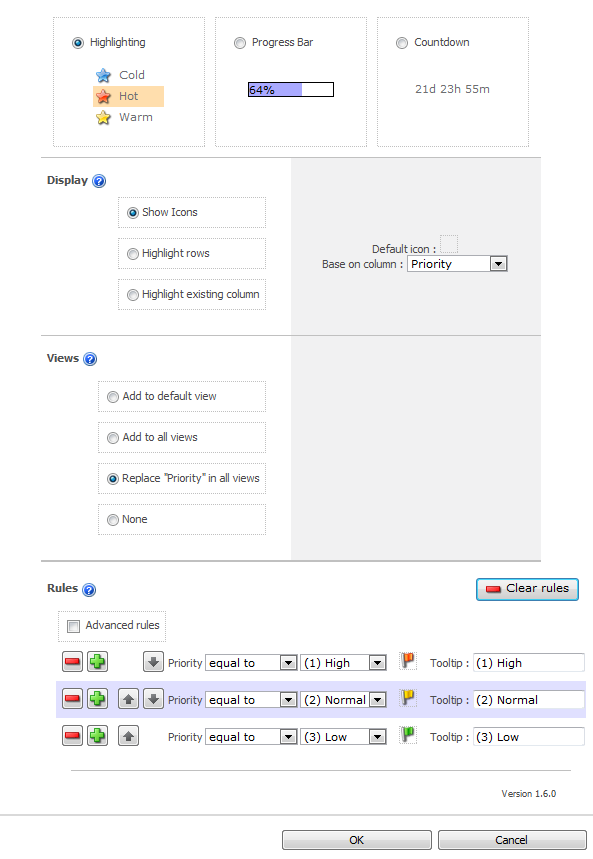
Highlight Priority
- Create a new Pentalogic Highlighter column
- Name the column Task Priority
- Choose the column type Highlighting
- Choose Show Icons
- Click the Default icon, then click Clear
- Change Base on column to Priority
- Select Replace ‘Priority’ on all views
- Under Rules click the Auto-create button
- Click OK
Due Date Countdown
- Create a new Pentalogic Highlighter column
 Name the column Due
- Choose the column type Countdown
- Change the Start option to [Today]
- Change the End option to Due Date
- Select Add to default view, on the Right
- Uncheck all the display options except Days
- Under Rules click the Auto-create button
 Name the column Due
Home page: Task calendar overview and summary
Uses Planner
On your site’s home page we’re going to add an at-a-glance overview of your tasks: A view of the task list (highlighted, if you did the previous section) and a task calendar.
Here’s what your home page will look like once we’ve finished:
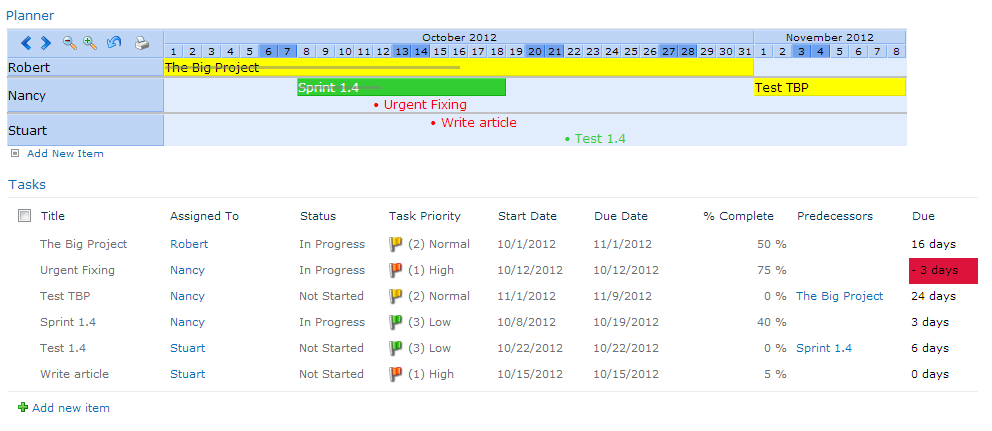
List view
- Edit the page and add Tasks from the Existing Lists category
- Edit the web part
- Change the Selected view to All Tasks (to ensure Highlighter columns are displayed)
- Click OK
Task calendar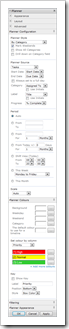

- Edit the page and add Planner v2 from the Miscellaneous category
- Set the Style to By Category
- Set the Planner Source to Tasks
- Set the Start Date to the column Start Date
- Set the End Date to the column Due Date
- Set the Category to Assigned To
- Set the Label to Title
- Set the Progress to % Complete
- Set the Period to Auto
- Change Set colour by column to Priority
- Assign appropriate Colors to the priorities (e.g. High – Red)
- Optional: Set a Fxed width under the Appearance section
- Optional: Set the Font size to Medium
Analysis page: Graphs and granular reporting
Uses FilterPoint and PivotPoint
Now we’re going to create an Analysis page to produce some graphs and reporting data from your task list.
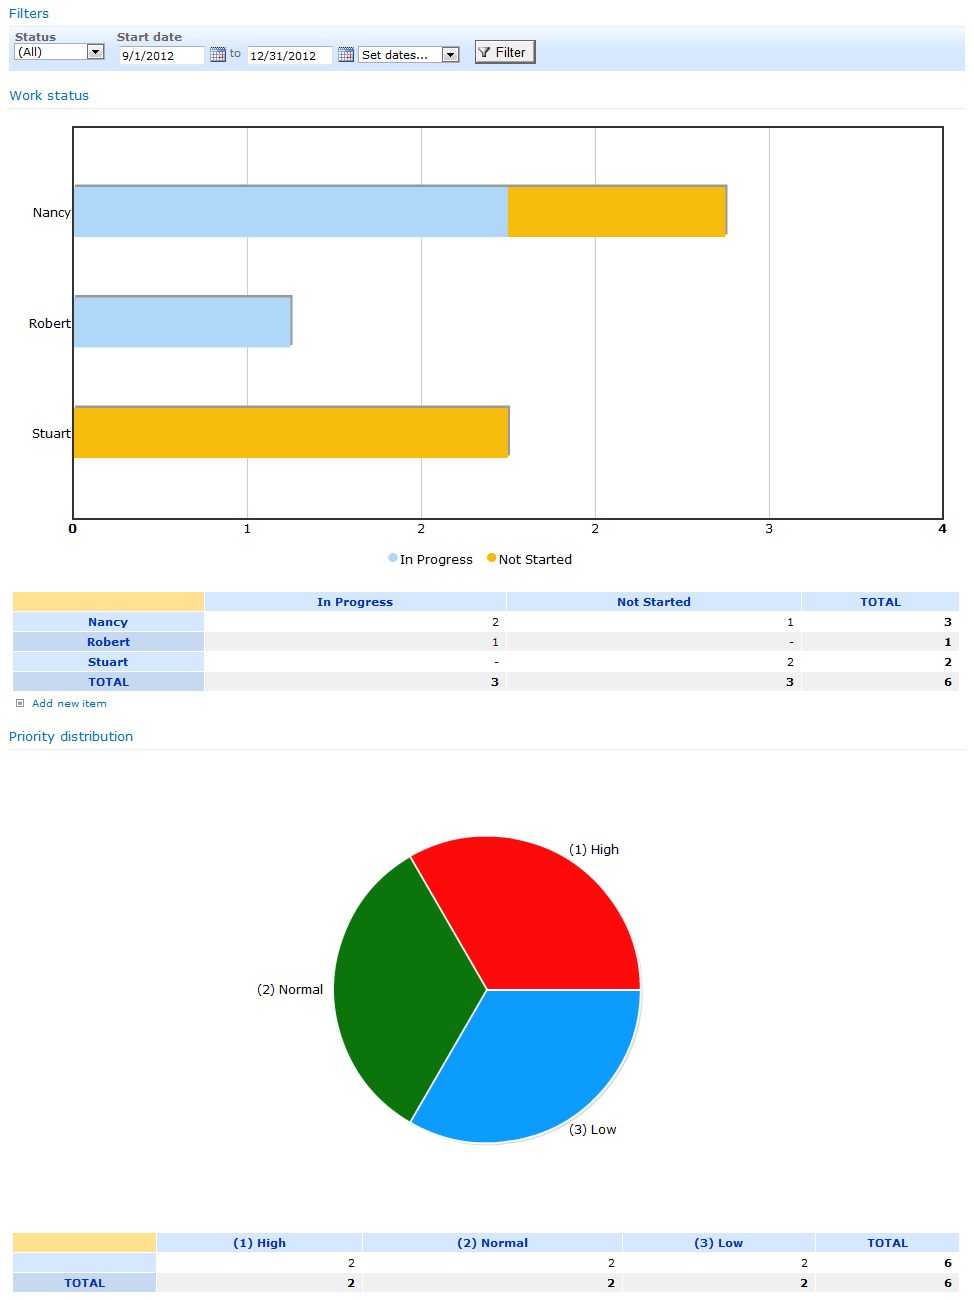
You will have an Analysis page that looks like this – showing charts for each persons workload.
Creating the page
- From Site Actions choose New Document Library (to put the page in)
- Call the library Pages
- Set Quick Launch to Yes
- Set Versioning to No
- Change the Document Template to Web Part Page
- Click Create
- From Site Actions choose More options…
- Under Page choose Web Part Page
- Call the page Analysis
- Change the Template to Full page, Vertical
- Set the Document Library to Pages

Graph and Report: Priority skew
Let’s add a graph to show us if tasks are being raised too often as “High priority”:
- Edit the Analysis page
- Add the PivotPoint web part from the Pentalogic.net category
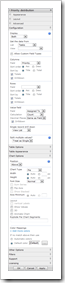
- Edit the web part
- Set Display to Both
- Set List to Tasks
- Under Columns set Field to Priority
- Under Chart options set Chart type to Pie
- Click OK
Graph and Report: Status by Person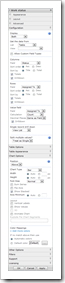

Next we’ll add a graph to show the status of tasks assigned to everyone. That’ll show us if we have any bottlenecks in the team:
- Edit the Analysis page
- Add the PivotPoint web part from the Pentalogic.net category
- Edit the web part
- Set Display to Both
- Set List to Tasks
- Under Columns set Field to Status
- Under Rows set Field to Assigned To
- Under Chart options set Chart type to Bar
- Set Color mappings to Automatic colors
- Click OK
Filtering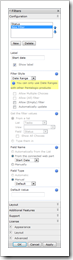
Lastly, let’s add a filtering web part. this will allow us to drill down into our data by selecting certain statuses and date ranges:
- Edit the Analysis page
- Add the FilterPoint web part from the Pentalogic.net category
- Connect the other web parts via the menu (Connections -> Provide filter to)
- Edit the web part
- Under Filters click New
- Change the Label to Status
- Set the Style to Drop Down
- Under Get the filter values select From a list
- Still under Get the filter values, the list Tasks and field Status
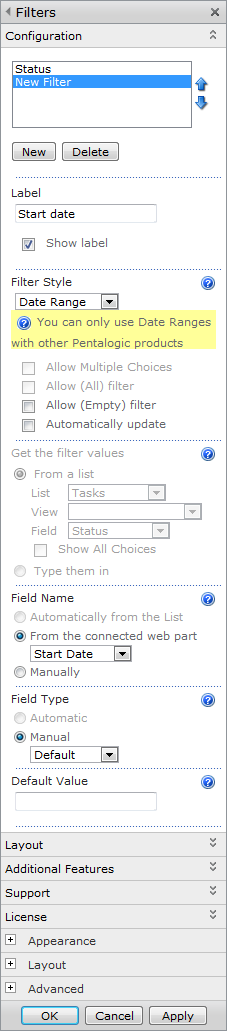
- Under Filters click New
- Change the Label to Start Date
- Set the Style to Date Range
- Set the Field name to From the connected web part and select Start Date
- Click OK
You can display the page on the Quick Launch menu via Site Actions -> Site Settings and selecting the Quick Launch option under Look and Feel.
Alert page: Configure “Overdue” alerts
Uses Reminder
The last step is to configure Reminder to send email alerts to us when tasks are overdue. You’ll need to create the Pages document library if you skipped the previous section, and then continue with the instructions:
- From Site Actions choose More options…
- Under Page choose Web Part Page
- Call the page Reminder
- Change the Template to Full page, Vertical
- Set the Document Library to Pages
- Edit the page
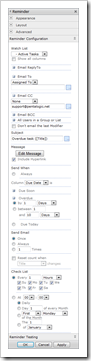
- Add the Reminder web part from the Miscellaneous category
- Edit the web part
- Set Watch list to Tasks
- Under Email to select Assigned To from the dropdown
- Under Email CC enter the manager’s e-mail address in the text box
- Next to Subject click “…” and enter the following into the popup box:Overdue task ([Title])
- Next to Message click “…” and enter the following:This task is overdue: Title: [Title]
Due date: [Due Date]
Priority: [Priority] - Under Send When expand Overdue and choose by 1 Days
- Click OK

You should hen see the following on the page:
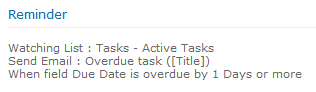
You can also setup email alerts to remind you when tasks are due in a few days.
Finished!
Your mundane Tasks list is now an all-singing all-dancing Task Master!
This is just one example of the many possible solutions that can be achieved with our products. Please feel free to browse the product pages below to learn more or take advantage of our 30 day free trial:
Send email alerts when a document is left checked out
Date:May 28th, 2012 Author:Ryan Tags: New Version, Reminder, SharePoint, SharePoint email alert, Web PartCategory: SharePoint Reminder Comments:2 ;
A new version of our Reminder web part for SharePoint has been released (v1.7.16) that allows you to send email alerts if a document is left checked out for a long time.
If you have document libraries that require check out before editing then you’ve undoubtedly been faced with the situation where documents have been left checked out – blocking other users from editing the document.
Reminder allows you to send email alerts after a period of time to ensure checked out documents are not forgotten about.
This example shows how to setup Reminder to send email alerts if something in a document library is left checked out for more than 12 hours.

The manual contains other common scenarios such as email alerts when Task/Due and Overdue, simple helpdesk in SharePoint, enhanced SharePoint alerts and more.
SharePoint Staff Vacation Planner Update – dealing with Public Holidays
Date:September 1st, 2011 Author:Clare Tags: PivotPoint, Planner, Reminder, SharePoint, Vacation PlannerCategory: PivotPoint Web Part, SharePoint Planner, SharePoint Reminder Comments:0 ;
Customers who use our SharePoint Staff Vacation Planner Toolkit often ask about the best way to deal with public holidays. Public Holidays tend to affect the whole team. So you want them clearly marked on your Vacation Planner dashboard, but you certainly don’t want to have to enter each public holiday for each team member as a separate event. And you probably also don’t want to be firing off absence approval requests for each holiday either.

So here are our suggestions on the best way of handling Public Holidays within the SharePoint Staff Vacation Planner Toolkit.
First you need modify your list. Go to list settings and open up your “Reason” field. In addition to your existing reasons for absence add a new reason – Public Holiday.
Then open up the settings for your “Requested By” column and make sure you have “Allow Multiple Selections” checked.
Now you need to modify your Planner web part.
So, “Edit Shared Web Part” then, under your “Category” picker, check the “split multiple selections box”. This is key if you want to be able to create just one event for each public holiday but have it show up against each of your team members.
Now go down to the Planner Colors section of the Toolpart and update your color coding by column section to include an extra color code for your new Reason for absence that you created in your list – Public Holiday – I am going for a nice orange.
Now check your PivotPoint web part. For this to work you are going to need PivotPoint 2.1.4 or above. Download it here if you don’t have it already (free to all PivotPoint v2 customers, or v1 customers with Premium Support). In the Toolpart make sure that in the “Split Multiple Values” dropdown you have chosen “Split Records”. This will ensure that when we enter a 1 day public holiday for 4th of July, for example, 1 day gets entered against each team member in the pivot table.
Finally, before we start adding events, to ensure that we don’t accidentally fire off approval requests and notifications all over the place, access the Reminder web parts that you have set up and in the “Reminder Testing” section at the bottom of the Toolpart enter your own email address so that any emails generated whilst you are adding the public holidays go to you. This will be a better solution than simply switching the Reminders off as you work, as it will mean that if any “real” requests are submitted whilst you are working you will be able to redirect them, rather than them being lost.
Add a Public Holiday
So, from your Planner dashboard add a new item. Let’s do 4th July. Set it up as an all day event. Set yourself as “approved by”, you will need to approve the event before it will show up in people’s dashboards. Now add your whole team to the “Requested By” field. It’s easiest to do this using the Address Book. Now ensure you have selected “Public Holiday” in your Reason field. Approve the request. Discard all the “Request approved” notifications that are redirected through to you. And now you will see your public holiday, nicely marked against each of your team members. Repeat as needed for all of your other public holidays, remove the redirect from your Reminder emails and then you can relax for another year!
I hope this helps you in using Vacation Planner. If you have any questions or requests about the Vacation Planner we would love to hear them.

Simple SharePoint workflow use case with SharePoint Reminder – Invoice Approvals
Date:May 19th, 2011 Author:Clare Tags: Reminder, SharePoint, SharePoint 2010, WorkflowsCategory: General, SharePoint Ideas, SharePoint Reminder Comments:0 ;
 SharePoint Workflows are one of the magic parts of the solution – the bits when even the most cynical and sceptical end user gets to see the benefit.
Instead of emails and bits of paper flying round your organization, getting lost, forgotten and falling between the cracks, everything is managed and driven centrally by SharePoint.
There are a whole load of scenarios where you could use workflows:
- Vacation approvals
- Expense claims
- Purchase order Authorisation
- Timesheet approvals
- Invoice payment approvals
- Helpdesk escalations
SharePoint can handle all of these processes seamlessly and automatically. Seeking appropriate approvals, escalating, notifying, referring back and reminding as needed, whilst keeping all documentation secure in one central location.
So, that’s the upside. The downside is that to create a SharePoint workflow you need to use either SharePoint Designer or Visual Studio. Whilst SharePoint Designer isn’t all that hard to master it is a very powerful tool and capable of doing serious damage in the wrong hands, for this reason many organizations keep it looked firmly away from most users. Visual Studio on the other hand really is hard to master – strictly for the mega-brains in your IT department. So this means that cooking up a bit of Workflow magic out of the box is out of the question for most SharePoint users.
The alternative is to use SharePoint Reminder to create your SharePoint workflows. Using SharePoint Reminder and some clever filtered list views you can easily create multi stage workflows to cover any of the scenarios listed above.
This use case walks you through how to create a 2 stage supplier invoice approval workflow, using SharePoint Reminder and a standard SharePoint document library.
Reminder only drives simple workflow, it doesn’t have the advanced logic of SharePoint OTTB Workflows and it won’t do things like automatically updating lists or other systems. But for a lot of your day to day processes, you might find that it does just what you need.


