This is Part 2 of the SharePoint Staff Vacation Planner – DIY Guide
So having set up our Vacation and Absence list yesterday, we can now apply Planner webpart, to create a vacation and absence dashboard like this:
So staff and managers can easily see who is off when, and when it will be possible to request leave.
If you don’t already have our Planner webpart you can download the free trial version here.
You will find all the installation instructions you need here.

Now we are ready to set up the Planner web part. Decide where you would like this to display, perhaps your HR home page, or your team home page, select Site Actions, Edit Page, Add a Web part then select Planner.
From the top right hand corner of the Planner web part which will have appeared on your page click edit and Modify shared webpart you will now see the Planner Configuration Panel on the right hand side of your screen.
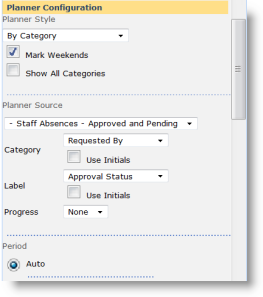
So, we are going to set the Planner up like this:
Planner Style: By Category
Planner Source: is the view you just set up, so in our case: Staff Absences – Approved and Pending
Category: Requested by, so the names of the people requesting absence will appear down the left hand side of the Planner.
Label: Approval Status, so each absence will be labelled Approved or Pending.
You can leave Period set at auto Planner will display in the format most appropriate to the items you have entered into your list and you can easily scroll back and forth and zoom in and out.
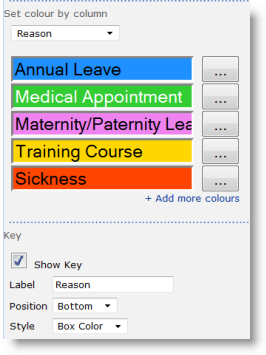
The next section we are going to change is Set colour by column. We are going to set this by the Reason column, and choose a different colour for each of the Reason choices we set up in our list.
This will allow us to see at a glance why a team member is absent. In this section you should also choose where and how to display the color coding key, ours is underneath the Planner chart.
And that’s the Planner set-up done.
For more information on Planner set up and configuration click here.
Or take a look at this for more info on using color coding in Planner.
In the next section we will look at setting up our “Absences to Date” dashboard, using PivotPoint webpart.
Tags: Planner, SharePoint, WebPart


I cant find Planner configuration panel. I get Edit Web Part and then a window opens to edit The Staff Absence Planner. What i have does not replicate Planner Configuration panel. Where do i get the panel? It was going so well until this part : (