Author Archive

Is Conditional Formatting in SharePoint 2013 dead?

Date:January 25th, 2013 Author: Tags: , ,
Category: Highlighter, SharePoint Development Comments:1 ;

With the release of the controversial new SharePoint Designer 2013, has the ever-popular Conditional Formatting option died a death?

Why is SharePoint Designer 2013 controversial?

The bee in everyone’s bonnet is SPD 2013’s lack of a Design View; one of the staple tools of every Designer user. The place to get up to speed on this topic is Marc Anderson’s article: SharePoint Designer 2013’s Missing Design View

How does this effect the Conditional Formatting option?

I asked the same question myself, so I installed SPD 2013 and gave it a try. After clicking, selecting, choosing, and swearing at pretty much every component I came to the conclusion that I was clearly missing something.

I posted on SPSE expecting a quick helpful pointer. Instead I was met by a resounding silence. After a suitable pause, I reposted onto MSDN, only to find that Conditional Formatting on list view web parts doesn’t seem to be supported anymore! Please feel free mock me mercilessly if this isn’t the case.

Of course it’s still possible to use it for other purposes, but formatting list views is the major purposes of that feature; it seems kind of pointless without it.

Is SharePoint Designer 2013 dead too?

It may still be early days, but when initially searching around for an answer, I was struck by how hard it was to find any blog posts about SPD 2013 (other than complaints about the Design View). For comparison, with the release of SPD 2010, the community was positively frothing over with articles and praise.

The same was true when posting on the forums: I leapt into the middle of the mainstream SharePoint 2013 river, expecting to be swept away by all the keen Designer users already trying out all the features. Instead I found myself sat in a rather shallow puddle.

So how can we apply Conditional Formatting in 2013?

Instead of wildly speculating on the popularity of SharePoint 2013’s tools, here are a couple of methods for working around the problem:

XSLT: It’s possible to create your own XSLT template by customising the default main.xsl, and then assigning it to the LVWP. I’ve searched high and low for a guide on how to apply conditional formatting using this method, with no success. Please let me know if you’ve seen such a thing.

Buying a solution: Inevitably the vulturous SharePoint software vendors have swept down on SPD 2013’s dying form, hoping to profit from its misfortune…

Oh! On an unrelated note; did I mention a new 2013-compatible version of SharePoint Highlighter has just been released? 😉

Turn A SharePoint Task List Into A Task Master

Date:October 19th, 2012 Author: Tags: , , , , , ,
Category: FilterPoint Web Part, Highlighter, PivotPoint Web Part, SharePoint Alert, SharePoint Planner, SharePoint Reminder, SharePoint webparts Comments:0 ;

Here’s how you can turn SharePoint’s built-in Task list into a powerful task tracking tool, using Pentalogic products.

These are just examples to get you started – we’re only scratching the surface here of what’s possible with our range of flexible SharePoint web parts.

To start, just create a new blank site and add a task list. Here’s one I made earlier:

start

Now just follow our guide for each section (or just the sections you want):

Each section has step-by-step instructions and a screenshot of the configuration to compare against.

Task list: Priority and Due Date highlighting

Uses Highlighter

To make the high-priority and upcoming tasks really stand out, we’re going to add a couple of highlighter columns.

Here’s what you will see on the All Tasks view – coloured flags to show priority, a column showing how long we’ve got left to complete items and a red highlight for things that are overdue.

highlighter_result

hl_priority

Highlight Priority

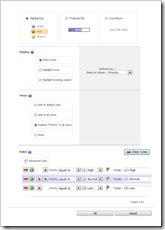
  • Create a new Pentalogic Highlighter column
  • Name the column Task Priority
  • Choose the column type Highlighting
  • Choose Show Icons
  • Click the Default icon, then click Clear
  • Change Base on column to Priority
  • Select Replace ‘Priority’ on all views
  • Under Rules click the Auto-create button
  • Click OK

Due Date Countdown

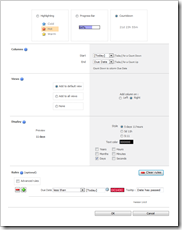
    • Create a new Pentalogic Highlighter column
    • hl_countdownName the column Due
    • Choose the column type Countdown
    • Change the Start option to [Today]
    • Change the End option to Due Date
    • Select Add to default view, on the Right
    • Uncheck all the display options except Days
    • Under Rules click the Auto-create button

Home page: Task calendar overview and summary

Uses Planner

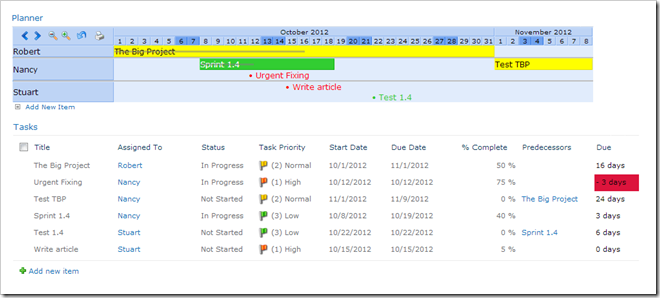
On your site’s home page we’re going to add an at-a-glance overview of your tasks: A view of the task list (highlighted, if you did the previous section) and a task calendar.

Here’s what your home page will look like once we’ve finished:

mainpage

List view

  • Edit the page and add Tasks from the Existing Lists category
  • Edit the web part
  • Change the Selected view to All Tasks (to ensure Highlighter columns are displayed)
  • Click OK

Task calendarplanner_config

  • Edit the page and add Planner v2 from the Miscellaneous category
  • Set the Style to By Category
  • Set the Planner Source to Tasks
  • Set the Start Date to the column Start Date
  • Set the End Date to the column Due Date
  • Set the Category to Assigned To
  • Set the Label to Title
  • Set the Progress to % Complete
  • Set the Period to Auto
  • Change Set colour by column to Priority
  • Assign appropriate Colors to the priorities (e.g. High – Red)
  • Optional: Set a Fxed width under the Appearance section
  • Optional: Set the Font size to Medium

Analysis page: Graphs and granular reporting

Uses FilterPoint and PivotPoint

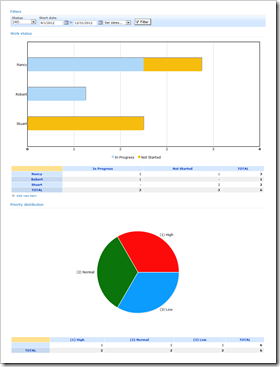
Now we’re going to create an Analysis page to produce some graphs and reporting data from your task list.

You will have an Analysis page that looks like this – showing  charts for each persons workload.

analysispage

Creating the page

  • From Site Actions choose New Document Library (to put the page in)
  • Call the library Pages
  • Set Quick Launch to Yes
  • Set Versioning to No
  • Change the Document Template to Web Part Page
  • Click Create
  • From Site Actions choose More options…
  • Under Page choose Web Part Page
  • Call the page Analysis
  • Change the Template to Full page, Vertical
  • Set the Document Library to Pagespivotpoint_pie_config

Graph and Report: Priority skew

Let’s add a graph to show us if tasks are being raised too often as “High priority”:

  • Edit the Analysis page
  • Add the PivotPoint web part from the Pentalogic.net category
  • Edit the web part
  • Set Display to Both
  • Set List to Tasks
  • Under Columns set Field to Priority
  • Under Chart options set Chart type to Pie
  • Click OK

Graph and Report: Status by Personpivotpoint_stack_config

Next we’ll add a graph to show the status of tasks assigned to everyone. That’ll show us if we have any bottlenecks in the team:

  • Edit the Analysis page
  • Add the PivotPoint web part from the Pentalogic.net category
  • Edit the web part
  • Set Display to Both
  • Set List to Tasks
  • Under Columns set Field to Status
  • Under Rows set Field to Assigned To
  • Under Chart options set Chart type to Bar
  • Set Color mappings to Automatic colors
  • Click OK

Filteringfilterpoint_config

Lastly, let’s add a filtering web part. this will allow us to drill down into our data by selecting certain statuses and date ranges:

  • Edit the Analysis page
  • Add the FilterPoint web part from the Pentalogic.net category
  • Connect the other web parts via the menu (Connections -> Provide filter to)
  • Edit the web part
  • Under Filters click New
  • Change the Label to Status
  • Set the Style to Drop Down
  • Under Get the filter values select From a list
  • Still under Get the filter values, the list Tasks and field Status
  • Under Filters click New
  • Change the Label to Start Date
  • Set the Style to Date Range
  • Set the Field name to From the connected web part and select Start Date
  • Click OK

You can display the page on the Quick Launch menu via Site Actions -> Site Settings and selecting the Quick Launch option under Look and Feel.

Alert page: Configure “Overdue” alerts

Uses Reminder

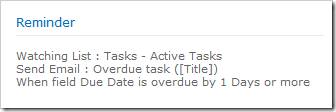
The last step is to configure Reminder to send email alerts to us when tasks are overdue. You’ll need to create the Pages document library if you skipped the previous section, and then continue with the instructions:

  • From Site Actions choose More options… reminder_config
  • Under Page choose Web Part Page
  • Call the page Reminder
  • Change the Template to Full page, Vertical
  • Set the Document Library to Pages
  • Edit the page
  • Add the Reminder web part from the Miscellaneous category
  • Edit the web part
  • Set Watch list to Tasks
  • Under Email to select Assigned To from the dropdown
  • Under Email CC enter the manager’s e-mail address in the text box
  • Next to Subject click “” and enter the following into the popup box:Overdue task ([Title])
  • Next to Message click “” and enter the following:This task is overdue: Title: [Title]
    Due date: [Due Date]
    Priority: [Priority]
  • Under Send When expand Overdue and choose by 1 Days
  • Click OK

You should hen see the following on the page:

reminderpage

You can also setup email alerts to remind you when tasks are due in a few days.

Finished!

Your mundane Tasks list is now an all-singing all-dancing Task Master!

This is just one example of the many possible solutions that can be achieved with our products. Please feel free to browse the product pages below to learn more or take advantage of our 30 day free trial:

Highlighter 1.6: More options, less buttons

Date:October 9th, 2012 Author: Tags: , , ,
Category: Highlighter Comments:0 ;

The next version of SharePoint Highlighter has been released, now with more options and less buttons:

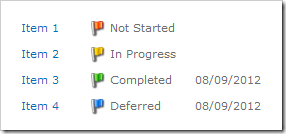
Color category

hl16cc

If you liked Highlighter’s icons, but still wanted to see the column values as well –  now you can!

This is now the default for Icon-based highlighter columns (existing columns will remain unchanged). You can pick and choose which you’d like to see simply by customizing your rules.

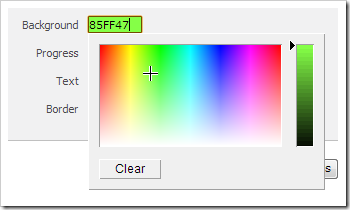
New color picker

hl16cp

Now you can pick colors faster and with greater flexibility, using our new color picker (courtesy of JSColor).

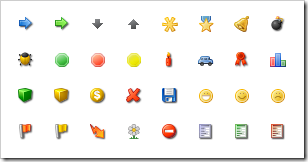
More icons

hl16i

Now even more choice of icons. Above are just a few you can use to make your lists stand out. These include a select few from the famous FamFamFam Silk icon set.

Want more icons? See the “How do I add more icon to the picker” section here: Highlighter Manual: Icon Picker

To upgrade

To upgrade to the latest version without losing any settings simply download and install the latest version.

SharePoint Datasheet FAQ

Date:October 5th, 2012 Author: Tags: , ,
Category: General, Training Comments:3 ;

faqSharePoint’s datasheet is a powerful tool and a source of much trouble: This article is a quick summary of the common problems and their solutions, where possible.

Unfortunately there is rather a lot that is not possible; the datasheet is not like any other part of SharePoint, as it’s produced by an entirely different method. As James Love explains:

Customisations to the Data Sheet View are not supported, as this is generated using the Microsoft Office Access Web Datasheet Component, which renders the grid using the same base engine as the data sheet view that Microsoft Access uses.

So for the vast majority of questions, the answer is simply:

No

This is a list of the common scenarios that are not possible via the datasheet view. Click the numbered links for example questions (and further information):

Can I modify the datasheet using JavaScript/jQuery? [1] [2]

No. The datasheet is not rendered as HTML, so it can’t be edited via JavaScript.

Can I apply Conditional Formatting to the datasheet? [1] [2] [3]

No. The datasheet is not rendered via XSL, so Designer can’t be used to change its rendering.

Can I make my cascading lookup work with the datasheet? [1] [2] [3] [4] [5]

No. Editing Custom Field Types is simply not supported in the datasheet:

In SharePoint Foundation, columns based on custom field types are read-only in Datasheet view.

Can I wrap the datasheet column headings onto a second row? [1] [2]

No. To quote Mr. Hammer: "Can’t touch this."

Can I use the datasheet view with BCS (e.g. External Lists)? [1] [2] [3] [4] [5]

No. The datasheet view is only configured for displaying SharePoint data and sees through the the SharePoint-like veneer provided by BCS.

Can I use the datasheet in Chrome/FireFox/Safari/64-bit IE? [1] [2] [3]

No. The datasheet requires the use of ActiveX controls: These are only only available on 32-bit versions of Internet Explorer.

Yes

Surprisingly, there are many problems with the datasheet that can be solved:

Can I add the datasheet to a different page? [1] [2]

Yes. Simply add a List View Web Part to the page, and edit it to display a view on the list that’s set to show the datasheet by default.

Can set the datasheet to only allow editing (not adding/deleting items)? [1] [2]

Yes. Edit the users’ list permissions so that they only have access to Edit and View Items.

Can I fix the error "The selected cells are read only"? [1] [2]

Mostly. Here are three possible causes of this:

  • Multiline rich-text fields: Switch them to plain text to edit
  • Approval is enabled: Disable it
  • Metadata fields: Not supported

So this isn’t a very good "Yes", but at least there are workarounds for most of the problems.

Why can’t I open the datasheet view? [1] [2] [3]

This appears to usually be caused by having 64-bit Office installed on the client machine. It can apparently fixed by installing the 2007 Office System Driver: Data Connectivity Components according to KB 2266203.

Interestingly, if you happen to not have Office at all (because you’re on a server, or writing an article on your home laptop) you may need to install the Microsoft Access 2010 Runtime instead.

Can I completely rewrite the datasheet view? [1]

Apparently yes (see linked question), although I’m not sure you’d want to.

SharePoint Sandbox Solutions: The Good, The Bad, and The Ugly

Date:July 11th, 2012 Author: Tags: , , , ,
Category: General, SharePoint Development, SharePoint webparts, Training Comments:3 ;

Sandbox solutions are often seen as the cure-all for the worries of installing in-house or third party software on your SharePoint farm; but all is not as it seems.

This article aims to dispel some of the illusions around the safety of Sandbox Solutions, and cut through some of the fluff about what the sandbox should actually be used for and why.

  • The Good: What sandbox solutions do well
  • The Bad: What sandbox solutions don’t protect you from
  • The Ugly: The compromises you have to make to use them

What is a Sandbox Solution?

A Sandbox Solution is just like a normal Farm solution, except that it is deployed to a specific Site Collection (rather than the whole Farm), and has a limited set of tools it can use.

A full listing of what you can and can’t do in the sandbox can be found here:

Sandbox Solution Considerations (section “Capabilities and Elements in Sandboxed Solutions”)
Restrictions on Sandboxed Solutions in SharePoint 2010

It’s just like having a toddler in a sandbox in your garden (or yard): They can build sandcastles and dig holes using the tools you give them, but they can’t play with the chainsaw or ride-on mower you’ve left lying around (or dig enormous holes in your flower beds).

The Good

Sandbox Solutions are prevented from doing many things that could cause security or performance issues on your SharePoint server. Notable restrictions include:

  • No access to the network(s) your server is connected to
  • No access to the server’s registry
  • No access to the server’s filesystem
  • No access to e-mail via SMTP
  • Permissions cannot be elevated

There are also some additional features to help keep solutions in line:

  • Solutions can be installed at the Site Collection level by Site Collection administrators.
  • Resource Usage Limits are applied to solutions and can be monitored and limited by the administrator, preventing faulty or processor-hungry code from overwhelming the server.
  • Solutions can be automatically validated, and known troublemakers can be banned from the entire farm.

Notably, the main benefit to the Site Collection administrator is the ability to deploy their own solutions, but the majority of the other benefits are to the Farm administrator (and/or hosting company); although everyone benefits from the improved system stability these features help to ensure.

The Bad

There are a great many features to help with system stability and the prevention of security breaches; but there are limits to what the solutions are prevented from doing.

You should certainly never deploy untested third-party solutions to the sandbox “without fear of bringing down the entire farm”.

The best example of a danger to stability from within the sandbox is the lack of control over the Client Object Model, mentioned here: Sandboxed Solutions in SharePoint 2010

Pages, Web Parts, and controls that are deployed in sandboxed solutions can include code that runs against one of the SharePoint Foundation client-side object models … Code that runs on the client computer is not subject to any of the code execution or resource usage restrictions.

For example, a solution could contain malicious or badly written code executed via COM that requested all the items in a list an infinite number of times. If embedded into a web part, this would effectively turn the computer of every user that viewed it into a node of a DDoS attack on the server farm.

Rather less dramatically, it’s worth noting that there are no specific restrictions on actively malicious code within a Site Collection. It’s perfectly possible to:

  • Delete sites and sub-sites
  • Add COM calls to export data to an external site (much like Wictor’s data import)
  • Copy data added/edited in lists with item-levels permissions to unrestricted lists

The Ugly

Although sandboxing adds restrictions at every level of SharePoint, the feature wasn’t in the original platform design (in SharePoint 2007). In order to squeeze this feature in, some sacrifices had to be made.

Since there’s no access to the filesystem, the following aren’t possible:

  • Application Pages
  • Visual Web Parts (since they deploy a Control Template)

There are a some compromises due to Split Page Rendering; where sandboxed web parts are rendered separately from the rest of the page in a controlled thread:

  • No Script Manager to output/organise JavaScript
  • No web part connections
  • No access to the page Cache

Similar to the above: Because sandbox solution code needs to run in a controlled thread, the following functionality (that uses separate threads) had to be removed:

  • Workflows containing code
  • Timer jobs

Although most of these compromises are understandable, there are some features that are missing for no apparent reason:

  • You cannot use any of SharePoint’s own web controls (e.g. Date picker, User selection)
  • You cannot hide Custom Actions, or add Custom Action Groups

Conclusion

Sandboxing makes it less likely that you’ll accidentally destabilize a SharePoint farm with broken code, and make it easier to find and deal with trouble making solutions.

It’s also more difficult for malicious code to gain access to anything outside the Site Collection it’s deployed to, and slightly more difficult to destabilize the farm.

However, it doesn’t guarantee safety from either bad or malicious code and there are a large number of compromises to consider. Working around sandbox limitations will add overheads to most development projects, and many solutions will simply not fit into the sandbox model.

For example: FilterPoint and Highlighter are two of our own products that can never be made sandboxable, as they’re based on features that are simply not available in the sandbox.

Edit: Since the publishing of this post, we’ve discovered that sandbox solutions are now deprecated in SharePoint 15; as mentioned in the article SharePoint 2013 preview – Apps or Crapps?.

Opening an URL in a new Window from a SharePoint list

Date:June 22nd, 2012 Author: Tags: , , , ,
Category: SharePoint HTML Calculated Column Comments:2 ;

HTMLCC-logo

A missing feature from SharePoint’s URL column is the ability to open links in a new window. However, our free HTML Calculated Column lets you do this in just a few easy steps.

Step 1: Get the software

Download our software from here: HTML Calculated Column Download

It’s free, but you’ll have to sign up to our newsletter. Don’t like our newsletter? Just unsubscribe. No logins, no e-mail reselling, no spam, no drama.

Just run the installer on your server and you’re done.

Step 2: Create a Text column

Add a simple Text column to your list (not a Hyperlink column). Create it as normal, call it ‘URL’ or something similar, and put an URL in it.

Calculated columns (both SharePoint’s and ours) don’t support Hyperlink columns, so it isn’t possible to use these in the formula below.

Step 3: Create an HTMLCC column

Next is our Pentalogic HTML Calculated Column (catchy name, eh?). Create it as you would a normal calculated column, and put the following formula in it:

=”<a href='”&[URL]&”‘ target=’_blank’>Link</a>”

The part that does the actual new window opening is the “target=’_blank’”, and [URL] is the name of your text column. You can customize the formula however you like; possibly with the help of our Calculated Column Cheatsheet.

When you save, you’ll see our cautionary malicious code warning. If you have users you don’t trust able to add/edit items in this list, then… well… sack them (or have them sacked). Then tick the box and click OK.

And while we’re here…

The “[?]” link to our site in the column title has been removed: We heard how annoying it could be, so we got rid of it.

Just upgrade to the latest version (1.3) to update your existing columns.

Let us know what you think of our free SharePoint tools and our other SharePoint web parts: [email protected]

TeamTime just went up a gear

Date:May 16th, 2012 Author: Tags: , , , , ,
Category: SharePoint TeamTime, SharePoint Timesheets Comments:0 ;

We’ve added some new bells and whistles to the latest version of TeamTime:

  • Add your own columns to the timesheet (Custom Columns)
  • Pull data from multiple TeamTime sites in to a single place (Overview Site)

Custom Columns

You can now add and reorder columns on the timesheet on your TeamTime homepage. For example, you can add Cost Center codes to record where the time is chargeable to:

tt_cc_example

This data can then be used to produce Reports and Analysis within TeamTime. It can be accessed via our extensibility lists to integrate with other systems in your organisation.

Here are some other useful columns you could add:

  • Overtime flag
  • Chargeable client
  • AM/PM

For more information see our Custom Column Guide.

Overview Site

Since there is no limit to the number of TeamTime sites you can have, we encourage creating smaller sites with fewer users. We’d recommend about 10-20, and certainly less than 50.

Having several small sites keeps it easier to use, as Marketing isn’t tripping over Development’s tasks, and the approvers don’t waste time trying to figure out who the heck “David Jones” is.

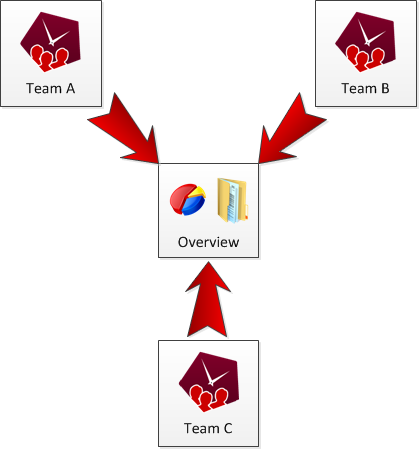
The next question is of course “How do I consolidate the data from all those sites into one place?”, and the answer is to use an Overview site.

Overview

Simply create an Overview site exactly as you would a normal TeamTime site, and pull the data from all your sites in the site collection into one place.

The Reports and Analysis are in the same familiar location and layout, with direct access to the consolidated list data as a bonus.

For more information see our Overview Site Guide.

Try it out!

Give our 30 day free trial a go:

If you’ve trialled TeamTime in the past, just ask us for a trial extension: [email protected]

If you’re upgrading from an earlier version, please see the following: v1.4 Upgrade Notes

10 things developers should know about SharePoint

Date:May 4th, 2012 Author: Tags: , , , ,
Category: Community, General, SharePoint Development, Training Comments:1 ;

Many developers walk into the world of SharePoint unaware of the strange and interesting journey of discovery they’re about to begin.

It’s often difficult to know where to being, so here’s the top 10 most useful things I’ve learned since I joined Pentalogic back in 2010.

Pitfalls

1. Know your Editions
2. Don’t even look at the database
3. Get to know the front-end
4. Dispose of your disposables

Building your Knowledge

5. Learn the language
6. Get a good book
7. Love the MSDN documentation
8. Find a SharePoint community that suits you

General advice

9. Learn to live with CAML
10. Remember that SharePoint is enormous
Conclusion

1. Know your Editions

SharePoint comes in many flavours, each of which has it’s own features and shortcomings. Here’s a quick run down of the notable versions:

Release Cheap Expensive MS Hosted
2007 WSS3 MOSS BPOS
2010 Foundation Standard/Enterprise SharePoint Online
/ Office 365

It’s useful to get to know these for when you’re searching for solutions, as you’ll sometimes come across those that are edition specific (e.g. the Standard Edition’s ContentIterator class for querying large lists).

There are few things more frustrating than finding the perfect solution, and then discovering you have the wrong Edition.

2. Don’t even look at the database

To those new to SharePoint this is entirely baffling: Why wouldn’t you want to get data from the database? There are two good reasons for this:

a) Microsoft is very touchy about their database. They will not support any installation with software on it that modifies the SharePoint database.

b) The structure will give you nightmares. At some point in almost every database developer’s career they say: “Why don’t we abstract the table structure, and just have one massive generic table of text data?”

They’re then hit in the head by whatever small throwable object happened to be nearby, and their colleagues point out that although it would be very flexible, it would also be fantastically slow and unwieldy.

Unfortunately either the SharePoint team operated a clean desk policy, or they put an extraordinary value on flexibility, and the result is lurking in the darkness of the SharePoint database.

3. Get to know the front-end

It’s very tempting to dive straight into the code side of things, but when you’re trying to orientate yourself in the API it helps to have a good understanding of what you’re looking at from the front-end.

It’ll also give you a good feel for the site’s design, and hence what sort of layout the users will expect to see.

Many of the actions you perform in code will correlate to actions in the front-end, as well as the structure.

For example, to find a particular list’s view in the front-end, you would:

  • Open the site using the URL
  • Open the sub site
  • Select the list
  • Select the view

The code version of which is very similar in structure and information needed:

    using (SPSite site = new SPSite(http://site))
     {
         using (SPWeb web = site.OpenWeb("subsite"))
         {
             SPList list = web.Lists["List name"];
             SPView view = list.Views["View name"];
         }
     }

4. Dispose of your disposables

Some SharePoint objects (in particular SPWeb and SPSite) won’t automatically dispose of themselves when they’re no longer used. If you’re unaware of this, then you may easily run into post-deployment problems caused by the ensuing memory leaks.

The code in the previous section shows one method of dealing with this problem, and here is Microsoft’s advice on the subject: Disposing Objects

Interestingly, you shouldn’t always dispose of these objects; for example you shouldn’t dispose of  SPContext.Current.Web. As a general rule of thumb:

If you made it, dispose of it. If you were given it, leave it.

5. Learn the language

There is a huge amount of SharePoint-specific terminology, and some of it can be inconsistent and often misleading. For example, a Site Collection is an SPSite object, but a Site is an SPWeb object.

Another example that caught me off guard at first was that there’s a difference between the Object Model (the server-side SharePoint API) and the Client Object Model (client-side API). Whereas I was under the impression that one was an abbreviated form of the other.

Microsoft has published an enormous glossary, which seems to cover quite a lot of it: Glossary for SharePoint 2010. Although as with any jargon or language, most of it is learned along the way.

6. Get a good book

A good reference guide is infinitely more useful than an enormous glossary when getting to know the components of SharePoint. It’s vitally important that you get an overview of all of these components, to avoid inadvertently reinventing the wheel.

There are two I can personally recommend (having read them both cover-to-cover):

Building the SharePoint User Experience (Furuknap): Written for 2007, but still covers the mainstay of SharePoint. An easy and interesting read: If you’re quickly bored by dry textbooks, then this is definitely the book for you.

Inside Microsoft SharePoint 2010 (Various): A good follow-on from Furuknap’s book. A solid foundation of 2010 knowledge, and a good one to refer to now and again. Don’t start with this book though, or you’ll find yourself climbing a pretty steep cliff.

As your SharePoint knowledge grows, revisiting the books can also be quite useful. Parts you may have glossed over previously will suddenly start to make more sense, and you may find some useful tips you missed first time.

7. Love the MSDN documentation

Having developed and worked with a great many third party APIs and interfaces in the past, I can say with considerable confidence that the MSDN documentation is phenomenal.

Every class, method, and property is documented. Even the most obscure properties have at least a placeholder page, which in itself offers more information than many specifications. On top of this is the community comments on each page add clarification and often links to useful related articles.

However, there are two minor shortcomings. The first is that the background documentation (such as “Disposing Objects” mentioned above) is usually painfully boring to read and often skims around subjects rather than getting to the point.

The second is that the CAML documentation is very bizarrely structured: Elements used for almost completed different things share the same page just because they have the same name. There is also missing documentation where the CAML is more obscure, such as the elements used in SPWeb.ProcessBatchData().

8. Find a SharePoint community that suits you

Sometimes no amount of Googling or searching of MSDN’s documentation will find you the answer to the problem that’s been bugging you. In these circumstances it’s good to have a community of like-minded SharePoint developers to help you with your problem.

Being an active member of a community will also help you to expand your knowledge of SharePoint in general.

Here are a couple of the more notable SharePoint developer-friendly communities:

I’ve previously discussed the differences between the two in the following article: SharePoint Questions: MSDN versus Stack Exchange

9. Learn to live with CAML

Collaborative Application Markup Language (CAML) is another example where flexibility seemed to take precedence over usability. In certain circumstances you’ll be forced to write unserializable and poorly validated XML to perform seemingly simple tasks, such as importing comparatively small quantities of data (a few thousand rows).

However, it isn’t all bad: As I mentioned, CAML does allow a great deal of flexibility, and also has very easily readable syntax. The core resource for CAML can be found here: Collaborative Application Markup Language Core Schemas

When querying data you can avoid CAML by using LINQ, which is reputedly faster and easier to use. If you have no fear of CAML (or are working on 2007), the following tool may be of use to you: U2U CAML Query Builder

P.S. While we’re talking about tools, I should mention the extensive and impressive list of SharePoint development tools found here: List of SharePoint 2007 development tools

10. Remember that SharePoint is enormous

It’s important to bear in mind that SharePoint is a mind bogglingly large framework, with dark corners that even the SharePoint Development Team themselves haven’t visited in years.

This is important because occasionally you’ll find an area that’s poorly documented or has strange known issues, and it helps to have a little perspective on the scale of the system you’re dealing with.

You also need to be aware that there’s an awful lot you don’t know, and some of which you may never know. Getting a good overview of the components is essential. I wouldn’t recommend designing a project to use a component (such as a Custom Field Type or Site Template) until you’ve at least made a prototype in that area; to appreciate the depth of what you’re tackling.

The variety of customizable components in SharePoint also means that there is almost always more than one solution to a problem, as you can see in some of my previous posts: How to do list highlighting in SharePoint

Conclusion

The first challenge in SharePoint is discovering the existence of all the things you don’t understand yet. Once you’ve got a vague idea of all the different components, then you can really start to learn what each is about.

To borrow Mr Rumsfeld’s turn of phrase: Once all your unknown unknowns are known unknowns, you can start learning known knowns.

SharePoint TeamTime 1.3: Unlocking the Toolbox

Date:February 8th, 2012 Author: Tags: , , , ,
Category: SharePoint TeamTime Comments:0 ;


SharePoint TeamTime (our time tracking software for SharePoint) has been upgraded with shiny new extensibility features, to make integrating it into your organisation even more seamless:

  • Get raw timesheet data
  • Import and export Projects and Tasks
  • View Approval logs
  • Attach workflows

All you have to do to install or upgrade is download and run the new installer, which will automatically upgrade any existing sites:

SharePoint TeamTime Download

What’s in the upgrade

Access to the lists used in the internal workings of TeamTime. Below is a short description of each list. More information is available on the Extensibility Manual Page

Timesheets List

This list is a read-only copy of the main Timesheet list, which allows you direct access to the data your users record. Once a timesheet is approved, its entries will be copied across to this list.

This allows you to generate your own custom reporting and to integrate TeamTime’s data into external applications.

Project and Task lists

You can now view and edit the Project and Task lists directly. Using the Datasheet view on these lists will allow you to bulk import your existing Projects and Tasks, and to quickly edit or extract data.

These lists can also be used with third party list synchronisation software, to keep TeamTime’s data in line with your data in lists elsewhere. Or alternatively workflows can be attached to these lists, and used to push changes elsewhere.

Approvals list

Now you can see who’s approving what and when; especially useful when self-approval is enabled.

You could also attach a workflow to this list to perform actions on approval: For example, letting users know when their timesheets have been approved.

Free HTML Calculated Column for SharePoint

Date:January 11th, 2012 Author: Tags: , , , ,
Category: Highlighter, SharePoint HTML Calculated Column Comments:0 ;

logo-wordy

A free calculated column for SharePoint 2007 and 2010 that allows you to display HTML: SharePoint HTML Calculated Column

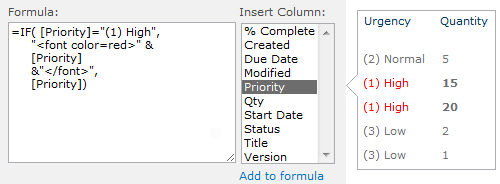
html-formula2

Why did you make this?

I spent a long time working on SharePoint Highlighter, and then later unsuccessfully trying to make a [Today] Calculated Column. During both these projects we kept coming back to this glaring hole in SharePoint: You can’t use HTML in a calculated column.

After unsuccessfully looking for open source projects (or even commercial alternatives) for some time, the only solution I could find was Christophe’s JavaScript workaround using a normal calculated column and a Content Editor Web Part. A nice solution, but unfortunately not without its drawbacks.

So when it came to deciding what I wanted to do in my 10% time, the answer was clear.

Having listened to me rant, rave, swear, and finally give up and denounce all Custom Field Type development (at least once a week during Highlighter, and several times during the [Today] incident), Ryan’s reaction to my choice of project was a typically understated “I’m… surprised?”.

So during the TeamTime project I spent my Friday afternoons creating the first of hopefully many pet projects from us at Pentalogic: SharePoint HTML Calculated Column

htmlccss

How is this different to Christophe’s solution?

Using the SharePoint HTML Calculated Column avoids the need to add Content Editor Web Parts (containing JavaScript) to every page you want the HTML to be displayed on.

Adding the CEWPs can be a bit of a chore in some cases, and are vulnerable to being accidentally broken by end users editing the pages. They can also be lost on 2007 to 2010 upgrades.

However, HTMLCC requires that a System Administrator install it on the SharePoint server; which in many organisations is a real pain in the ears. Whereas Christophe’s solution can be implemented by most power users.

Isn’t this the same as Highlighter?

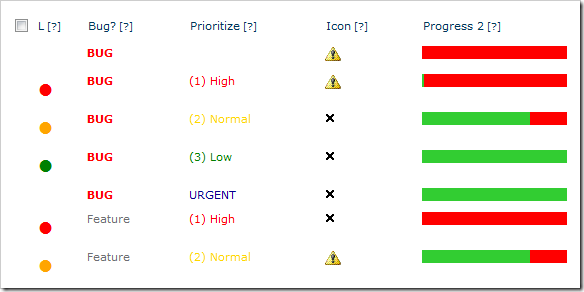
SharePoint Highlighter offers quite a lot more than this solution on it’s own. I won’t go into enormous detail, but here’s a sample of what Highlighter offers over the HTML Calculated Column:

  • Row highlighting
  • Countdowns
  • Conditional formatting
  • Built-in icon library

Most notably, all of this is offered through a polished and intuitive interface.

Finally

So, you get to plug the hole in SharePoint that’s bothered so many people over so much time, and we get to plug SharePoint Highlighter whenever we mention it. Everybody’s happy. Smile