New version of SharePoint Reminder – corrects a problem caused by Chrome v37

Date:October 27th, 2014 Author: Tags: , , , ,
Category: SharePoint Reminder Comments:0 ;

A new version (1.9.6) of Reminder for SharePoint which enables date based email Alerts  is available.

The main change in this version is to make it compatible with Google Chrome v37. Controversially Google removed a feature (showModalDialog) that has been included in most browsers since 1994 and is still part of the latest HTML5 specification.

We’ve also added

  • Improved compatibility with custom master pages or other controls that use jQuery and the ability stop reminder including jQuery on a page that already has it. (options under the Support tab).
  • Reduced storage requirements for state data to support large lists
  • Configurable Web Part processing timeouts (for large lists)
  • A correction to an error that occurred if you use List and View name with angle brackets in the title.

To upgrade simply download and install the latest trial version – your license key will be picked up during the upgrade and all your settings will be saved.

Warning – Once you’ve upgraded to v1.9.6 or above you can’t rollback to a version older than 1.9.6.

SharePoint – wildcard / free text searching the List View web part

Date:May 30th, 2014 Author: Tags: , ,
Category: Filter, FilterPoint Web Part, SharePoint Development Comments:8 ;

It’s a common requirement to be able to do wildcard free text searches on SharePoint lists.

Whilst you can’t do wildcard or complex Boolean search (that’s what the search system is for) you can get close with a contains search. Thus searching for “Acme” will return “ACME Construction” and “Big ACME Rentals” but not “Rent-A-Crane”

It’s not easy though, and does require SharePoint Designer and a Filter Provider such as our FilterPoint product.

Filter Providers and Filter Consumers.

In SharePoint you have

  • Filter Providers (like FilterPoint or SharePoint Enterprises own filter web parts)
  • Filter Consumers (like the List View web part or other web parts such as our PivotPoint).

The Filter Provider sends the filter you’ve entered (e.g. “Customer” and “Acme”) but it’s entirely up to the Filter Consumer what it does with that filter.

This means that if you want to do things like Date Ranges, wildcard filtering using “Contains” operations you have to set those options on the Filter Consumer.

Our products (PivotPoint, Planner etc) have options to allow you to easily set what to do with the incoming filters, but SharePoints built in List View web part does not.

Using “Contains” filters to do free text search in FilterPoint.

We’re going to use SharePoint Designer to setup Parameters and Filters in the List View Web Part (LVWP) so we can do wildcard type filtering.

(It’s a limitation of SharePoint that you can’t do this without SharePoint Designer – sorry!)

First go to the web part page that has your list (or create a new, empty web part page and add your list to it).

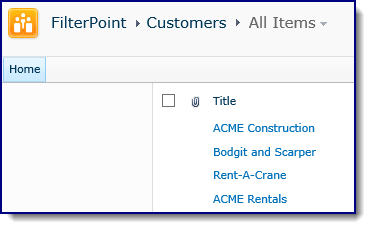
In our example we’ve got a list of Customers with the customer name in the Title field.

Customers List

  • Open this page in SharePoint Designers edit view.

(Depending on what type of page this is will invoice different steps – see these tips for more help on using SharePoint Designer or the online manual for SharePoint Designer)

SharePoint Designer List Parameters

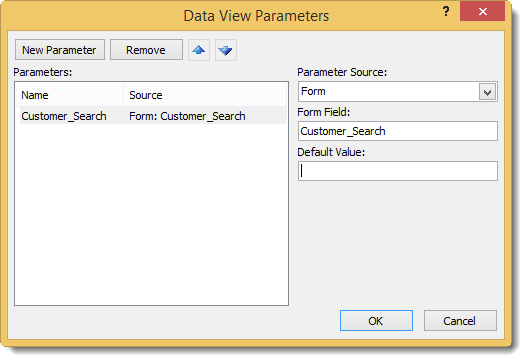
  • In the Data View Parameters window :-
    • Click New Parameter,
    • In the Name box put Customer_Search.
    • (You can use whatever name you want here but it needs to be consistent across the next few steps, also note an underscore, no spaces!)
    • Change Parameter Source to Form
    • Change Form Field to Customer_Search
    • Click OK

SharePoint Desinger - add parameter

  • Now select Filter from the Ribbon (top left of the edit page view) to open the Filter Criteria window

SharePoint Designer - filter criteria

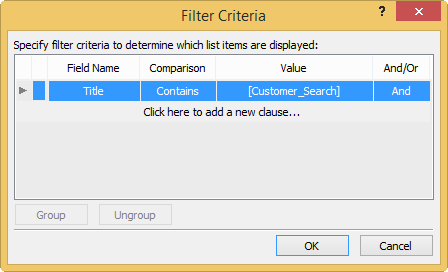
  • Choose
    • The field name you want to filter on – in our case the customers’ names are in the Title field.
    • Set the Comparison operator to Contains (this means that searching for ACME will return “ACME Corporation “or “Big ACME rentals” etc.)
    • Set Value to be the parameter we created above – Customer_Search.
    • Click OK

We’re done with SharePoint Designer (SPD) now so you can hit save and close SPD.

Open the page you’ve been working with in the browser – notice that the list won’t be displaying any results as we’re not passing in anything to our Contains Parameter.

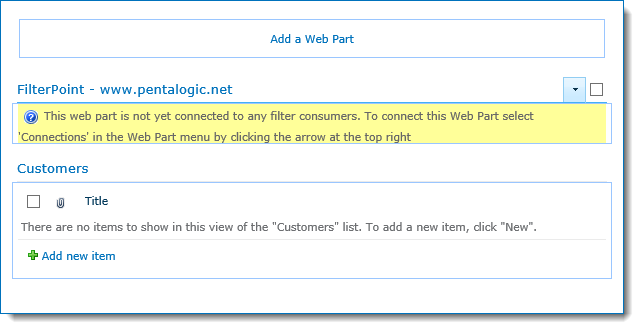
Edit the page and add the Filter Point web part (or another FilterProvider web part of your choosing)

FilterPoint web part added

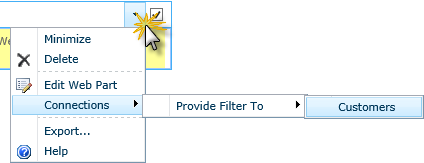
  • Select the Web Part menu (button on top right highlighted) and then Connections > Provide Filter To > Customers (or whatever your list is called.

Connect FilterPoint to customers list

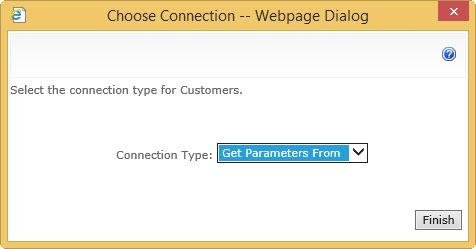
  • On the next dialog box select Get Parameters From and then Finish

Web Part Connection get parameters from

  • Right – we’ve added a Parameter and a Contains Filter to the List view and connected the FitlerPoint web part to the List View, nearly there!
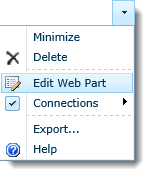
  • Next open FilterPoint’s configuration toolpane

FilterPoint - edit web part

    • Select New and enter a label such as Customer
    • Set the Filter Style to “Free Text”
    • Set the Field Name to From the connected web part and choose the parameter that you set above – in our case Customer_Search.
  • Click OK and you’re finally done.

(For more info on configuring FilterPoint see the manual)

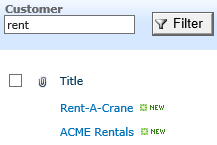
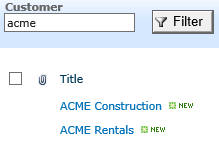
Searching for “acme” or “rent” will now return any customer that has that string in their name :-

search rent search acme

A couple of points to note :-

  • You can’t do complex searches like “acme AND rent” or “Rent*Crane” – just Contains or Begins With searches.
  • If you want to setup additional filters then once you’ve connected the web parts in “Get Parameters” mode (rather than the normal “Get Filter Values” mode) you will have to repeat the above steps to create Parameters and Filters in the List for each filter. It’s a pain but a limitation of SharePoint.
  • If you do add additional Parameters and Filters be sure to set the And/Or operator correctly – for most use cases you will want And.

#

SharePoint Designer 2013 – How to modify List View web part filters and parameters

Date:May 30th, 2014 Author: Tags: , , ,
Category: Filter, FilterPoint Web Part, General, SharePoint Development, SharePoint Ideas Comments:18 ;

SharePoint Designer is especially useful for things like setting up complex filters and parameters for List View web parts like ‘wildcard’ searches and ‘before or after a date’ filters.

In SharePoint Designer 2013 (SPD 2013) the “Design View” was (controversially) removed so now it’s a little harder to use as you have to wade through some X/HTML soup. There is also a bit of a wicked bug that’s going to trip you up as well so in this post I am going to give a few tips on how get to the Parameters and Filters options in the ribbon menu.

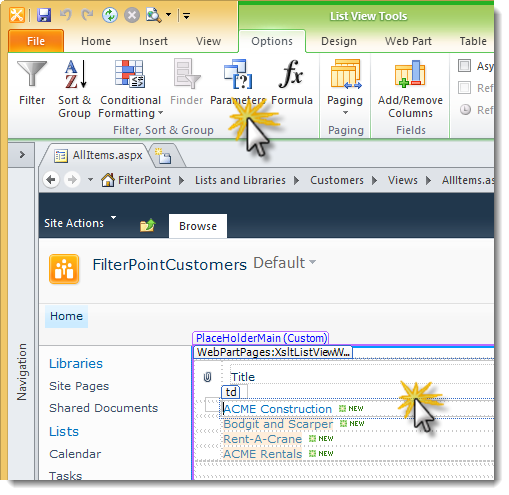
SharePoint Desinger 2013 - Filter and Parameters

Note –this post is NOT a tutorial on how to use SharePoint Designer (its complex and worth a whole book in itself) but just a few tips for those already familiar with using SPD on how to do use the 2013 version. It won’t put back all you’ve lost, just allow you to access the Parameter & Filter options.

Missing Designer View and finding the List View Web Part

When you edit a page the most obvious difference in SPD 2013 is that you don’t get a Design View (the WYSIWYG view that allows you to see how the page will look whilst editing it). Instead you’ve only got the code view and you’re going to have to work through some angle bracket gibberish!

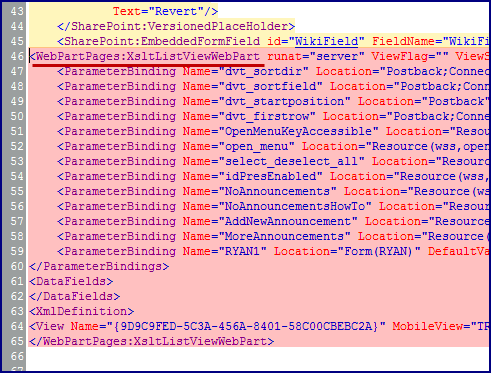
You’re looking for the code that defines the list view – it starts with <WebPartPages:XsltListViewWebPart and ends with </WebPartPages:XsltListViewWebPart> (pink in the pic here).

SharePoint Designer 2013 - how to find List View Web Part LVWP in code view

But save your eyes! Just search (CTRL+F) for XsltListViewWebPart! If the cursor is between the two XsltListViewWebPart tags then this is the same as clicking on the List in the old Design / Split view.

(If there are more than one List View on the page you will have to figure out which is which by the position of the web part in the page or look for the URL listed in TitleUrl, DetailLink or Url)

Getting the List View Tools options to show in the Ribbon

After putting the text cursor (or clicking) in the code that makes up the List View web part the ribbon should show the List View Tools option.

Except… there is a wicked bug in SPD 2013 at the time of writing that means the Ribbon doesn’t update to show the Options menu (unless you’ve turned off Server Rendering).

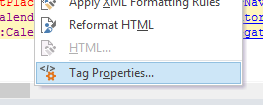
The trick (given to me by MdMazzotti) is to right click on XsltListViewWebPart then select Tag Properties and then click OK without clicking anythingSPD - Tag PropertiesYou will now have access to the List View Tools > Options ribbon and the Filter and Parameters button (see picture at the top of this page) SPD - Web Part Properties

You can view these steps in a video :-

Unable to display content. Adobe Flash is required.

Add Highlighting & Conditional Formatting to PivotPoint tables

Date:March 12th, 2014 Author: Tags: , , , , ,
Category: PivotPoint Web Part, SharePoint Ideas Comments:1 ;

Our PivotPoint web part for SharePoint allows you to summarise data from your SharePoint lists in a similar way to Excel’s Pivot Tables and Charts.

A few users have asked how you can add highlighting or conditional formatting to the Pivot Tables – to do things like highlighting the High Risk column, or any cell above a certain value.

We have a Highlighter app that allows you to do this on normal Lists but it doesn’t work with PivotPoint so I thought I would put together some examples of how you can do this using every SharePoint hackers favourite tools – JavaScript and jQuery.

You will need some experience with programming and/or JavaScript to be able to modify these examples to do what you want but there are lots of comments in the code to help.

If you’re looking for an easy way to add conditional formatting/ highlighting for SharePoint Lists then check out Highlighter.

So lets get started. The files you need for the article can be found in a zip file here. Inside you will see a test .html page that can be used just to experiment with the javascript and a .js.txt file that contains the javascript to use on your site.

Adding JavaScript to a page

The first thing we need to know is how to add JavaScript to a page. Read up about that and come back!

In SharePoint 2013 you can add a Script Editor web part (under Media and Content). This blog post walks you through.

For SharePoint 2010 and 2007 you have to use the Content Editor web part (CEWP)

You could use the Source View of the CEWP and put the JavaScript directly into it, but you could also staple your tongue to a door and it will probably be less painful!

A much better way is to save the script as a .txt file in a document library and then include the file on the page with the Content Editors “Content Link” feature. Christophe walks you through this method here.

jQuery or not?

The examples given here use jQuery – a great addition to JavaScript that simplifies many common tasks.

You could adapt these ideas to run without jQuery if you like – but you’re on your own with that!

You can see the reference to jQuery on the first line of the example scripts.

One thing you should determine is

a)      Has jQuery already been added to all your SharePoint pages (by an administrator adding them into a custom master page)? If so then you should remove the jQuery reference from these examples as there is no point in including it twice.

b)      These jQuery files are loaded from Googles CDN servers. If you don’t have external internet access you will have to copy jQuery to some other location (such as a document library).

Show me the examples already!

Download and unpack these zip files – inside you will see

.htm files that you can experiment with.

Open them in a browser to see what they look like. Open them in a text editor like Notepad to change how they look and then re-load in the browser (F5).

.js.txt files that you can use in SharePoint.

Use a text editor to copy the changes you’ve made in the example .htm file in and then add them to the page that you have PivotPoint on using any of the methods in “Adding JavaScript to a page”.

The two examples are :-

Highlighting PivotPoint cells based on the value

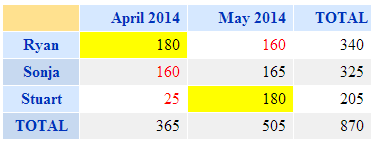
The first example we’re going to look at is to highlight different cells depending on the value that’s in them.

For our example –

  • If it’s less than or equal to 160 then we want the text in red
  • If it’s more than or equal to 180 then it should have a background in yellow.

The result should be a web part like this.
highlight-by-cell-value

There are plenty of comments in the JavaScript source code but basically what it’s doing Is looping through each cell in the PivotTable, checking what value It is and applying a CSS style.

See the source of highlight-by-cell-value.html and highlight-by-cell-value.js.txt in the ZIP file


Highlighting PivotPoint based on the row and column

In this example we’re looking to highlight a cell based on what Row and Column it appears in.

E.g. in this risk matrix we want to highlight the “High Risk” and “Frequent Probability” in red.

risk-matrix

There are two ways to do this in the javascript example given.

The first is to highlight based on the position, e.g.

highlightCellByIndex(0,0,'background','red');

Will highlight the cell in column 0, row 0 by setting the background red. (Yes sorry, the rows and columns start from number 0!).

But – if the layout of your table changes in future (e.g. someone adds a “Super Extra High Risk”) column) then everything will move and this will be in the wrong place.

In that case the better way is to highlight by the value of the Column and Row headers – e.g.

highlightCell("Rare","Low", 'background','red');

See the source of highlight-by-column-and-row.html and highlight-by-column-and-row.js in the ZIP file

Tips –

  • When making changes to the javascript do a small amount at a time, then you will know where to start if this doesn’t work!
  • You’re not just limited to setting colours, you can also add in any other effect possible in CSS.
  • Use the developer toolbar (F12 in IE and Chrome) if you have an error – this tool will enable you to track it down, but how to use it is beyond the scope of what we can show here!
.css('font-weight','bold');
.css('font-size','200%');
.css('border','1px solid red');
  • You can also add images (e.g. flags)
.append("<img src='some-url-to-an–icon.gif'>");


Disclaimer – these technique is provided as is and free of charge to get you started. You will need some experience of JavaScript or programming and the browser developer tools to modify these to do exactly what you want. Whilst we can’t provide technical support for this we will endeavour to help customers with active Premium Support and Maintenance contracts in place for PivotPoint.


Free online SharePoint conference – SP24

Date:January 24th, 2014 Author: Tags:
Category: Community, SharePoint Ideas, Training Comments:0 ;

The team over at SharePoint-Community.net are organising their first on-line conference – SP24.

It runs on Wednesday 16th April, 2014 from 10pm GMT for 24 hours.

There are two tracks – Business and Technical focused and each track has one session per hour. There are some great speakers lined up already and more being voted in by the community.

Its totally free to attend – just hop on over and register.

Key Facts

  • Free for all attendees.
  • It’s entirely on-line – so you won’t need to leave the office or home!
  • Takes place on 16th April 10pm GMT.
  • Lasts for 24 hours.
  • Famous speakers from all over the world.
  • Keynote from Bill Baer (Senior Product Manager, Microsoft).
  • Comprises of 2 tracks, (business and technical).
  • 48 Live sessions + on-demand sessions.

Find out more and register at https://www.sp24conf.com/

New Office 365 App for Reminder 365

Date:November 21st, 2013 Author: Tags: , , ,
Category: Reminder 365, SharePoint Alert, SharePoint Free Tools, SharePoint Online / 365 / Cloud Comments:1 ;

You can now use Reminder 365 (which provides overdue/customisable alerts for Office 365) by installing our new free app from the Office 365 App Store:

installapp

This makes getting started with Reminder 365 even easier than before!

How do I use it?

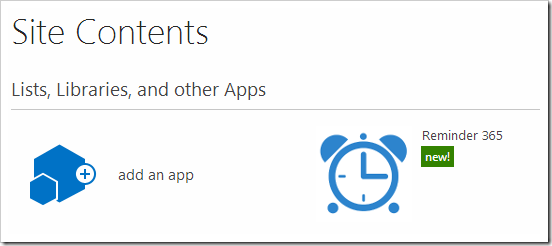
Once you’ve installed the app, you can either click the app icon under Site Contents:

sitecontents

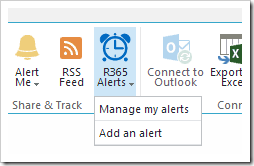
Or you can add/view alerts directly from your list or library:

ribbon

What are the benefits?

Instead of creating an account, verifying your e-mail address, and entering your O365 login credentials, you can just install the app on your site (or site collection).

Clicking the app automatically authorises R365 to send alerts from your lists on your behalf – no account to setup and no passwords to remember.

Try it out!

Install the Reminder 365 app and try it out using your free account:

installapp

TeamTime 2: SharePoint time tracking reborn

Date:July 24th, 2013 Author: Tags: , , , ,
Category: SharePoint TeamTime, SharePoint Timesheets Comments:0 ;

SharePoint TeamTime version 2 has just been released! Time tracking in SharePoint is now a faster, cleaner, and more customizable experience.

Here are some of the features you’ll see in this new version:

  • A brand new theme
  • Archiving old data
  • Settings for individual users
  • and more …

New Theme

We’ve worked with our designers to produce a simple clean interface to keep the focus on what matters: Tracking and reporting on your teams’ time.

Archiving

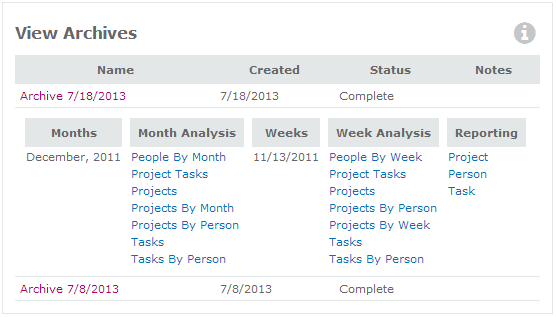
Old data slowing your site down? Archive it away to improve performance. Don’t worry, you can still view the archive’s Reports and Analysis, as well as pulling it into an Overview site.

User Settings

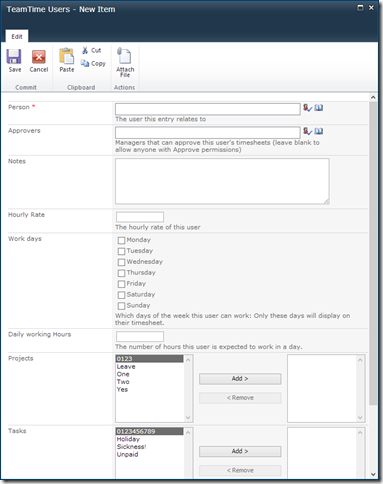
Different people work on different projects, have different working days or hours, and different approvers. Now you can configure all these settings and more on a per-user basis.

tt_users

More!

Here are some more of the new features we’ve added:

  • Cost Reports: View and export detailed reports on your teams’ costs
  • Change the week start: Don’t start work on a Monday? Now your site can match your working week.
  • Dates on the timesheet: Avoid confusion by displaying the day’s date on the timesheet
  • Hide custom columns: Don’t want to see a custom column in a certain site? Now you can hide it.

Try it out!

Give our 30 day free trial a go:

How do I upgrade?

If you’re already using TeamTime version 1 and have Premium Support, then upgrading is simply a matter of installing the new version and sending us your new Installation Code (as well as your old License Key).

Similarly, if you have purchased TeamTime version 1 in the past 90 days, then we’re happy to upgrade you free of charge.

You can contact us at support@pentalogic.net

New version of FilterPoint web part for SharePoint – configurable date ranges

Date:July 20th, 2013 Author: Tags: , ,
Category: FilterPoint Web Part Comments:0 ;

A new version of our FilterPoint web part for SharePoint is available – v1.3.3

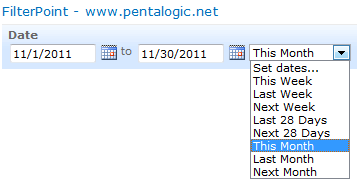
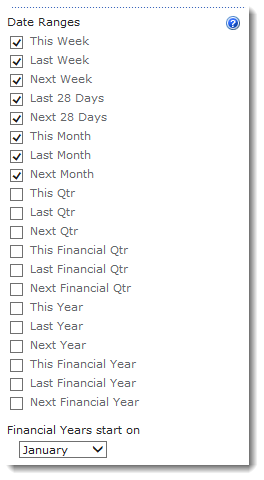
This new version adds a configurable Date Range control.

More details are in the online manual.

You can download and upgrade to the latest version without losing any settings.

New version of PivotPoint – chart axis controls

Date:June 13th, 2013 Author: Tags: , ,
Category: PivotPoint Web Part Comments:0 ;

A new version of our PivotPoint web part for SharePoint is available – v 2.4.4

This new version adds options for manually controlling the scale and layout of the axis in charts.

Auto Scale

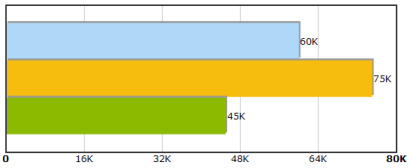
If you show values on the graph the Auto Scale option will scale large numbers to improve the display. For example 10,500 will be shown as 10.5K and 50,000,000 will be shown as 50M

pivotpoint-auto-scale

Axis Maximum & Number of Division Lines

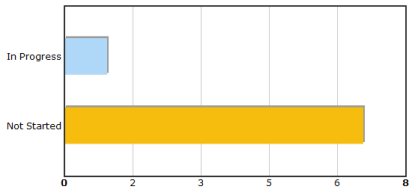
Normally the maximum value on the axis and how many division lines are used is set automatically based on the data you’re charting. However with some settings – particularly small numbers it doesn’t always get it right. For example :-

pivotpoint-auto-axis

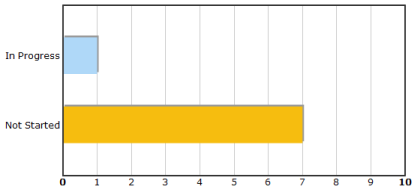
You can now manually specify these settings, in this example the axis is set from 0 to 10 with 10 division lines giving divisions at every exactly 1 intervals for a much better looking chart.

pivotpoint-manual-axis

More details are in the online manual.

You can download and upgrade to the latest version without losing any settings.

.

Contract renewals in Office 365

Date:April 30th, 2013 Author: Tags: , , , , , ,
Category: Reminder 365, SharePoint Alert, SharePoint Online / 365 / Cloud Comments:0 ;

Reminder 365

Remembering to check when contracts are up for renewal can be a chore. Instead of waiting for someone to nag you about it, beat them to it with your own monthly reminder e-mail.

Here’s how you’d set it up

Select your list and view:

Choose list

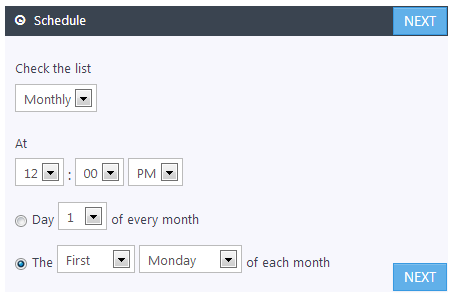
Then choose when you’d like the e-mails sent. Here we’ve set them up for the first Monday of each month:

Pick schedule

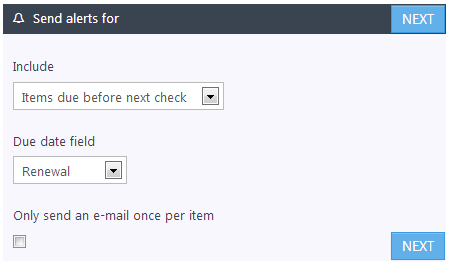
Next choose “Items due before next check” and the column with the renewal date in. This will send e-mails for renewals due this month:

Send alerts for

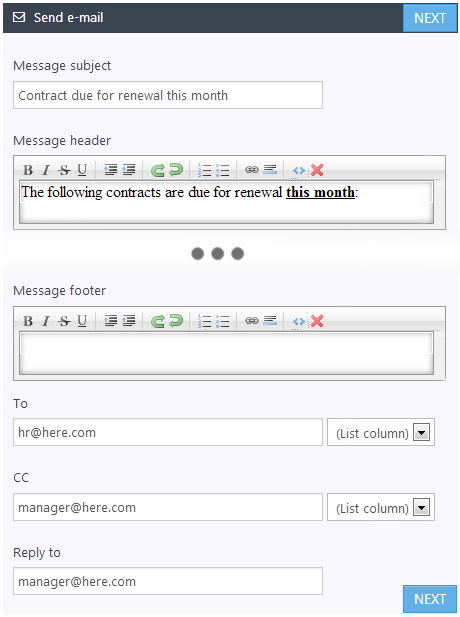
Give the e-mails a subject and some explanation in the header. We’ve chosen to end the e-mails to HR and copy in the manager:

Email

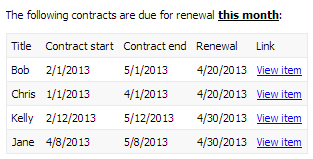
Give it a name, save it, and that’s it! Reminder 365 will start delivering e-mails like this every month:

Example email


signup