Archive for the ‘Highlighter’ Category

Finding where Highlighter is used in a SharePoint site

Date:June 20th, 2019 Author: Tags: ,
Category: Highlighter, SharePoint Development, SharePoint HTML Calculated Column Comments:0 ;

Highlighter allows you to easily apply conditional formatting to your SharePoint lists.

A customer recently asked us how to find out where it had been used (which sites, lists and columns).

We wrote this Powershell script to do just that – but it can be adapted to find any custom field type (or even built in fields with certain attributes like name & type).

Note – it’s commonly suggested on the ‘internets to use the SPField.ListFieldUsedIn method but that will only find where a Site Column has been added to a List, not where a custom field has been directly put into a List column. (see an explanation of the difference between Site Columns and List Columns)

You can download the script here – unzip and open in a text editor for instructions.

Run it from the SharePoint Administration Shell with the URL of your site – e.g.

.\FindWhereHighligherUsed.ps1 https://yoursiteurl/

And it will search all sub-sites and lists and return any fields that use Highlighter :-


The Ultimate Flexible CRM solution for SharePoint

Date:March 5th, 2013 Author: Tags:
Category: FilterPoint Web Part, General, Highlighter, Partners, PivotPoint Web Part, SharePoint Reminder Comments:0 ;

The Ultimate Flexible CRM Solution for SharePoint

SharePoint is the platform millions of organizations use to manage various facets of their businesses.  However, in many cases, SharePoint’s built-in functions do not provide the ease of use and advanced functions that users need to work efficiently and effectively.

Some SharePoint consulting firms will recommend custom-built web parts to provide the necessary functionality required.  Before going this route, companies would be wise to evaluate pre-built applications and web parts to save significant time and money!  Evaluating and sourcing the right products however can be an overwhelming task – and falling prey to vendor hype a common outcome.  This is particularly true with CRM technology (Business/Customer Relationship Management).

Benefits of a 100% SharePoint- based CRM application:

A system that is designed to be highly configurable and evolve with the business’s ability to embrace change is the key to a successful implementation and a higher than average level of user acceptance.

  • Single point of user login where all business related information is stored
  • Maintenance of  sensitive customer data inside a controlled environment
  • Leverages existing technology investment

sharepoint-crm-dashboards

manage-leads-in-sharepoint

sharepoint-crm-outlook-plugin

Designed exclusively for SharePoint, SharePoint CRM by LookOut Software revs SharePoint up with dynamic, flexible and powerful features out of the box – yet is easy to personalize, scale, and upgrade as needed.

Rather than reinvent the wheel, LookOut Software partnered with one of the top Web Part developers in the industry to provide powerful, yet optional, enhanced functionality for its CRM application.

Pentalogic’s Filter Point, Pivot Point, Highlighter and Reminder  web parts enhance and further empower SharePoint CRM with easy to use, flexible and comprehensive interactive Charts, Graphs, Filters, Alerts and more.

Some examples:

filterpoint-sharepoint-filtering pivotpoint-sharepoint-crm-charting
highlighter-sharepoint-color-coding reminder-mini-workflow-sharepoint-crm

SharePoint CRM and Pentalogic’s simple- to-use and effective add-on web parts combine to create the ultimate Flexible CRM Solution for SharePoint.

Highlighter is now compatible with SharePoint 2013

Date:January 25th, 2013 Author: Tags: ,
Category: Highlighter Comments:0 ;

Highlighter is now compatible with SharePoint 2013 as of version 1.7.3.

You can download and install the latest version here.

If upgrading from SharePoint 2010 to SharePoint 2013 simply perform the upgrade then install the latest version – your old settings and license key will be picked up.

This page will be updated as our other web parts are made SharePoint 2013 compatible

Is Conditional Formatting in SharePoint 2013 dead?

Date:January 25th, 2013 Author: Tags: , ,
Category: Highlighter, SharePoint Development Comments:1 ;

With the release of the controversial new SharePoint Designer 2013, has the ever-popular Conditional Formatting option died a death?

Why is SharePoint Designer 2013 controversial?

The bee in everyone’s bonnet is SPD 2013’s lack of a Design View; one of the staple tools of every Designer user. The place to get up to speed on this topic is Marc Anderson’s article: SharePoint Designer 2013’s Missing Design View

How does this effect the Conditional Formatting option?

I asked the same question myself, so I installed SPD 2013 and gave it a try. After clicking, selecting, choosing, and swearing at pretty much every component I came to the conclusion that I was clearly missing something.

I posted on SPSE expecting a quick helpful pointer. Instead I was met by a resounding silence. After a suitable pause, I reposted onto MSDN, only to find that Conditional Formatting on list view web parts doesn’t seem to be supported anymore! Please feel free mock me mercilessly if this isn’t the case.

Of course it’s still possible to use it for other purposes, but formatting list views is the major purposes of that feature; it seems kind of pointless without it.

Is SharePoint Designer 2013 dead too?

It may still be early days, but when initially searching around for an answer, I was struck by how hard it was to find any blog posts about SPD 2013 (other than complaints about the Design View). For comparison, with the release of SPD 2010, the community was positively frothing over with articles and praise.

The same was true when posting on the forums: I leapt into the middle of the mainstream SharePoint 2013 river, expecting to be swept away by all the keen Designer users already trying out all the features. Instead I found myself sat in a rather shallow puddle.

So how can we apply Conditional Formatting in 2013?

Instead of wildly speculating on the popularity of SharePoint 2013’s tools, here are a couple of methods for working around the problem:

XSLT: It’s possible to create your own XSLT template by customising the default main.xsl, and then assigning it to the LVWP. I’ve searched high and low for a guide on how to apply conditional formatting using this method, with no success. Please let me know if you’ve seen such a thing.

Buying a solution: Inevitably the vulturous SharePoint software vendors have swept down on SPD 2013’s dying form, hoping to profit from its misfortune…

Oh! On an unrelated note; did I mention a new 2013-compatible version of SharePoint Highlighter has just been released? 😉

Turn A SharePoint Task List Into A Task Master

Date:October 19th, 2012 Author: Tags: , , , , , ,
Category: FilterPoint Web Part, Highlighter, PivotPoint Web Part, SharePoint Alert, SharePoint Planner, SharePoint Reminder, SharePoint webparts Comments:0 ;

Here’s how you can turn SharePoint’s built-in Task list into a powerful task tracking tool, using Pentalogic products.

These are just examples to get you started – we’re only scratching the surface here of what’s possible with our range of flexible SharePoint web parts.

To start, just create a new blank site and add a task list. Here’s one I made earlier:

start

Now just follow our guide for each section (or just the sections you want):

Each section has step-by-step instructions and a screenshot of the configuration to compare against.

Task list: Priority and Due Date highlighting

Uses Highlighter

To make the high-priority and upcoming tasks really stand out, we’re going to add a couple of highlighter columns.

Here’s what you will see on the All Tasks view – coloured flags to show priority, a column showing how long we’ve got left to complete items and a red highlight for things that are overdue.

highlighter_result

hl_priority

Highlight Priority

  • Create a new Pentalogic Highlighter column
  • Name the column Task Priority
  • Choose the column type Highlighting
  • Choose Show Icons
  • Click the Default icon, then click Clear
  • Change Base on column to Priority
  • Select Replace ‘Priority’ on all views
  • Under Rules click the Auto-create button
  • Click OK

Due Date Countdown

    • Create a new Pentalogic Highlighter column
    • hl_countdownName the column Due
    • Choose the column type Countdown
    • Change the Start option to [Today]
    • Change the End option to Due Date
    • Select Add to default view, on the Right
    • Uncheck all the display options except Days
    • Under Rules click the Auto-create button

Home page: Task calendar overview and summary

Uses Planner

On your site’s home page we’re going to add an at-a-glance overview of your tasks: A view of the task list (highlighted, if you did the previous section) and a task calendar.

Here’s what your home page will look like once we’ve finished:

mainpage

List view

  • Edit the page and add Tasks from the Existing Lists category
  • Edit the web part
  • Change the Selected view to All Tasks (to ensure Highlighter columns are displayed)
  • Click OK

Task calendarplanner_config

  • Edit the page and add Planner v2 from the Miscellaneous category
  • Set the Style to By Category
  • Set the Planner Source to Tasks
  • Set the Start Date to the column Start Date
  • Set the End Date to the column Due Date
  • Set the Category to Assigned To
  • Set the Label to Title
  • Set the Progress to % Complete
  • Set the Period to Auto
  • Change Set colour by column to Priority
  • Assign appropriate Colors to the priorities (e.g. High – Red)
  • Optional: Set a Fxed width under the Appearance section
  • Optional: Set the Font size to Medium

Analysis page: Graphs and granular reporting

Uses FilterPoint and PivotPoint

Now we’re going to create an Analysis page to produce some graphs and reporting data from your task list.

You will have an Analysis page that looks like this – showing  charts for each persons workload.

analysispage

Creating the page

  • From Site Actions choose New Document Library (to put the page in)
  • Call the library Pages
  • Set Quick Launch to Yes
  • Set Versioning to No
  • Change the Document Template to Web Part Page
  • Click Create
  • From Site Actions choose More options…
  • Under Page choose Web Part Page
  • Call the page Analysis
  • Change the Template to Full page, Vertical
  • Set the Document Library to Pagespivotpoint_pie_config

Graph and Report: Priority skew

Let’s add a graph to show us if tasks are being raised too often as “High priority”:

  • Edit the Analysis page
  • Add the PivotPoint web part from the Pentalogic.net category
  • Edit the web part
  • Set Display to Both
  • Set List to Tasks
  • Under Columns set Field to Priority
  • Under Chart options set Chart type to Pie
  • Click OK

Graph and Report: Status by Personpivotpoint_stack_config

Next we’ll add a graph to show the status of tasks assigned to everyone. That’ll show us if we have any bottlenecks in the team:

  • Edit the Analysis page
  • Add the PivotPoint web part from the Pentalogic.net category
  • Edit the web part
  • Set Display to Both
  • Set List to Tasks
  • Under Columns set Field to Status
  • Under Rows set Field to Assigned To
  • Under Chart options set Chart type to Bar
  • Set Color mappings to Automatic colors
  • Click OK

Filteringfilterpoint_config

Lastly, let’s add a filtering web part. this will allow us to drill down into our data by selecting certain statuses and date ranges:

  • Edit the Analysis page
  • Add the FilterPoint web part from the Pentalogic.net category
  • Connect the other web parts via the menu (Connections -> Provide filter to)
  • Edit the web part
  • Under Filters click New
  • Change the Label to Status
  • Set the Style to Drop Down
  • Under Get the filter values select From a list
  • Still under Get the filter values, the list Tasks and field Status
  • Under Filters click New
  • Change the Label to Start Date
  • Set the Style to Date Range
  • Set the Field name to From the connected web part and select Start Date
  • Click OK

You can display the page on the Quick Launch menu via Site Actions -> Site Settings and selecting the Quick Launch option under Look and Feel.

Alert page: Configure “Overdue” alerts

Uses Reminder

The last step is to configure Reminder to send email alerts to us when tasks are overdue. You’ll need to create the Pages document library if you skipped the previous section, and then continue with the instructions:

  • From Site Actions choose More options… reminder_config
  • Under Page choose Web Part Page
  • Call the page Reminder
  • Change the Template to Full page, Vertical
  • Set the Document Library to Pages
  • Edit the page
  • Add the Reminder web part from the Miscellaneous category
  • Edit the web part
  • Set Watch list to Tasks
  • Under Email to select Assigned To from the dropdown
  • Under Email CC enter the manager’s e-mail address in the text box
  • Next to Subject click “” and enter the following into the popup box:Overdue task ([Title])
  • Next to Message click “” and enter the following:This task is overdue: Title: [Title]
    Due date: [Due Date]
    Priority: [Priority]
  • Under Send When expand Overdue and choose by 1 Days
  • Click OK

You should hen see the following on the page:

reminderpage

You can also setup email alerts to remind you when tasks are due in a few days.

Finished!

Your mundane Tasks list is now an all-singing all-dancing Task Master!

This is just one example of the many possible solutions that can be achieved with our products. Please feel free to browse the product pages below to learn more or take advantage of our 30 day free trial:

Highlighter 1.6: More options, less buttons

Date:October 9th, 2012 Author: Tags: , , ,
Category: Highlighter Comments:0 ;

The next version of SharePoint Highlighter has been released, now with more options and less buttons:

Color category

hl16cc

If you liked Highlighter’s icons, but still wanted to see the column values as well –  now you can!

This is now the default for Icon-based highlighter columns (existing columns will remain unchanged). You can pick and choose which you’d like to see simply by customizing your rules.

New color picker

hl16cp

Now you can pick colors faster and with greater flexibility, using our new color picker (courtesy of JSColor).

More icons

hl16i

Now even more choice of icons. Above are just a few you can use to make your lists stand out. These include a select few from the famous FamFamFam Silk icon set.

Want more icons? See the “How do I add more icon to the picker” section here: Highlighter Manual: Icon Picker

To upgrade

To upgrade to the latest version without losing any settings simply download and install the latest version.

Free HTML Calculated Column for SharePoint

Date:January 11th, 2012 Author: Tags: , , , ,
Category: Highlighter, SharePoint HTML Calculated Column Comments:0 ;

logo-wordy

A free calculated column for SharePoint 2007 and 2010 that allows you to display HTML: SharePoint HTML Calculated Column

html-formula2

Why did you make this?

I spent a long time working on SharePoint Highlighter, and then later unsuccessfully trying to make a [Today] Calculated Column. During both these projects we kept coming back to this glaring hole in SharePoint: You can’t use HTML in a calculated column.

After unsuccessfully looking for open source projects (or even commercial alternatives) for some time, the only solution I could find was Christophe’s JavaScript workaround using a normal calculated column and a Content Editor Web Part. A nice solution, but unfortunately not without its drawbacks.

So when it came to deciding what I wanted to do in my 10% time, the answer was clear.

Having listened to me rant, rave, swear, and finally give up and denounce all Custom Field Type development (at least once a week during Highlighter, and several times during the [Today] incident), Ryan’s reaction to my choice of project was a typically understated “I’m… surprised?”.

So during the TeamTime project I spent my Friday afternoons creating the first of hopefully many pet projects from us at Pentalogic: SharePoint HTML Calculated Column

htmlccss

How is this different to Christophe’s solution?

Using the SharePoint HTML Calculated Column avoids the need to add Content Editor Web Parts (containing JavaScript) to every page you want the HTML to be displayed on.

Adding the CEWPs can be a bit of a chore in some cases, and are vulnerable to being accidentally broken by end users editing the pages. They can also be lost on 2007 to 2010 upgrades.

However, HTMLCC requires that a System Administrator install it on the SharePoint server; which in many organisations is a real pain in the ears. Whereas Christophe’s solution can be implemented by most power users.

Isn’t this the same as Highlighter?

SharePoint Highlighter offers quite a lot more than this solution on it’s own. I won’t go into enormous detail, but here’s a sample of what Highlighter offers over the HTML Calculated Column:

  • Row highlighting
  • Countdowns
  • Conditional formatting
  • Built-in icon library

Most notably, all of this is offered through a polished and intuitive interface.

Finally

So, you get to plug the hole in SharePoint that’s bothered so many people over so much time, and we get to plug SharePoint Highlighter whenever we mention it. Everybody’s happy. Smile

SharePoint Highlighter v1.5: If wishes were trees

Date:November 22nd, 2011 Author: Tags: , , ,
Category: Highlighter Comments:0 ;

Since SharePoint Highlighter’s release in May we’ve had some great suggestions and requests for features and improvements; one of the more surprising was the request for performance enhancements for those with 20 or more Highlighter columns in a view (and really big screens, no doubt).

Although we’ve added odds and ends during other projects, the Highlighter wishlist has steadily grown; fed by the suggestions from its growing user base and our own drive for continuous improvement.

So while TeamTime was being tested and prepared for beta, we stroked our collective beards (it is Movember after all) and decided to clear it down. Here are some highlights:

  • Row highlighting columns hide themselves
  • Highlighter displays on View Item form
  • Lookup columns now supported

Hidden Row Highlighting Columns

If you have a Highlighter column which displays Row Highlighting you’ll no doubt have noticed that the empty Highlighter column has to be visible on the page on order for the highlighting to work:

v1_5_rh_a

In Highlighter v1.5 the column will automatically hide itself from the page if it is only used for Row Highlighting:

v1_5_rh_b

View Item Form Display

Previously Highlighter columns would not display on the View Item form (or customized versions of it):

v1_5_df_a

Highlighter columns will now display on this form, with the exception of those used only for row highlighting (which will be hidden entirely):

v1_5_df_b

Lookup Columns

You can now use Lookups as source columns, which act in much the same way as Choice columns:

v1_5_lu

Upgrading

Please see the manual for instructions on downloading and upgrading to the latest version of SharePoint Highlighter.

What’s on your wishlist?

The more suggestions we have the better we can make our products. Every feature request is reviewed and added to the product’s wishlist. Once a wishlist hits a certain size, the most popular (and/or the best ideas) are rounded up and herded into the next version.

Contact us at support@pentalogic.net and tell us what’s on your wishlist!

Thinking Sideways About Highlighter

Date:September 15th, 2011 Author: Tags: , , , , ,
Category: Highlighter, SharePoint Ideas Comments:0 ;

You may have caught Clare’s post earlier about Highlighter’s recent performance enhancements, that were mostly due to some of the surprising ways we’ve seen it being used in the wild. To illustrate this sideways thinking (lateral and literal) we’ll take a look at exploding a humble status column into an Approval Progress Overview:

Status overview

As you can see, we now have a quick at-a-glance idea of how the projects are doing. To create this view, a Highlighter column has been added for each of the statuses. In each of these columns we’ve set it up to display icons (cell color is also a good choice), and cleared the default. Let’s take the Approved status as an example:

Icon setup

All we need to do is click the Auto-create button to create some rules, remove those for the earlier statuses, change the later ones to green icons, and this column’s status of interest to a working icon:

Rules

Just to keep people on their toes lets add a little urgency to the list with a Due Date column. So now we want to change the Approved column to a red icon if the Due Date has passed, and the status isn’t yet Approved. This is done by switching to Advanced mode and adding a single rule:

Due date rule

Here are the results of that extra change:

Overview (with due date)

If that wasn’t enough for you, here’s the weaponized version of Highlighter featuring cell colors, priority icons, and Project Manager Blood Pressure indicator:

weaponised

We’re always interested to hear what you’ve done with our products (especially Highlighter); so if you’ve done something even scarier than the above, send a screenshot to support@pentalogic.net.

How not to develop a SharePoint [Today] Calculated column

Date:August 22nd, 2011 Author: Tags: , ,
Category: Calculated Columns, Highlighter, Training Comments:4 ;

After developing SharePoint Highlighter, we seriously considered expanding on this area with a Calculated Column that would allow you to use [Today] in the formula. If you’re thinking “But you can already!” I suggest looking at Ryan’s article about the [Today] column trick.

Needless to say, this would be a very useful tool for almost any SharePoint user. After much researching and prototyping we came to an unfortunate conclusion: Although it was possible to make a Custom Field Type to do this, it was almost certainly impractical (certainly for us).

The avenues we investigated finished in three types of dead-end:

  • Brick wall: A completely impassable system limitation.
  • Overgrown with brambles: Nothing but pain for all involved.
  • Swamps: A long unpleasant slog, with an uncertain outcome.

The Brick Wall

The first thought in any developer’s mind when making a variation on a class should be “Inherit it”. It allows you to take advantage of the existing class’ methods with minimal difficulty and yet offers (almost) total control over its behaviour.

Attempting to do so will reward you with the slightly misleading error:

The type ‘Microsoft.SharePoint.SPFieldCalculated’ has no constructors defined

A brief search in the MSDN documentation for SPFieldCalculated shows that the absence of public constructors is intentional:

Windows SharePoint Services 3.0 does not support inheriting from this class.

And so this avenue ended in a brick wall. More worryingly; disallowing the inheritance of a class is usually a sign that something so heinous is happening inside that Microsoft doesn’t want it reproduced.

Brambles

Intrigued by the promise of horrifying creatures dwelling within, I had a look inside the class to see what was happening (using my own powers of code intuition, and not any kind of questionable reverse engineering method).

It seems the actual calculations take place outside of the SPFieldCalculated class, using instead a call to SPRequest. This new lane of research quickly ended in spiky brambles, as using a direct call to SPRequest would make our product (and hence anything it’s installed on) unsupported by Microsoft.

Undeterred, I took inspiration from the billing system at my old work and looked at keeping the ‘black box of calculation mystery’ class running in the background, with the new class acting as a wrapper around it.

Creating a Custom Field Type that kept a hidden field for data storage in the background was an architecture we’d experimented with when creating Highlighter, so adding a relatively minor call to update the formula with the current date and time seemed quite easy.

The thorny ending in this case was the enormous potential server load; updating the formula every time the list was viewed (to keep it up to date) caused the entire list’s worth of calculations to be refreshed. Viewing just 20 items would make up to 5000 items recalculate their values for each of our columns on the view.

Swamps

The final and most desperate option was to do it ourselves: Completely rewrite all or a subset of the calculated column functions, and handle the associated function nesting.

I’m DIM: Doin’ It M’self.

Following this path would mean wading through the boggy and unpleasant process of exactly reproducing Microsoft’s function calls; avoiding the murky bottomless pools of performance issues. All the while hoping we wouldn’t run into any of the hungry and sharp-toothed show stoppers along the way.

As you may have guessed, we didn’t venture down this path.

Why are you telling me all this?

Because although these paths aren’t available to us as an ISV, it doesn’t mean they aren’t options to you (except the brick wall, of course).

Brambles: Using SPRequest is unsupported, but if this doesn’t deter you then this is still very much an option. Similarly, if you have an abundance of processing power (or really need a space heater in your server room) performing complete column recalculations on every view shouldn’t bother you.

Swamps: If you have very specific requirements you could get away with only recoding a few functions, which would greatly reduce the chances of you disappearing forever. Alternatively, if you have a large herd of idle developers you could set about recreating the whole set. However, I doubt this is a serious option for anyone except the head of the Microsoft Silverlight team.
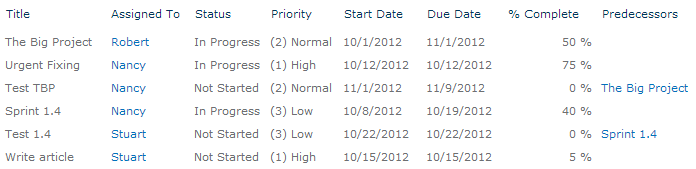