Posts Tagged ‘Javascript’

Add Highlighting & Conditional Formatting to PivotPoint tables

Date:March 12th, 2014 Author: Tags: , , , , ,
Category: PivotPoint Web Part, SharePoint Ideas Comments:1 ;

Our PivotPoint web part for SharePoint allows you to summarise data from your SharePoint lists in a similar way to Excel’s Pivot Tables and Charts.

A few users have asked how you can add highlighting or conditional formatting to the Pivot Tables – to do things like highlighting the High Risk column, or any cell above a certain value.

We have a Highlighter app that allows you to do this on normal Lists but it doesn’t work with PivotPoint so I thought I would put together some examples of how you can do this using every SharePoint hackers favourite tools – JavaScript and jQuery.

You will need some experience with programming and/or JavaScript to be able to modify these examples to do what you want but there are lots of comments in the code to help.

If you’re looking for an easy way to add conditional formatting/ highlighting for SharePoint Lists then check out Highlighter.

So lets get started. The files you need for the article can be found in a zip file here. Inside you will see a test .html page that can be used just to experiment with the javascript and a .js.txt file that contains the javascript to use on your site.

Adding JavaScript to a page

The first thing we need to know is how to add JavaScript to a page. Read up about that and come back!

In SharePoint 2013 you can add a Script Editor web part (under Media and Content). This blog post walks you through.

For SharePoint 2010 and 2007 you have to use the Content Editor web part (CEWP)

You could use the Source View of the CEWP and put the JavaScript directly into it, but you could also staple your tongue to a door and it will probably be less painful!

A much better way is to save the script as a .txt file in a document library and then include the file on the page with the Content Editors “Content Link” feature. Christophe walks you through this method here.

jQuery or not?

The examples given here use jQuery – a great addition to JavaScript that simplifies many common tasks.

You could adapt these ideas to run without jQuery if you like – but you’re on your own with that!

You can see the reference to jQuery on the first line of the example scripts.

One thing you should determine is

a)      Has jQuery already been added to all your SharePoint pages (by an administrator adding them into a custom master page)? If so then you should remove the jQuery reference from these examples as there is no point in including it twice.

b)      These jQuery files are loaded from Googles CDN servers. If you don’t have external internet access you will have to copy jQuery to some other location (such as a document library).

Show me the examples already!

Download and unpack these zip files – inside you will see

.htm files that you can experiment with.

Open them in a browser to see what they look like. Open them in a text editor like Notepad to change how they look and then re-load in the browser (F5).

.js.txt files that you can use in SharePoint.

Use a text editor to copy the changes you’ve made in the example .htm file in and then add them to the page that you have PivotPoint on using any of the methods in “Adding JavaScript to a page”.

The two examples are :-

Highlighting PivotPoint cells based on the value

The first example we’re going to look at is to highlight different cells depending on the value that’s in them.

For our example –

  • If it’s less than or equal to 160 then we want the text in red
  • If it’s more than or equal to 180 then it should have a background in yellow.

The result should be a web part like this.
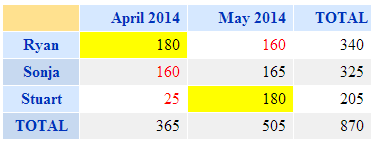
highlight-by-cell-value

There are plenty of comments in the JavaScript source code but basically what it’s doing Is looping through each cell in the PivotTable, checking what value It is and applying a CSS style.

See the source of highlight-by-cell-value.html and highlight-by-cell-value.js.txt in the ZIP file


Highlighting PivotPoint based on the row and column

In this example we’re looking to highlight a cell based on what Row and Column it appears in.

E.g. in this risk matrix we want to highlight the “High Risk” and “Frequent Probability” in red.

risk-matrix

There are two ways to do this in the javascript example given.

The first is to highlight based on the position, e.g.

highlightCellByIndex(0,0,'background','red');

Will highlight the cell in column 0, row 0 by setting the background red. (Yes sorry, the rows and columns start from number 0!).

But – if the layout of your table changes in future (e.g. someone adds a “Super Extra High Risk”) column) then everything will move and this will be in the wrong place.

In that case the better way is to highlight by the value of the Column and Row headers – e.g.

highlightCell("Rare","Low", 'background','red');

See the source of highlight-by-column-and-row.html and highlight-by-column-and-row.js in the ZIP file

Tips –

  • When making changes to the javascript do a small amount at a time, then you will know where to start if this doesn’t work!
  • You’re not just limited to setting colours, you can also add in any other effect possible in CSS.
  • Use the developer toolbar (F12 in IE and Chrome) if you have an error – this tool will enable you to track it down, but how to use it is beyond the scope of what we can show here!
.css('font-weight','bold');
.css('font-size','200%');
.css('border','1px solid red');
  • You can also add images (e.g. flags)
.append("<img src='some-url-to-an–icon.gif'>");


Disclaimer – these technique is provided as is and free of charge to get you started. You will need some experience of JavaScript or programming and the browser developer tools to modify these to do exactly what you want. Whilst we can’t provide technical support for this we will endeavour to help customers with active Premium Support and Maintenance contracts in place for PivotPoint.


How to create a Countdown in a SharePoint list

Date:May 17th, 2011 Author: Tags: , , , , ,
Category: Highlighter, SharePoint Development, SharePoint Free Tools, Training Comments:0 ;

countdown

If you’ve got a list containing important dates (such as the above example), it’s very useful to be able to easily see how long is left before that date, or how long since it has passed. Unfortunately basing a calculated column on the current date isn’t supported by SharePoint natively, as discussed in my previous article: How to use [Today] in a SharePoint list

So how can we work around this shortcoming without having to wave signs and shout outside Microsoft’s offices? The are a few options available to us:

  • JavaScript: Use a Content Editor Web Part.
  • Designer: Create a custom view in SharePoint Designer.
  • Code: Make your own custom field type from scratch.
  • SharePoint Highlighter: Buy our custom field type.

JavaScript document_into83

Since SharePoint is so uncooperative about using the current date on the server side (i.e. with a calculated column), we can wait until the information gets to our browser and fix it there with JavaScript.

We can get JavaScript onto a page using a Content Editor Web Part, which is added just like any other web part. Christophe at Path to SharePoint has put together a script that displays the date difference on hover, that can be modified slightly to display just the countdown: Countdowns – A second method

Adding a CEWP to each page your list is displayed on can become quite arduous if it’s displayed in a lot of places. In addition to this, information in a CEWP is quite vulnerable to accidental edits, as they are accessible to any user that can edit page content.

Designer designer3013

SharePoint Designer is a free and powerful tool from Microsoft for customizing SharePoint. Unfortunately, because it can do so much, its use is often frowned upon by site administrators (and sometimes even banned).

If you’re lucky enough to be allowed to use it, then (in an unusual twist) Christophe may once again be the person to look to. In a break from his many and various JavaScript solutions he’s put together a Designer solution for this problem too: A countdown for tasks lists

As with the JavaScript solution above, the Designer changes will have to be made on each view web part you want to see the countdown on, but fortunately the changes can only be overridden by someone else using Designer, or an administrator.

Code studio63

If you already have the backbone of a custom field type coded, then adding the XSLT to display this in 2010 should be reasonably straightforward. Alternatively this can be done within the custom field type class.

If you’re using 2007, then CAML rendering unfortunately fails you here, and it’s necessary to use a JavaScript workaround in one form or another.

Creating a custom field type from scratch for this sole purpose is probably going to be remarkably costly (in terms of time). Actually making the foundations of a custom field type is a bit of an investment, but thankfully Microsoft has put together a walkthrough to at least help you get started.

The benefit of using this method is that columns created from a field type are displayed on every page without having to add any additional code to the page itself.

SharePoint Highlighter currency_dollar43

Of course, it is possible to get all the benefits of a custom field type with much less pain: Buy a commercial solution.

If you have a glance at out handy product comparison, you can see the wealth of products we managed to find that offer this functionality. So far that grand total is… One: SharePoint Highlighter.

So if you’re looking for a commercial solution it looks like we’re the only option. If you know otherwise then please do tell us; but for the time being we’ll cheerfully carry on being the front-runner in this one horse race.

How to create a SharePoint KPI column

Date:May 12th, 2011 Author: Tags: , , , , , , , ,
Category: Highlighter, SharePoint Development, SharePoint Free Tools Comments:0 ;

icon

Whether you call it a KPI, an Indicator, or a Data Visualization Asset, the chances are that you immediately understand the purpose of the icons in the picture above. The beauty of adding icons to a list is harnessing this instant recognition to make your users work more efficiently with their data.

So how do we add icons to our list? This depends very much on how complex and configurable you want he results to be, so let me give you a run down of the options:

Do It Yourself

  • JavaScript: Do the work on the client-side with a Content Editor Web Part
  • Designer: Customise the list view using SharePoint Designer
  • Download: Download an open source Custom Field Type
  • Code: Create a custom field type from scratch

Buy It

  • Enterprise Edition: Use the Out of The Box Enterprise Edition functionality
  • Buy: Buy a pre-made Custom Field Type

JavaScript document_into8[6]

By adding a Content Editor Web Part to each page you want the icon to display on, you can add JavaScript that will insert icons once the page has been rendered.

Christophe at Path to SharePoint uses his signature HTML Calculated Column to do most of the hard work in his article: Apply color coding to your SharePoint lists. In this instance JavaScript is used solely to render the HTML correctly, as SharePoint renders the output of calculated columns as text normally.

Designer designer30

If you don’t mind spending a little time dabbling with SharePoint Designer, and you can convince your Site Administrator you’re probably not going to do anything too damaging; then Microsoft’s free tool may be the solution for you.

Toni Frankola has risked the wrath of Microsoft and written an article on how to use Designer reproduce Enterprise edition’s KPI columns without having to upgrade: Visual Indicators for the Masses: KPIs in WSS.

As with the JavaScript solution, you’ll have to make this change on every page you want to see the icons on.

Download arrow_down_green4

If you’re and end-user looking for a quick solution, or a developer interested in further developing an existing Custom Field Type, then the IconSet CodePlex project may be of interest to you.

I have enormous respect for those that donate their efforts to the community, such as the developers of this project. Unfortunately open source developers often have a day job and other commitments, so expecting rapid free support from them can be a tall order.

Code studio6

It’s entirely possible to create a Custom Field Type yourself. This is by far the most time-consuming of the options listed on this page, and hence also probably one of the most expensive. However, if you want to avoid some of the initial investment, you could use the IconSet CodePlex project mentioned above as a good starting point (or reference guide).

Fortunately, as the icons are directly rendered onto the page you can avoid the majority of the JavaScript rendering problems I mentioned in How to do list highlighting in SharePoint. If you also avoid [Today] then you can avoid some of the related trouble.

A benefit of all three of the Custom Field Type options is that the results are shown wherever the column is shown in a view, avoiding page-by-page additions.

Enterprise Edition sharepoint

SharePoint Enterprise edition allows you to add KPI information to your site, along with many other additional features. If you’re working with Enterprise edition then take a look at Mark Miller’s article: KPIs for the Masses.

Since use of this functionality is prolific and directly supported by Microsoft it’s very a good option for those that have this version of SharePoint. Unfortunately the functionality isn’t available to those working with Foundation or Standard edition.

Buy currency_dollar4

Many companies don’t have Enterprise edition, and feel that upgrading solely to use the KPI functionality is perhaps not the best use of resources. As a result, the functionality has been reproduced by a great many products (not least our own: SharePoint Highlighter).

Because we have our own product in this area, we’ve created a product comparison to demonstrate the available functionality, and associated cost.

How to use [Today] in a SharePoint list

Date:May 12th, 2011 Author: Tags: , , , , , ,
Category: Calculated Columns, Highlighter, SharePoint Development, Training Comments:0 ;

today

Quite frequently we see questions about using the current date to display messages on a list when a date or time is (or will soon be) overdue. Most of these queries are from frustrated users who are trying to use [Today] in a calculated column, but find it missing.

I’ll quickly outline why this option is missing from calculated columns, and hence why the notorious [Today] trick is quite so controversial. But most importantly, I’ll run you through ways to actually display the information you want.

Why is [Today] missing from calculated columns?

When we look at a SharePoint list, the vast majority of us are instantly reminded of Excel (or Grandfather Excel, if you prefer). Because of this we quite reasonably expect it to act like Excel, and hence expect it to reconsider every formula and data item on the page each time we view it.

Unfortunately because of the much larger amount of information SharePoint has to pass back and forth, it takes a different approach to updating the data items. It will only update calculated values when the related item is added or edited.

Consider SharePoint as an overworked secretary; if you ask for a file to be updated they’ll find it in the filing cabinet, update the information, and correct anything else that’s awry on the paperwork while they’re there. If you ask for all the files for people named “Smith” to be put on your desk, unless you specifically say “And update the information on every single one while you’re at it”, it’s not likely they’ll do the extra work for no reason.

Because of this change in records-keeping, Microsoft had to skip functionality that would make this lower-maintenance updating method obvious. Since having a [Today] option would cause unedited items to go out of date every day, they had to leave it out. The [Me] option was another casualty, as it would require checking the current user every time the data was displayed.

So how do we get our files updated without further flustering our imaginary secretary? There are several options:

  • JavaScript: Use a Content Editor Web Part. Also known as “Do it yourself.”.
  • Designer: Create a custom view in SharePoint Designer. “Ask the secretary really nicely”.
  • Code: Make your own custom field type from scratch. “Get your own team to do it”.
  • SharePoint Highlighter: Our own solution to the problem. “Hire an extra secretary”.

JavaScript document_into8

Of course there’s always a JavaScript solution, and this one in particular from Paul Grenier uses jQuery to help with the process. This will mean adding the jQuery libraries to your site, and it’s also necessary to add a Content Editor Web Part to each page you want the feature to work on.

A little JavaScript knowledge will probably be necessary to make it fit your requirements, and as with any code tweaking, the more you know the better the result will be.

Designer designer30

SharePoint Designer is a free and powerful (and hence often banned) tool from Microsoft for modifying your SharePoint site. Using Designer it’s possible to alter a view so that it uses Today when rendering the data on the page. This done by modifying the view’s XSLT (the template the view uses to decide what data goes where).

If you’d like a dabble to test the water of such changes, MSDN has a nice tutorial on how to get started.

However, if you already have some experience with Designer (or you’d like to just jump straight in), Greg Osimowicz has an article on using Today in XSLT to calculate holidays accrued to date (scroll down to “Below are the steps I followed:”).

Code studio6

There are a number of possible different methods to solving this problem using a custom field type. As always this comes with my standard disclaimer that developing a custom field type from scratch for a single purpose requires a disproportionate investment of time for the results.

In 2010 it’s possible to do the calculations in the custom field type class (with some light persuasion), however this is not possible with 2007 as it does not use the class to render its information on list views.

Unfortunately not even CAML can save us in this instance, as the View Schema doesn’t provide the current date in a usable form. But if you’re using 2010 you may be able to create a workaround with XSLT and Greg’s Designer XSLT solution in the section above.

The last option is to use the field type to get JavaScript onto the page instead of using a CEWP. This has the benefit that you don’t need to put the CEWP on each page, but as I mentioned in my previous article it can be very troublesome to do so: How to do list highlighting in SharePoint

SharePoint Highlighter currency_dollar4

Normally this is the section where I’d talk about the benefits of a commercial solution, and try to avoid mentioning SharePoint Highlighter too much (I might even link to our product comparison page). However, it’s very difficult to talk in general terms about commercial products on the market that have this functionality when yours is the only one that does.

So I’m not going to beat around the bush: If you want to buy a commercial solution to change your list view display based on today’s date, then SharePoint Highlighter is the only (and hence best) solution. It does much more than just this, but I’m not going to blow my trumpet too much.

If you want to see a real life problem and its solution using SharePoint Highlighter; have a look at this SharePoint Overflow question.

Editing The SharePoint List Item Menu (Part 3: Other Uses)

Date:November 18th, 2010 Author: Tags: , , , , ,
Category: General, SharePoint Development, SharePoint Ideas, Training Comments:4 ;

In previous posts I’ve used the “Open in new window” function to illustrate the two different methods of adding to the List Item menu, or Edit Control Block (ECB) to use its catchier name.

Part 1 covered the CustomAction element; the developer-leaning Visual Studio method. Part 2 avoided any kind of dedicated program by doing the same directly in SharePoint using Javascript in a Content Editor Web Part (CEWP); for power users or those with software commitment issues.

In this section I’ll be looking at some more interesting, and possibly useful, extra options to illustrate the potential of these kinds of enhancements. These can also be used as stubs to produce more complex functionality along the same lines.

I’ve purposefully kept these changes low-touch (avoiding AJAX libraries for example), to make them quick to try out without installing any additional dependencies.

In each example I’ll give a snippet of code for using a CustomAction or Javascript; these will be brief, as they assume you’ve read my earlier posts.

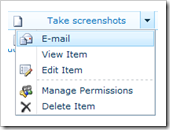
E-mail a task

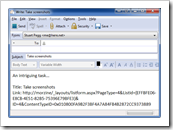
This example adds a link that pre-populates a new e-mail with some information from the selected task. It uses the good old ’mailto:’ to open the default mail program for the client machine. If you don’t have a default mail client then, well, it won’t (harsh but fair).

This can be used as a quick way to create nagging e-mails for task owners, or to highlight tasks that may be of interest to others.

menuemailemail

To add this option using Javascript, add the following to a CEWP:

<script type="text/javascript">
function getMailTo (ID)
{
var taskTitleLink = document.getElementById(ID).firstChild;
var mailTo = 'mailto:?subject=';
mailTo += encodeURIComponent(taskTitleLink.innerHTML);
mailTo += '&body=';
mailTo += encodeURIComponent('An intriguing task...\n\nTitle: ' + taskTitleLink.innerHTML + '\n');
mailTo += encodeURIComponent('Link: ' + taskTitleLink.getAttribute('href'));
return mailTo;
}

function Custom_AddListMenuItems(m, ctx)
{
CAMOpt(m,’E-mail’,’window.location=getMailTo(‘ + currentItemID+ ‘);’,’/_layouts/images/EMAILPST.PNG’);
return false;
}
</script>

To produce the same result using a CustomAction, using almost the same Javascript in the link; the following UrlAction should be used:

<UrlAction Url="javascript:window.location='mailto:?subject='+encodeURIComponent(document.getElementById({ItemId}).firstChild.innerHTML)+'&amp;body='+encodeURIComponent('An intriguing task...\n\nTitle: '+document.getElementById({ItemId}).firstChild.innerHTML+'\n')+encodeURIComponent('Link: '+document.getElementById({ItemId}).firstChild.getAttribute('href'));"/>

The differences between the two (other than the infrastructure used) are as follows:

  1. UrlActions are ugly not amenable to declaring Javascript functions in an readable way.
  2. URL in an UrlAction is  wrapped in a Javascript function (STSNavigate) when rendered in the OnMenuClick event attribute, so it needs the javascript: prefix to use such. The Javascript version is put in the same event attribute, but without the wrapping function no prefix is needed.
  3. currentItemId and {ItemId} both get the current List Item’s ID in their own contexts.

The code in both of the above examples take advantage of the fact the Title and link are within the div that shares this item’s ID. Using this method limits the amount of information we can get our hands on. We can get a little more using GetAttributeFromItemTable, but to get all the information we’d have to use some more contrived methods.

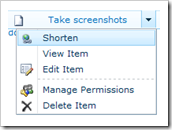
Shorten an item linkmenushorten

This option opens a new window to tinyurl’s site with the task’s abbreviated link posted through. If you’re using an earlier version of Flash than 10 (rather you than me) it’ll even put it in the clipboard for you.

As you may have previously seen, SharePoint links are often a nest of GUIDs. This allows a neat little link to be produced instead: great for optimising scary archaic communication methods such as paper documents or VoYP (Voice over Yoghurt Pot).

I’ve used tinyurl simply because you can send the link to be shortened in a querystring, and nothing else is needed. Much as I love fetching API tokens and/or posting plain text login details, I used the most straightforward method for brevity’s sake.

<script type="text/javascript">
function getShortenUrl(ID)
{
var shortenUrl = 'http://tinyurl.com/create.php?url=';
shortenUrl += encodeURIComponent(document.getElementById(ID).firstChild.getAttribute('href'));
return shortenUrl;
}

function Custom_AddListMenuItems(m, ctx)
{
CAMOpt(m,’Shorten’,’window.open(getShortenUrl(‘ + currentItemID+ ‘));’,’/_layouts/images/LINK.GIF’);
return false;
}
</script>

There is very little difference between the two implementations, except as mentioned in the previous section.

<UrlAction Url="javascript:window.open('http://tinyurl.com/create.php?url='+encodeURIComponent(document.getElementById({ItemId}).firstChild.getAttribute('href')));"/>

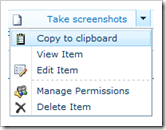
Copy to clipboard (IE only)menuclipboard

A slightly more obvious method of copying an item’s direct link to the clipboard than the right-click menu. Handy for quick intuitive copying, or for broken mice.

Unfortunately this functionality is restricted to Internet Explorer (which covers most SharePoint users). Alternative solutions and their problems are covered pretty comprehensively on this Stack Overflow question.

<script type="text/javascript">
function setClipboard(ID)
{
window.clipboardData.setData('text',document.getElementById(ID).firstChild.getAttribute('href'));
}

function Custom_AddListMenuItems(m, ctx)
{
if (window.clipboardData)
{
CAMOpt(m,’Copy to clipboard’,’setClipboard(‘ + currentItemID+ ‘);’,’/_layouts/images/CLP16.GIF’);
}
}
</script>

The above sample takes advantage of the Javascript method’s flexibility, and does not display the option if the window.clipboard object is not present (i.e. not IE). But due to the restrictive nature of the Custom Action, we don’t have that ability.

<UrlAction Url="javascript:if(window.clipboardData){window.clipboardData.setData('text',document.getElementById({ItemId}).firstChild.getAttribute('href'))}"/>

Conclusion

The two methods of adding to the List Item menu each have their own benefits and restrictions.

The CustomAction method allows site-wide distribution and can be bundled with other CustomAction modifications (such as changes to the command ribbon), but it lacks flexibility and has very little granularity in its release (an entire list type). It also requires Visual Studio, and access to install such features.

Using Javascript in a CEWP is very flexible and much more readable for anything more than a very straightforward action. It can be added by power users rather than developers, without even using SharePoint Designer. Unfortunately it has to be added on every target view individually. If the Javascript was added to the master page it would result in an even less targeted release than the CustomAction option.

Both of these methods have very little item data to hand, but both can be greatly extended by making use of AJAX calls to SharePoint Web Services, 3rd party services, or custom pages.

Editing The SharePoint List Item Menu (Part 2: Using Javascript)

Date:November 4th, 2010 Author: Tags: , ,
Category: SharePoint Development, SharePoint Ideas, SharePoint webparts, Training Comments:6 ;

MenuBeforeFollowing on from Part 1 of this series which covered Editing the SharePoint List Item Menu Using Elements, I thought it would valuable to reproduce the same results without using Visual Studio or SharePoint designer (Part 4 will be to do it without a monitor). This method will allow non-developers with view edit access to customise the List Item Menu.

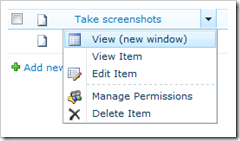
In this example, a ‘View (new window)’ option will once MenuAfteragain be added to each item’s context menu to avoid the modal box, as illustrated to the right. Although as Christophe helpfully pointed out in response to Part 1, the modal boxes can be banished under the list’s Advanced settings. Fortunately there are many other uses for these techniques, as we will see in Part 3.

This example uses a Content Editor web part, which means the Javascript can be added on a view-by-view basis. This allows a more targeted release and can be added by any user with permissions to edit the view. However, it makes widespread distribution more difficult; putting the function in a master page can overcome this but will implement it for every item menu on every list.

(more…)