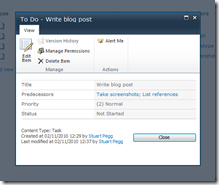
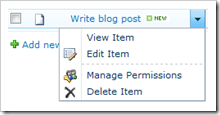
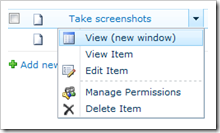
 While copying my rapidly lengthening scribbled to do list into a SharePoint Tasks list, my unconscious habit of middle-clicking items to come back to was being constantly foiled. Instead of opening a new tab the modal box kept popping up in the middle of my screen (new to 2010 I hear).
The drop-down menu options did exactly the same, leaving no alternative but to right-click the item, copy the link, manually open a new tab, paste it in, and switch back; much too much like hard work. So I decided to add an option to open the item in a new window… in retrospect probably harder work than just putting up with it.
As a result, this is a brief run-through of how to add options to the context menu of list items in SharePoint, using a CustomAction in Visual Studio. For using JavaScript to the same ends, see Part 2: Using JavaScript (coming soon).
To start with all you need to do is:
- Create a new Empty SharePoint Project
- Add a Feature
- Add a new Empty Element to the project
Detailed instructions on this, as well as an even briefer CustomAction example, can be found on MSDN.
Within the element’s Elements.xml you’ll need to add a CustomAction element; below is my example for the ‘new window’ link:
<?xml version="1.0" encoding="utf-8"?>

 <Elements xmlns="http://schemas.microsoft.com/sharepoint/">

 <CustomAction

 Id="ECBViewNewWindow"

 RegistrationType="List"

 RegistrationId="107"

 Location="EditControlBlock"

 Sequence="199"

 Title="View (new window)"

 Description="Open this item in a new window (rather than a modal box)"

 ImageUrl="/_layouts/images/LIST.gif">

 <UrlAction

 Url="javascript:window.open(‘DispForm.aspx?ID={ItemId}');"

 />

 </CustomAction>

 </Elements>
A summary of the CustomAction class can be found here. Although this summarises each of the fields, there are a few items of note in the example:
Location
EditControlBlock is the internal name for the context menu; more locations (including the ribbon and other menus) can be found on the catchily named Default Custom Action Locations and IDs.
RegistrationId
In the example this is 107 (the Tasks list); Mike Smith has put together a very comprehensive list of possibilities with descriptions, with some helpful notes on usage. The custom action will be added for every list of the type referred to, within the scope of the feature (Site or Site Collection).
Sequence
Some fiddly work with the inspect option in Chrome’s developers tools (Firebug for Firefox is a comparable alternative) showed the sequence number for the existing “View Item” link to be 200 on the Tasks list. 199 puts it one above, although the default options appear to have gaps of 20 (“Edit Item” is 220).
ImageUrl
Although this can be used to put any image as the action icon on the menu, I’ve opted to use one of SharePoint’s built-in icons for ease of deployment. These can usually be found in:
C:\Program Files\Common Files\Microsoft Shared\Web Server Extensions\14\TEMPLATE\IMAGESAs per the rather useful Special Directories and Storage Locations.
UrlAction
In the example I’ve used Javascript to open a new window, after seeing a helpful comment from the previously mentioned Mike Smith on an otherwise lacklustre UrlAction reference.
In the Url attribute is also an UrlAction Token {ItemId}. This token is used to get the item ID, which has then been posted to the DispForm.aspx page to be viewed. Posting to EditForm.aspx would provide open an edit page instead.
This method is a very straightforward way to add actions to the item drop-down menu, but unfortunately lacks the ability to remove or edit the existing actions. The only way of doing this is via the Javascript route.
The broad coverage of the CustomAction to all lists of a certain type within the feature’s scope allows easy widespread distribution over many lists, with the disadvantage that targeted release (e.g. to a single list in a site with many of the same type) is not possible.
Part 2 will cover how to do the above example using Javascript, avoiding Visual Studio altogether. Then in Part 3 we’ll move on to some much more interesting examples (sending chaser e-mails, getting a shortened URL) and which method suits them best.
Tags: SharePoint, SharePoint 2010, SharePoint Development, Visual Studio, VS2010


Looking forward to part 2!
Note that modal window vs. new window in SP 2010 is your choice, just switch the option in the list settings.
Thanks Christophe. I’ve found it now under Advanced, which is very handy.
Fortunately this menu-altering functionality has many other uses; although this setting makes my researching an even larger red herring from updating my task list!