Author Archive

How to do list highlighting in SharePoint

Date:May 11th, 2011 Author: Tags: , , , , , ,
Category: Highlighter, SharePoint Development, SharePoint Free Tools Comments:1 ;

highlight

Lists can often look a little bland, and attempting to impatiently skim read them can often lead to missing important information. This is why a bit of well-placed color can really help users with their day-to-day work.

In my last post How to create a progress bar in SharePoint I covered the various methods of displaying a progress bar on your SharePoint list view. For this article I’m going to do the same for row and cell highlighting, as I’ve spent a rather considerable time wrestling with this particular feature in SharePoint Highlighter:

Client based

  • JavaScript: Put some JavaScript code into a Content Editor Web Part
  • Designer: Use SharePoint Designer to set up Conditional Formatting

Custom Field Type

  • Code it yourself: Make your own custom field type from scratch
  • Buy: Purchase a pre-made solution

JavaScript document_into8

If you need a free solution that doesn’t require farm administrator permissions, then using JavaScript in a Content Editor Web Part may be the solution for you. As always with this method, Christophe at Path to SharePoint has a great example.

Alternatively, there’s a slightly off-topic walkthrough by Boris Gomiunik which avoids having to use an HTML calculated column. It has a great deal of useful information, and would only require minor tweaking to do cell or row coloring instead of text.

The JavaScript and CEWP method should avoid having to trouble your IT department to make the change, which I’m almost certain you’ll both be happy about.

Although you’ll have to implement the CEWP on every page you want the highlighting to display (which may cause your view drop-down to disappear), you may not have to copy the full JavaScript into every CEWP, as discussed in my previous article’s comments.

Designer designer30

If you’re lucky enough to have a generous (or inattentive) IT department, you may be able to use SharePoint Designer; a free tool from Microsoft. SharePoint Designer allows you to add Conditional Formatting to your list views in a manner very similar to Excel. This has to be added to each of the views you want to see the highlighting on.

You’ll need a little time to become familiar with Designer, and to set it up for your needs, but once you have done so it can be a powerful tool. Unfortunately it is often regarded by administrators as a dangerous tool for this very reason.

There’s a useful step-by-step guide to setting up conditional formatting in SPD 2010 by Frederique Harmsze at Macaw, and a more straight-laced 2007 version on the Microsoft Office site.

Code studio6

Creating a custom field type to perform highlighting on a list view is in many ways like trying to type on a keyboard on the other side of a crowded the room with a pole (which sometimes gets stolen by the janitor if you leave it out overnight). That might be a slight exaggeration, but it is very awkward.

This is mostly because there is no way to programmatically interact with the row and cell color from server-side code (the distance across the room in my analogy). So you’ll need to get JavaScript onto the page in order to do the highlighting (the metaphorical pole).

The crowd represents SharePoint’s own JavaScript (all 0.5MB of it), which may interfere with yours; an example of this would be the use of AJAX to render Group By views.

Finally, SharePoint seems to passive-aggressively object to script elements, and silently removes them from HTML text stored in the database; the metaphorical janitor. This can be worked around by rendering using XSL (in 2010) or CAML (in 2007).

Buy currency_dollar4

If you want to avoid the unpredictable cost of time spent creating a solution, then you’re better off paying the money up front for a pre-made solution. As a bonus it won’t be you that has to test it to death or maintain and support it.

By some enormous coincidence, we happen to have recently released a product called SharePoint Highlighter that can do this kind of highlighting very easily. Of course, there are other similar products on the market, which we’ve listed on this handy comparison matrix.

How to create progress bars in SharePoint

Date:May 10th, 2011 Author: Tags: , , , ,
Category: Highlighter, SharePoint Development, SharePoint Free Tools Comments:7 ;

progress

Progress bars are a great addition to any list; making percentage values, target achievement, and progress between dates much clearer. Having included this functionality in SharePoint Highlighter, I’ve tried and tested the various ways this can be achieved and thought I’d share my conclusions.

The main methods for getting a progress bar on your list are:

Client based

  • JavaScript: Put some JavaScript code into a Content Editor Web Part
  • Designer: Use SharePoint Designer to create a custom view

Custom Field Type

  • Free Download: Install a community-supported custom field type
  • Code it yourself: Make your own custom field type from scratch
  • Buy: Purchase a pre-made solution

JavaScript document_into

If you need a free solution that doesn’t require farm administrator permissions, then Christophe’s JavaScript progress bar may be what you’re looking for. This uses JavaScript in a Content Editor Web Part along with a calculated column to render the progress bar.

To customise this to suit your needs you need to have some experience with JavaScript. Alternatively, Christophe is very quick to respond to comments, and may be willing to help with minor tweaks or troubleshooting.

Advantages of this method are the flexibility of Christophe’s HTML calculated column, and the low cost (providing you don’t spend too long customising it). Although by far the largest advantage is that most end users will be able to implement this solution without having to contact their IT department.

The main disadvantage is having to implement the CEWP on every page you want to see the progress bar, and the need to change the JavaScript in every CEWP for any future alterations.

Designer designer

If you’re reasonably familiar with SharePoint Designer, or you’re willing to learn a little, then the Microsoft SharePoint Designer Team Blog has a good article on how to use it to create progress bars: CSS Style Bar Graphs using Data Views

The main advantage of this solution is that it is free (SharePoint Designer is a free download), not counting the cost of the time to create it of course. As with the JavaScript solution, you will need to add the modification on each page you want the progress bars to be displayed.

SharePoint Designer has a chequered history with regards to the amount of power it wields (and hence damage it can cause), and so it is unfortunately often the case that SharePoint site administrators ban or severely restrict its use.

Free Download arrow_down_green

If your requirements are quite straightforward, there are a few community supported progress bar custom columns available for download (for example this Codeplex project).

These are single-purpose additions that tend to be low on customizable options (such as conditional formatting), but are good for quickly meeting specific requirements.

These community supported progress bars are usually open source, which allows you to further develop them if you wish. The above example is an exception; being both closed-source and obfuscated. Support for community projects is unfortunately entirely voluntary, and usually forum-based.

Code studio

If you’re reading this section rather than trying to ignore it you’re probably a developer, or thinking about hiring one. I can tell you from experience that unless you have some very specific requirements or intend to re-use the code for other solutions, it will almost certainly be cheaper to buy a pre-made solution.

This is for the most part due to the rather large overhead of setting up the infrastructure of a working custom field type and the daunting learning curve associated with it. For the sole purpose of creating a progress bar, this investment of time may be disproportionately expensive.

Obviously having a vested interest in you buying our product makes my advice somewhat tainted, so I’ll refer you to the impartial words of Bjørn Furuknap on the subject:

“Looking back I think it would have been easier, and less painful, to eat my own eyes.”

If you’re brave enough to continue down this path, creating your own custom field type allows you to tailor a solution much closer to your needs, limited only by your determination and ability to think sideways. To help you on your way, there is a particularly useful MSDN walkthrough.

Although MSDN as a whole is a gold mine for such a project, there are some rather troublesome areas that are thinly documented.

Buy currency_dollar

There are a number of commercial products on the market that allow you to add visual indicators such as progress bars to lists; one in particular that springs to mind (for some reason) is our own product SharePoint Highlighter.

Many commercial solutions come with additional features that may make the purchase more worthwhile. Rather than throw marketing bullet points everywhere (Synergise ROI!) I’ll simply nod meaningfully towards this comparison matrix.

Enormous professional bias aside, the main benefits of a commercial solution in comparison to the above alternatives are: guaranteed support, more reliability, and user-friendlier configuration. Of course, the glaring disadvantage is having to spend some money up front, rather than the less visible cost of time.

Conclusion about

Each of these possible solutions caters to a slightly different problem, and there is no single right answer. Obviously if there was a single correct, reliable, unbiased answer it would be to buy SharePoint Highlighter*.

*Possibly not entirely unbiased

Your SharePoint community needs you!

Date:March 7th, 2011 Author: Tags: , ,
Category: General Comments:0 ;

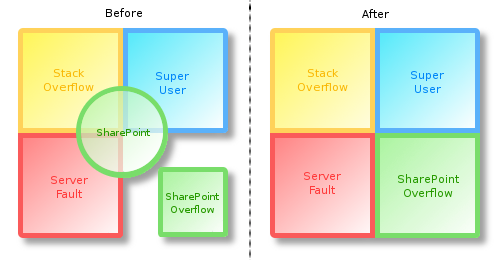
As many of you may know, SharePoint Overflow is site where anyone can find out anything about any version of SharePoint. Unlike other expert answer sites, it’s solely dedicated to solving SharePoint problems in all their forms.

In order for the community to continue to grow and thrive, SharePoint Overflow being melded into the enormous and varied Stack Exchange community.

Stack Exchange?

A shopping mall of different expert answer sites, based on the three original sites: Stack Overflow for developers, Server Fault for Systems Administrators, and Super User for power users.

Although Stack Exchange in general is an amazing and reliable resource for getting expert answers on tricky questions, all three of these sites cover slightly different aspects of SharePoint. Deciding which category a problem falls into can be a problem in itself.

If Stack Exchange is a shopping mall; imagine the three original sites as a clothes shop, shoe shop, and an accessory shop. These are all very large and full of useful things, but what about if I’m getting married? The clothes shop has a suit that’s a bit like a morning suit, the shoe shop has some shiny shoes that’ll do the job, and the accessory shop has a likely tophat hidden away at the back (but they’re only selling it “ironically”).

So at the end of this several hour long imaginary trip of rummaging I have something that passes as a suitable outfit. Unfortunately my wife-to-be sighs and points out that I could have done all this at the wedding shop (Shar LaPointe’s Ouverflowe) on the other side of town in a matter of minutes, and I wouldn’t have “I <3 Hatz” written on the front of my tophat.

So, why is this relevant to me?

Well, to get to the point, this is all about getting the wedding shop into the mall where it can be seen by slightly befuddled grooms.

If enough people get together and vote on the proposal, SharePoint Overflow gets it’s own spot in the bustling Stack Exchange community. It will consolidate the SharePoint questions and answers into a single place; becoming much more than the total of the individual sections.

VennSOtoSE

A bigger community also means more and better quality answers for everyone. Even if you don’t ask such questions yourself, helping to bring this project to fruition means your future problem-investigating web searches are more likely to have useful results.

So who gets to vote?

You! Here’s how:

1. Follow this link to Area 51 (the Stack Exchange site proposal site):
SharePoint Overflow on Area 51
2. Press the big “Commit!” button
3. Put in your name, e-mail (there’s no spam or newsletters) and reason for loving SharePoint.
4. Take the next 20 seconds off work; you’ve earned it.

SharePoint and Access: Power to the People

Date:February 2nd, 2011 Author: Tags:
Category: General, SharePoint Ideas Comments:0 ;

SharePoint and Access cater for an essential part of every organisation: the Power User. Whether it’s a full-time SharePoint Architect, or Jeff who’s “Good With Spreadsheets”; both can make use of these tools to help bridge the gap between custom developed systems and bought-in solutions.

The FamilyPowerUserFamily

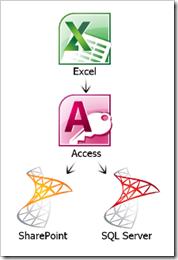
From my (reasonably short) time using SharePoint, it seems there is a family tree of products that favour the Power User. Right at the top we have the grandfather (or Godfather) Excel, who provides good honest data-entry and hand-tailored analysis.

The middle generation is Access, who took the family-business spreadsheet and took it several steps further. Firstly the data was backed with a database engine, then Forms were added to allow the custom validation and entry of the data, and finally Reports were used to polish the resulting information for analysis and display.

The beauty of this was that an entire useful and end-user-friendly system could be built without needing an in-house development team nor having to buy-in a pre-made solution.

The last generation is Access’s two daughters: the serious older sister SQL Server, and the smart but friendly SharePoint. SQL Server took on the grim and complex business of dealing with data (and later married into the dour .Net family), whereas SharePoint set about taking system creation to the masses.

Of course SQL Server takes care of SharePoint’s data as a big sister would, and more than a few favours are called-in from the .Net family too. This allows SharePoint to concentrate on user interfaces and providing systems to everyday folk put off by SQL Server and .Net’s serious and frowny expressions.

What are you talking about?

To summarise before this analogy runs away with itself: SharePoint is Access with the inner workings of data processing hidden, and the idea of a customisable Power User created interface polished even further.

Why is this a good thing?

For Power Users this is good because they can concentrate on making the systems match what the users need without having to worry about things that they’d much rather a developer would worry about, like “How do I make a page to show an order?”.

Normal users get systems made by people that know the business, and avoid the ominous pause when asking a developer how long (or worse: how much) a small change will be. Having been an in-house developer for a small business I can vouch that anything that lets users do the work they need to do without effecting mine gets a giant smiley sticker (and I mean giant).

Finally, SharePoint is much more flexible and customisable than the earlier generations; all manner of additions can be made that can make it into a tool specialised for an individual organisation.

Why is this not such a good thing?

It’s entirely possible to misuse these tools (for example, using SharePoint as a tea-brewing timer); but it would take some strong arguments from a seasoned professional to dissuade an enthusiastic director deafened by the sound of a new market.

I once worked with an MD who would create a mock-up of the system he wanted in Access, and then hand it over to our team to make it into a reality. In truth the system he wanted looked and worked very little like the database (“if you click that it should actually do this”). While it is possible to create things this way, it was much more efficient (and less nightmare inducing) to talk out the requirements and design from there.

As with many complex tools, it needs someone (developer or otherwise) with a good working knowledge to use them to their full potential. It is important to know the limits of both can be done and what should be done.

In short

These tools give users the ability to easily construct systems and applications that wouldn’t otherwise be possible without a few years of getting to know Mr & Mrs .Net.

However, the more powerful a tool is the more easily misused it is (think chainsaw): It’s best to consult someone with some experience before endangering your limbs.

Editing The SharePoint List Item Menu (Part 3: Other Uses)

Date:November 18th, 2010 Author: Tags: , , , , ,
Category: General, SharePoint Development, SharePoint Ideas, Training Comments:4 ;

In previous posts I’ve used the “Open in new window” function to illustrate the two different methods of adding to the List Item menu, or Edit Control Block (ECB) to use its catchier name.

Part 1 covered the CustomAction element; the developer-leaning Visual Studio method. Part 2 avoided any kind of dedicated program by doing the same directly in SharePoint using Javascript in a Content Editor Web Part (CEWP); for power users or those with software commitment issues.

In this section I’ll be looking at some more interesting, and possibly useful, extra options to illustrate the potential of these kinds of enhancements. These can also be used as stubs to produce more complex functionality along the same lines.

I’ve purposefully kept these changes low-touch (avoiding AJAX libraries for example), to make them quick to try out without installing any additional dependencies.

In each example I’ll give a snippet of code for using a CustomAction or Javascript; these will be brief, as they assume you’ve read my earlier posts.

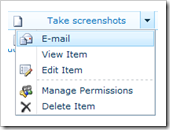
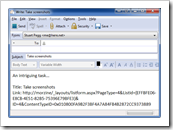
E-mail a task

This example adds a link that pre-populates a new e-mail with some information from the selected task. It uses the good old ’mailto:’ to open the default mail program for the client machine. If you don’t have a default mail client then, well, it won’t (harsh but fair).

This can be used as a quick way to create nagging e-mails for task owners, or to highlight tasks that may be of interest to others.

menuemailemail

To add this option using Javascript, add the following to a CEWP:

<script type="text/javascript">
function getMailTo (ID)
{
var taskTitleLink = document.getElementById(ID).firstChild;
var mailTo = 'mailto:?subject=';
mailTo += encodeURIComponent(taskTitleLink.innerHTML);
mailTo += '&body=';
mailTo += encodeURIComponent('An intriguing task...\n\nTitle: ' + taskTitleLink.innerHTML + '\n');
mailTo += encodeURIComponent('Link: ' + taskTitleLink.getAttribute('href'));
return mailTo;
}

function Custom_AddListMenuItems(m, ctx)
{
CAMOpt(m,’E-mail’,’window.location=getMailTo(‘ + currentItemID+ ‘);’,’/_layouts/images/EMAILPST.PNG’);
return false;
}
</script>

To produce the same result using a CustomAction, using almost the same Javascript in the link; the following UrlAction should be used:

<UrlAction Url="javascript:window.location='mailto:?subject='+encodeURIComponent(document.getElementById({ItemId}).firstChild.innerHTML)+'&amp;body='+encodeURIComponent('An intriguing task...\n\nTitle: '+document.getElementById({ItemId}).firstChild.innerHTML+'\n')+encodeURIComponent('Link: '+document.getElementById({ItemId}).firstChild.getAttribute('href'));"/>

The differences between the two (other than the infrastructure used) are as follows:

  1. UrlActions are ugly not amenable to declaring Javascript functions in an readable way.
  2. URL in an UrlAction is  wrapped in a Javascript function (STSNavigate) when rendered in the OnMenuClick event attribute, so it needs the javascript: prefix to use such. The Javascript version is put in the same event attribute, but without the wrapping function no prefix is needed.
  3. currentItemId and {ItemId} both get the current List Item’s ID in their own contexts.

The code in both of the above examples take advantage of the fact the Title and link are within the div that shares this item’s ID. Using this method limits the amount of information we can get our hands on. We can get a little more using GetAttributeFromItemTable, but to get all the information we’d have to use some more contrived methods.

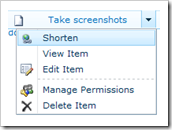
Shorten an item linkmenushorten

This option opens a new window to tinyurl’s site with the task’s abbreviated link posted through. If you’re using an earlier version of Flash than 10 (rather you than me) it’ll even put it in the clipboard for you.

As you may have previously seen, SharePoint links are often a nest of GUIDs. This allows a neat little link to be produced instead: great for optimising scary archaic communication methods such as paper documents or VoYP (Voice over Yoghurt Pot).

I’ve used tinyurl simply because you can send the link to be shortened in a querystring, and nothing else is needed. Much as I love fetching API tokens and/or posting plain text login details, I used the most straightforward method for brevity’s sake.

<script type="text/javascript">
function getShortenUrl(ID)
{
var shortenUrl = 'http://tinyurl.com/create.php?url=';
shortenUrl += encodeURIComponent(document.getElementById(ID).firstChild.getAttribute('href'));
return shortenUrl;
}

function Custom_AddListMenuItems(m, ctx)
{
CAMOpt(m,’Shorten’,’window.open(getShortenUrl(‘ + currentItemID+ ‘));’,’/_layouts/images/LINK.GIF’);
return false;
}
</script>

There is very little difference between the two implementations, except as mentioned in the previous section.

<UrlAction Url="javascript:window.open('http://tinyurl.com/create.php?url='+encodeURIComponent(document.getElementById({ItemId}).firstChild.getAttribute('href')));"/>

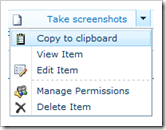
Copy to clipboard (IE only)menuclipboard

A slightly more obvious method of copying an item’s direct link to the clipboard than the right-click menu. Handy for quick intuitive copying, or for broken mice.

Unfortunately this functionality is restricted to Internet Explorer (which covers most SharePoint users). Alternative solutions and their problems are covered pretty comprehensively on this Stack Overflow question.

<script type="text/javascript">
function setClipboard(ID)
{
window.clipboardData.setData('text',document.getElementById(ID).firstChild.getAttribute('href'));
}

function Custom_AddListMenuItems(m, ctx)
{
if (window.clipboardData)
{
CAMOpt(m,’Copy to clipboard’,’setClipboard(‘ + currentItemID+ ‘);’,’/_layouts/images/CLP16.GIF’);
}
}
</script>

The above sample takes advantage of the Javascript method’s flexibility, and does not display the option if the window.clipboard object is not present (i.e. not IE). But due to the restrictive nature of the Custom Action, we don’t have that ability.

<UrlAction Url="javascript:if(window.clipboardData){window.clipboardData.setData('text',document.getElementById({ItemId}).firstChild.getAttribute('href'))}"/>

Conclusion

The two methods of adding to the List Item menu each have their own benefits and restrictions.

The CustomAction method allows site-wide distribution and can be bundled with other CustomAction modifications (such as changes to the command ribbon), but it lacks flexibility and has very little granularity in its release (an entire list type). It also requires Visual Studio, and access to install such features.

Using Javascript in a CEWP is very flexible and much more readable for anything more than a very straightforward action. It can be added by power users rather than developers, without even using SharePoint Designer. Unfortunately it has to be added on every target view individually. If the Javascript was added to the master page it would result in an even less targeted release than the CustomAction option.

Both of these methods have very little item data to hand, but both can be greatly extended by making use of AJAX calls to SharePoint Web Services, 3rd party services, or custom pages.

Editing The SharePoint List Item Menu (Part 2: Using Javascript)

Date:November 4th, 2010 Author: Tags: , ,
Category: SharePoint Development, SharePoint Ideas, SharePoint webparts, Training Comments:6 ;

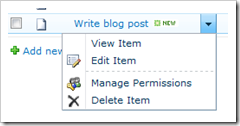
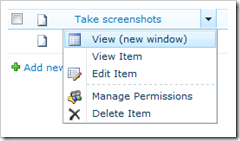
MenuBeforeFollowing on from Part 1 of this series which covered Editing the SharePoint List Item Menu Using Elements, I thought it would valuable to reproduce the same results without using Visual Studio or SharePoint designer (Part 4 will be to do it without a monitor). This method will allow non-developers with view edit access to customise the List Item Menu.

In this example, a ‘View (new window)’ option will once MenuAfteragain be added to each item’s context menu to avoid the modal box, as illustrated to the right. Although as Christophe helpfully pointed out in response to Part 1, the modal boxes can be banished under the list’s Advanced settings. Fortunately there are many other uses for these techniques, as we will see in Part 3.

This example uses a Content Editor web part, which means the Javascript can be added on a view-by-view basis. This allows a more targeted release and can be added by any user with permissions to edit the view. However, it makes widespread distribution more difficult; putting the function in a master page can overcome this but will implement it for every item menu on every list.

(more…)

Editing The SharePoint List Item Menu (Part 1: Using Elements)

Date:November 4th, 2010 Author: Tags: , , , ,
Category: SharePoint Development, SharePoint Ideas, Training Comments:2 ;

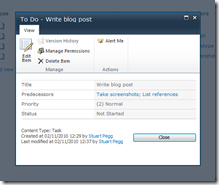
The lovable modal boxWhile copying my rapidly lengthening scribbled to do list into a SharePoint Tasks list, my unconscious habit of middle-clicking items to come back to was being constantly foiled. Instead of opening a new tab the modal box kept popping up in the middle of my screen (new to 2010 I hear).

The drop-down menu options did exactly the same, leaving no alternative but to right-click the item, copy the link, manually open a new tab, paste it in, and switch back; much too much like hard work. So I decided to add an option to open the item in a new window… in retrospect probably harder work than just putting up with it.

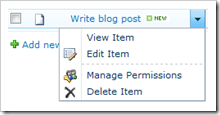
The default item menu
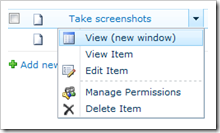
The modified item menu

As a result, this is a brief run-through of how to add options to the context menu of list items in SharePoint, using a CustomAction in Visual Studio. For using JavaScript to the same ends, see Part 2: Using JavaScript (coming soon).

(more…)