Posts Tagged ‘WebPart’

Google Chrome v43+ incompatibility – new version of Planner, PivotPoint and TeamTime available

Date:June 1st, 2015 Author: Tags: , , , , ,
Category: PivotPoint Web Part, SharePoint Planner, SharePoint TeamTime Comments:0 ;

New versions of Planner, PivotPoint and TeamTime are available that correct an incompatibility with Google Chrome v43+.

This incompatibility can cause the web part to be hidden when using the web part configuration toolpane (edit web part).

As Google Chrome is automatically updated it’s important that any customers who use Chrome update to the latest version.

You can download the latest trial version and upgrade by installing over the top – your existing settings will be saved and the License Key picked up to activate the full version.

New version of FilterPoint web part for SharePoint – configurable date ranges

Date:July 20th, 2013 Author: Tags: , ,
Category: FilterPoint Web Part Comments:0 ;

A new version of our FilterPoint web part for SharePoint is available – v1.3.3

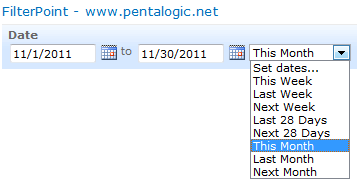
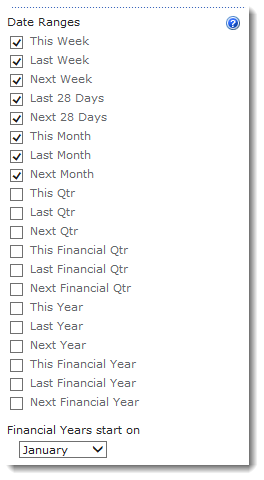
This new version adds a configurable Date Range control.

More details are in the online manual.

You can download and upgrade to the latest version without losing any settings.

FilterPoint Update

Date:November 30th, 2010 Author: Tags: , , , , ,
Category: Filter, General, SharePoint Development, SharePoint Ideas Comments:0 ;

We have spent a lot of time over the past month working on the beta version of FilterPoint. Our team of professional testers have been working hard to check for compatibility with all versions of SharePoint 2007 and 2010 and a wide range of browsers, as well as looking for bugs and challenging us on some aspects of the usability of the UI.

And we also owe a huge vote of thanks to our beta volunteers who have been testing out the product in the real world.  Our volunteers and not only uncovered some bugs, but also come up with suggestions for additional things that we could include in the first release.  Some of these we have already added and they include:

(more…)

New SharePoint FilterPoint web part – public beta released

Date:November 1st, 2010 Author: Tags: , , ,
Category: Filter, General, SharePoint webparts Comments:0 ;

FilterPoint SharePoint webpartWell finally, after months of hard work we are delighted to be able to let you know that we have just released our new FilterPoint web part for SharePoint in beta.

FilterPoint has been a long time coming so we hope you are going to like it.  It’s a tool that we always knew we wanted to develop. Dynamic filtering  – the ability to flip between filter values at the click of a mouse – is one of the building blocks for the kinds of rich applications that our customers like to build for themselves.  It builds on the power of webpart connections (a much neglected area in SharePoint) and once you have the ability to apply a group of filters to a page with a selection of webparts and lists you have the potential for some really nice dashboards.

But, as I said FilterPoint has been a long time coming, because what started out looking like a straight forward project turned out to be anything but . . . .

It starts off looking ever so simple with plenty of online examples – but when you start delving into the details it quickly becomes the stereotypical “Can of Worms” project.

There are basically two interfaces you can use – one old IFilterProvider interface , and the new ITransformableFilterValues interface. So far sounds easy but how about some wildcards….

With the new ITransformableFilterValues interface – you can’t create filters dynamically,  and you can’t have multiple connections on the consumer side in SP 2007.

On the other hand, with the old IFilterProvider interface you can’t send multiple filter values to List view web parts and you can’t connect more than one provider web part to a consumer web part. And that’s just scratching the surface.

To top it all off you have little control over what the filter consumer web part actually does with the info you give it – want to say “Equals” or “Not Equals” or “Greater Than” etc and thats out of the scope of what a filter provider can do (we’ve got some ideas on how to work around this in a future version of FilterPoint though).

My oh my, enough to make your head spin!

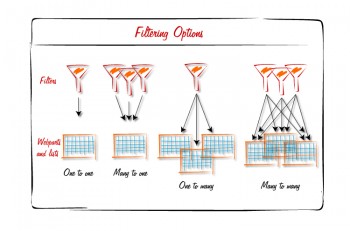
FilterPoint Webpart, filtering optionsAnyway- we’ve worked really hard to make this web part as simple to use as possible whilst still being compatible with any web parts that can accept the standard web part connections.  We have managed to come up with a tool which allows you to apply multiple filters to multiple webparts and lists, and (at least when working with our Planner and PivotPoint) you can have some control over the operator – using “not equal”, “greater than” and “less than” as well as the standard “equals”.  We hope to extend this aspect of the functionality in v2.

So, why might you want to use this thing then?

Well, you might want to use simply it to guide your users to the most relevant data in one list or webpart – giving them the ability to “filter on the fly”, selecting new data sets, and then clearing filters in one click.

Or, at the other extreme, you might want to bring together a collection of lists and web parts on one page, and use FilterPoint to create a truly dynamic dashboard for your users.

In fact, once you start to use filters and webpart connections there are any number of different ways to enhance the functionality of your SharePoint site with a tool like FilterPoint – we already have it set up on our Sales Pipeline and Client lists here, and are finding more possible uses every day.

We are planning to have FilterPoint ready for full public release by the end of the month.  In the meantime, if you pre-register for your free trial, you will qualify for a 25% discount on the product purchase price.

We hope you like it, and as always, we are keen to hear your thoughts and feedback.

Filterpoint Download

Why Tooltips are cool tips in PivotPoint Webpart for SharePoint

Date:September 9th, 2010 Author: Tags: , , ,
Category: PivotPoint Web Part, SharePoint webparts Comments:0 ;

Tooltips  – those little boxes that pop up when you hover over something – can be a blessing or a bit of a nightmare.  It drives me nuts when people enable those snapshot tooltips on every hyperlink on a page.  the resulting pop ups are huge, usually contain info I don’t want to see, and seem to hang around on the screen for ever.

But imagine a tooltip where you choose exactly what information is displayed?  How cool would that be?  Well that’s exactly what you get with tooltips in our PivotPoint web part  for SharePoint – which is why I think they rock.

(more…)

SharePoint Case Study – Websense Pivot Through Their Marketing Dashboards

Date:September 6th, 2010 Author: Tags: , ,
Category: General, PivotPoint Web Part, SharePoint webparts Comments:0 ;

Hi everyone.

We wanted to share this new SharePoint case study with you.  It shows how online security specialists Websense are using our PivotPoint webapart to slice and dice their marketing list data, and create some awesome, dynamic dashboards.

(more…)

SharePoint Planner Webpart – new version released

Date:September 1st, 2010 Author: Tags: , ,
Category: General, SharePoint Planner, SharePoint webparts Comments:0 ;

Just a quick note to let you all know that we have just released a new version of SharePoint Planner web part – v2.6.4.

The new version includes a couple of handy new features that might be useful for you.

The new Split Multiple Values option will be useful in resource planning in circumstances where you want to enter multiple category values into one list item, but still view each individual category’s activity as a separate line in your Planner view.  For example you might want to create a list item for a project meeting, with several people in attendance.  In a Gantt view of project tasks it would be appropriate to show this meeting as one item.

sharepoint planner gantt chart

But in a category view of staff availability/commitments you would want the meeting to appear as a separate item for each staff member involved. (more…)

SharePoint Staff Vacation Planner – DIY Guide part 5 – the system in action and Out of the box options.

Date:August 9th, 2010 Author: Tags: , ,
Category: PivotPoint Web Part, SharePoint Ideas, SharePoint Planner, SharePoint Reminder, SharePoint webparts Comments:0 ;

This is Part 5 of the SharePoint Staff Vacation Planner – DIY Guide

See the System In Action

So, now let’s reap the rewards for all of our hard work and see the system in action.

I need to book a day off for a hospital appointment on Friday 9th of July.  I can see all the absence bookings for my department and the number of days I have had off this year on the absence dashboards above. I’ve only had 1 day off for Medical Appointments so far this year and I am allowed 3 so that’s fine – but 3 people are off on that day already, it’s going to be tough, but I really need to go to that appointment.

So, as you can see, I can add a new item to the planner straight from the link in the webpart, I don’t need to go to the list.
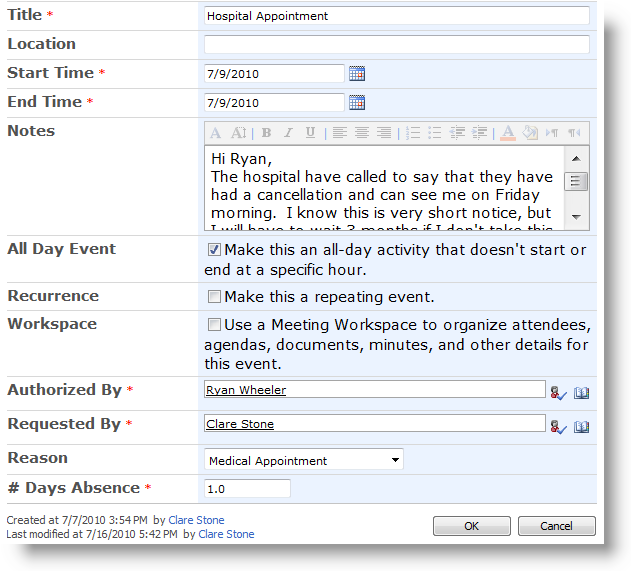
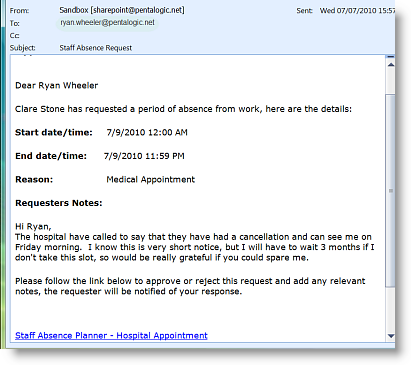
Ryan receives the absence request email and from looking at his dashboards he can see that although I am well within my Medical Appointments entitlement approving this absence is going to leave him really short staffed on Friday – but he can’t face the thought of listening to me moaning about my in-growing toenail for another 3 months, so he approves the request.

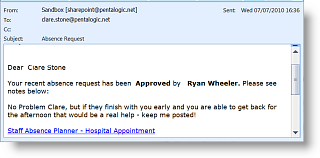
Once the request is approved I get an email notifying me, and the status of the absence changes from “pending” to “approved” on the absence planner.
And for the final step in the process, is the email to Ryan on Thursday, to remind him that I am off the next day, giving him chance to make sure all my work is covered.
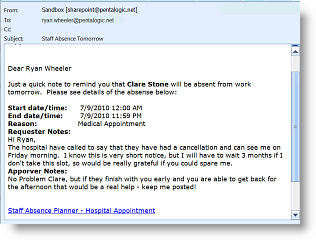
So now we should have no excuse for messing up staff absence planning ever again!

So Can’t I do this with SharePoint out of the Box?

Well some of it. Clearly, your basic list and filtered views are all set up in SharePoint out of the box.

When it comes to your dashboard views there are some limitations.

This is how your Vacation Planner Wall Chart looks out of the box:
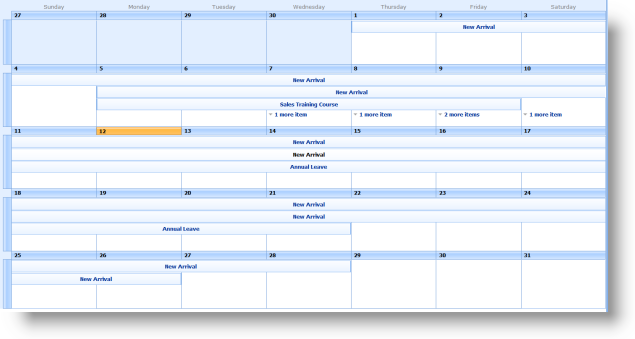
or as a Gantt view:

We have lost all of our color coding, it’s not possible to show the name of the person who is absent, unless you make this the title of the event, and we have no way of distinguishing between approved and pending items.
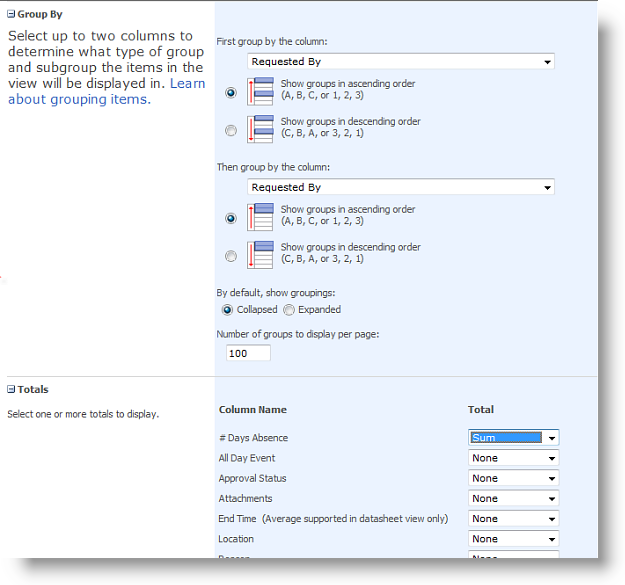
For the “Absences to Date” and “My Absences” dashboards we can achieve something similar, if a bit clunky, out of the box.  From the settings tab in your Staff Absence Planner list, choose edit current view.

Head down to Group By and choose Requested By and Reason.  Then expand the Totals section and choose # Days Absence and sum.


This will give you a view like this:
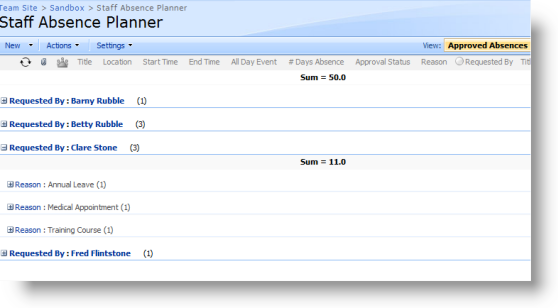
The information is all there, but I have to work to get at it.  For example Ryan can see that I have had 11 days off this year, covering 3 separate occasions, but he is going to have to drill into each individual event and get his calculator out to figure out how many of my days off have been annual leave, training or Medical.

Then on to the workflow emails. It is possible to generate email alerts for the absence request and the request approval, but the solution isn’t perfect.  For absence requests an administrator can set the list up to email all line managers within your company or department, every time a new request is added to the list.  This means that managers will get absence requests from their own staff, but also from all other staff as well.  The only way to avoid this would be to set up a separate absence request list for each line manager.

For the request approved/rejected email the requester will need to set up an alert on each request as they create it, asking to be alerted any time anything changes on that list item.

When the alert emails arrive, this is how they look:
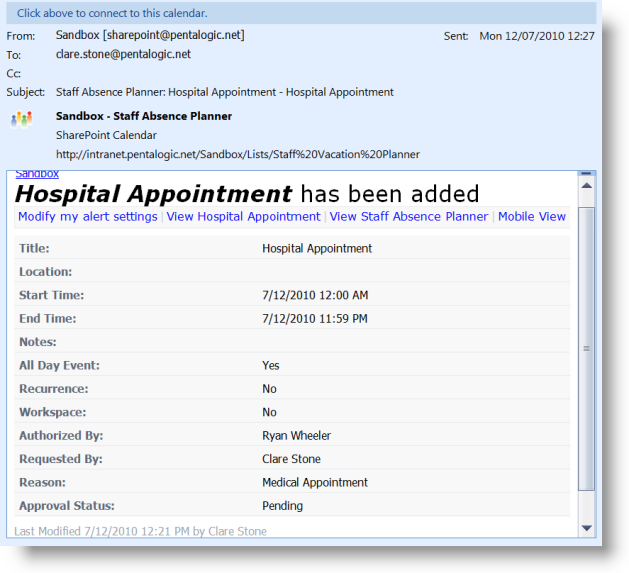
There is no way to edit the email, and give the recipient clues on what they are supposed to do with it.

The final “John Smith is off work tomorrow” email, cannot be generated in SharePoint out of the box, as it doesn’t do date based alerts.

You could do this with Workflow and Event Receivers, but that means having some technical knowledge and breaking out SharePoint Designer and/or Visual Studio.

So – can you build a staff absence planning system with SharePoint out of the box?  I guess the answer is “kind of”. It is possible to build a basic system but it’s going to lack some useful functionality and may now be enormously user friendly.

We hope you’ve found this useful.

If you would like to try the Vacation planning system you can download a 30 day free trial version here.

And as always, if you have any questions or comments, we would love to hear them.

SharePoint Staff Vacation Planner part 4 – create an absence approval workflow

Date:August 5th, 2010 Author: Tags: , ,
Category: General, SharePoint Ideas, SharePoint Reminder Comments:0 ;

This is Part 4 of the SharePoint Staff Vacation Planner – DIY Guide

In parts 1 through 3 of this series we have laid the foundations for our tailor made Staff Vacation and absence planning system.  We have set up the basic SharePoint list, defined a number of list views, and set up dashboards using SharePoint Planner and PivotPoint webparts.

Now we are going to add the “moving parts” to the system and set up a simple approval email workflow using SharePoint Reminder webpart.

We are going to have 3 steps in our system :-

  • One email to a staff member’s line manager when a new request for absence has been submitted.
  • One email to the staff member and let them know whether their request has been approved or rejected.
  • One email to the line manager the day before a staff member is due to be absent from work as a reminder.

(more…)

SharePoint Staff Vacation Planner – DIY Guide part 3 – set up an Absences to Date Dashboard

Date:August 4th, 2010 Author: Tags: , , ,
Category: General, PivotPoint Web Part, SharePoint Ideas Comments:0 ;

This is Part 3 of the SharePoint Staff Vacation Planner – DIY Guide

So having set up our basic SharePoint list with filtered views, and our “Wall Chart” dashboard, using SharePoint Planner webpart, we are now ready to get up our “Staff Absences to date” and “My Absences” dashboards.  This is the bit that allows managers to monitor the amount of absence each of their team members has had:

Or for individual staff members to monitor their own absences:

(more…)