Posts Tagged ‘Planner’

Google Chrome v43+ incompatibility – new version of Planner, PivotPoint and TeamTime available

Date:June 1st, 2015 Author: Tags: , , , , ,
Category: PivotPoint Web Part, SharePoint Planner, SharePoint TeamTime Comments:0 ;

New versions of Planner, PivotPoint and TeamTime are available that correct an incompatibility with Google Chrome v43+.

This incompatibility can cause the web part to be hidden when using the web part configuration toolpane (edit web part).

As Google Chrome is automatically updated it’s important that any customers who use Chrome update to the latest version.

You can download the latest trial version and upgrade by installing over the top – your existing settings will be saved and the License Key picked up to activate the full version.

Date Range filtering with the new version of FilterPoint, PivotPoint and Planner.

Date:December 13th, 2011 Author: Tags: , , ,
Category: Filter, FilterPoint Web Part, PivotPoint Web Part, SharePoint Planner, SharePoint webparts Comments:0 ;

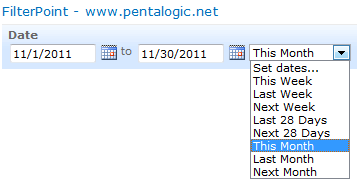
FilterPoint has had the ability to send Date Filters but a common request has been Date Ranges – like showing everything this month, last year or between two arbitrary dates.

FilterPoint - Date Range Filtering

The good news is that we’ve added this in to FilterPoint as of version 1.2

The bad news is that this will only work with our other SharePoint products – Planner and PivotPoint – it won’t work with SharePoints built in List View web part (LVWP).

That’s disappointing!

Yes it is – it’s just a limitation of SharePoints filtering I am afraid, but all is not lost!

This page shows how you can do things like Month filtering using calculated columns and this blog article shows how you can setup “Current Month/Previous Month” views using nothing more than Calculated Columns and View filters.

Upgrading

As always you can upgrade without losing any settings by downloading and running the latest trial version and selecting “Upgrade” when prompted (don’t forget you need the a recent version of Planner (v2.6.9+) and PivotPoint (2.2.0+) to accept date range filters.

SharePoint Staff Vacation Planner Update – dealing with Public Holidays

Date:September 1st, 2011 Author: Tags: , , , ,
Category: PivotPoint Web Part, SharePoint Planner, SharePoint Reminder Comments:0 ;

Customers who use our SharePoint Staff Vacation Planner Toolkit often ask about the best way to deal with public holidays.  Public Holidays tend to affect the whole team.  So you want them clearly marked on your Vacation Planner dashboard, but you certainly don’t want to have to enter each public holiday for each team member as a separate event.  And you probably also don’t want to be firing off absence approval requests for each holiday either.

So here are our suggestions on the best way of handling Public Holidays within the SharePoint Staff Vacation Planner Toolkit.

First you need modify your list.  Go to list settings and open up your “Reason” field.  In addition to your existing reasons for absence add a new reason – Public Holiday.

Then open up the settings for your “Requested By” column and make sure you have “Allow Multiple Selections” checked.

Now you need to modify your Planner web part.

So, “Edit Shared Web Part” then, under your “Category”  picker, check the “split multiple selections box”.  This is key if you want to be able to create just one event for each public holiday but have it show up against each of your team members.

Now go down to the Planner Colors section of the Toolpart and update your color coding by column section to include an extra color code for your new Reason for absence that you created in your list – Public Holiday – I am going for a nice orange.

Now check your PivotPoint web part. For this to work you are going to need PivotPoint 2.1.4 or above.  Download it here if you don’t have it already (free to all PivotPoint v2 customers, or v1 customers with Premium Support). In the Toolpart make sure that in the “Split Multiple Values” dropdown you have chosen “Split Records”.  This will ensure that when we enter a 1 day public holiday for 4th of July, for example, 1 day gets entered against each team member in the pivot table.

Finally, before we start adding events, to ensure that we don’t accidentally fire off approval requests and notifications all over the place, access the Reminder web parts that you have set up and in the “Reminder Testing”  section at the bottom of the Toolpart enter your own email address so that any emails generated whilst you are adding the public holidays go to you.  This will be a better solution than simply switching the Reminders off as you work, as it will mean that if any “real” requests are submitted whilst you are working you will be able to redirect them, rather than them being lost.

Add a Public Holiday

So, from your Planner dashboard add a new item.  Let’s do 4th July. Set it up as an all day event.  Set yourself as “approved by”, you will need to approve the event before it will show up in people’s dashboards.  Now add your whole team to the “Requested By” field.  It’s easiest to do this using the Address Book.  Now ensure you have selected “Public Holiday” in your Reason field.  Approve the request.  Discard all the “Request approved” notifications that are redirected through to you.  And now you will see your public holiday, nicely marked against each of your team members.  Repeat as needed for all of your other public holidays, remove the redirect from your Reminder emails and then you can relax for another year!

I hope this helps you in using Vacation Planner.  If you have any questions or requests about the Vacation Planner we would love to hear them.

SharePoint Planner – New Version Release, every minute counts!

Date:August 25th, 2011 Author: Tags: , , ,
Category: General, SharePoint Planner Comments:0 ;

We were recently contacted by a customer who was going to be responsible for organizing a visit from a Very, Very important person. The visit would only last a couple of hours, but would involve many people and needed to be planned down to the minute.

The client wanted an easy to use graphical representation of the project, in SharePoint, for everyone to refer to and update as the event progressed.

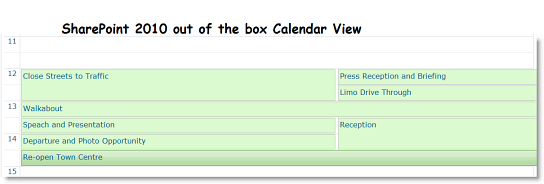
Let’s take a look at how the project might have looked in an out of the box calendar view:

Hmmm, don’t think that’s really giving us the kind of info we need.  We have 7 items here, scheduled over a 3 hour period from 12 noon to 3pm, items fall in to different categories and are assigned to different people.  We’re not really getting that from this view are we?

Actually, the view is quite misleading.  The first event “Close Streets to Traffic” looks as though it lasts for one hour from 12.00 to 13.00 right? Wrong, this is actually a 40 minute event, starting at 12 and finishing at 12.40.  This may not seem like a big deal but there are times when this kind of accuracy really matters – it’s easy to see how running 20 minutes late at a VIP event could lead to VIP tantrums!

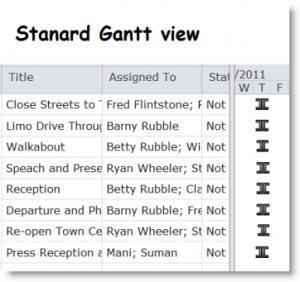
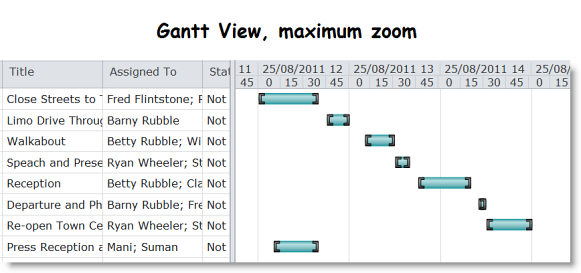
So how about the out of the box Gantt Chart? OK, so we have access to a little more info on who is doing what, but now we can see nothing at all on timings.

We can zoom though, and this is what we get when we do maximum zoom.

Well it’s certainly an improvement, but it’s not great is it?  We are on maximum zoom here are it’s still quite difficult to see the detail of what’s happening when.

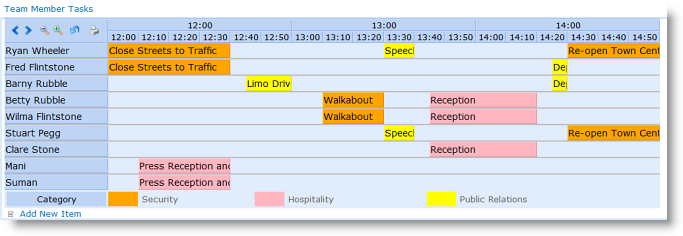
We thought we could do better.  So we added to SharePoint Planner the ability to set timescales to 10 or 15 minutes.  We think this gives a much clearer view for fast moving projects like this. Either in the classic Gantt view, most usually used for projects: Or in a category view for exactly what each of your team members should be doing at any one time:

The new 10 and 15 minute scheduling options allow you to schedule events more accurately and deploy resources more effectively.

This is a new feature in Planner version 2.6.6, so if you are using an older version of the software it would be worth upgrading now.

Or if you don’t yet use SharePoint Planner why not give it a try today with 30 day free trial?

SharePoint Planner Webpart – new version released

Date:September 1st, 2010 Author: Tags: , ,
Category: General, SharePoint Planner, SharePoint webparts Comments:0 ;

Just a quick note to let you all know that we have just released a new version of SharePoint Planner web part – v2.6.4.

The new version includes a couple of handy new features that might be useful for you.

The new Split Multiple Values option will be useful in resource planning in circumstances where you want to enter multiple category values into one list item, but still view each individual category’s activity as a separate line in your Planner view.  For example you might want to create a list item for a project meeting, with several people in attendance.  In a Gantt view of project tasks it would be appropriate to show this meeting as one item.

sharepoint planner gantt chart

But in a category view of staff availability/commitments you would want the meeting to appear as a separate item for each staff member involved. (more…)

SharePoint Staff Vacation Planner – DIY Guide part 2 – set up a “Wall Chart” Dashboard

Date:August 3rd, 2010 Author: Tags: , ,
Category: General, SharePoint Ideas, SharePoint Planner Comments:1 ;

This is Part 2 of the SharePoint Staff Vacation Planner – DIY Guide

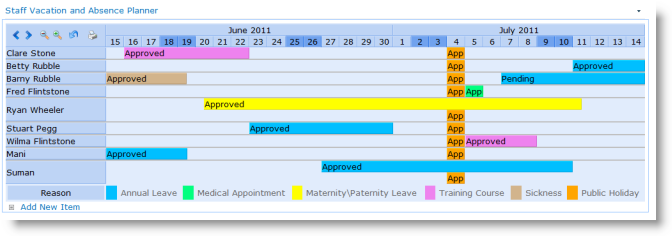
So having set up our Vacation and Absence list yesterday, we can now apply Planner webpart, to create a vacation and absence dashboard like this:

So staff and managers can easily see who is off when, and when it will be possible to request leave.

(more…)

SharePoint Staff Vacation Planner – DIY Guide – Part 1

Date:August 2nd, 2010 Author: Tags: , , ,
Category: General, SharePoint Ideas, SharePoint Planner, SharePoint Reminder Comments:10 ;

SharePoint offers a great foundation for non-programming business people to build applications around our business processes, just the way we want them.  This guide will show you how to build your own SharePoint staff vacation and absence planning system.

Staff vacation and absence planning can cause trouble and strife in any organization.  The good old wall planner can work for staff who are all in the same physical locations . . .

. . . . until you approve an absence then forget to enter it on to the planner, and then allow someone else to book vacation at the same time, leaving your department under staffed.

. . . . .or until you forget that Sam has booked a week’s vacation and call him up furious on Monday morning asking why he isn’t in work.

. . . . . .or authorize Jenny’s week off in the Caribbean only to get a thorough ticking off from HR because you have allowed Jenny to exceed her annual leave entitlement.

I’ve been guilty of all these crimes in my time. So I was pleased to find that with SharePoint we can make things a little more organized, and using our PivotPoint, Reminder and Planner web parts together we can set up a slick little Vacation Planning system in just a few minutes.
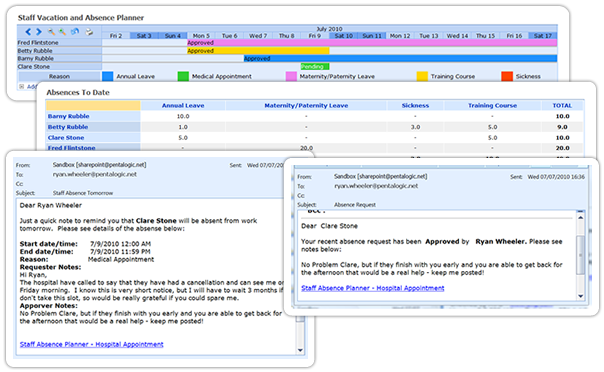
So, what we are aiming for here is:

  • A dashboard “Absence Planner” display, which will be accessible to all staff via SharePoint.
  • A personal and managers “Absences to Date” dashboards.
  • An automated Absence Request approval system
  • An email reminder to line managers of imminent staff absence.

To be clear: this is not a ready made “Vacation Planning” template or application, its a guide showing how you could build your own system, using some of SharePoints built in features and then add a little pizazz with our web parts. Its going to take a little work to set this up for your organisation but then it should be a better fit than a packaged solution.

Setting up the Vacation Planner should take you about an hour if you have our webparts already, a little more if you need to download them.  So we have broken this guide up into 4 parts, which we will be publishing over the next 5 days:

Today – set up your Staff Vacation and Absences list and filtered views

Part 2 – set up a Staff Vacation Planner dashboard with SharePoint Planner webpart

Part 3 – Set up Absences to date dashboard with SharePoint PivotPoint Webpart

Part 4 – Set up a absence request and approvals workflow with SharePoint Reminder Webpart

Part 5 – see the system in action, and see how much of this you could achieve with SharePoint out of the box.

For those of you who can’t wait that long, you can download the full PDF guide and a 30 day free trial of the webparts here.

First set up your List

We are going to use a Calendar List, add some extra columns, and switch on Approvals.

So, from which ever section of your site you want choose select Site Actions from the top right of the page, then from the dropdown, select Create then from the Tracking tab, select Tasks.

Call your list whatever you want – Staff Absence Planner works for me, decide whether you want it to display in the quick launch menu  – probably no need as few people will need to access the list that way once we have our system set up.  Then select no in the Alerts option.  Click OK and you list is set up.

Now go to the Settings tab in your list and first of all choose Create Column. We are going to add a few extra columns to the list. Add the columns Requested By and Authorized By, the column type for both of these is “Person or Group” and you want them both to display in the default view. Make these mandatory fields by clicking Yes for Require that this column contains information. Now we are going to add a column to show the reason for the absence – annual leave, maternity leave, training, sabbatical, whatever.  The column type for this column is going to be Choice and again we are going to made completion of this field mandatory, and show the field in the default view. Finally a column for the number of days of each absence, we want this to be a number column, I have set the minimum value to 0.5 days and the maximum to 30 days, and again we want it to be a mandatory field.

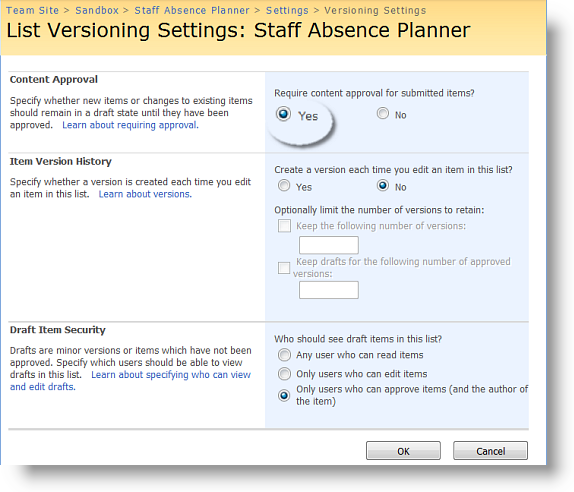
Next let’s switch on Approvals.  Back in the Settings tab of your list choose List Settings and from the General tab choose Versioning Settings. In Content Approval click Yes and we are done with the list set up.
Set up Filtered Views

Now for the filters.  If you haven’t made much use of filters before it may be worth having a look at these resources:

SharePoint filter techniques articles

Filters can really enhance the power of SharePoint lists, and we are going to use 3 here in our vacation planner.

#1 – Approved and Pending Absences for Planner

We want our Planner to provide a dashboard display for all staff, showing absences requested and approved.  So that staff can see when it will be possible to book an absence and managers can decide whether they wish to approve a staff absence request.

Our list actually contains 3 approval status’s “Pending”, “Approved” and “Rejected” we don’t need to display absence requests that have been rejected on our Planner, so we are going to set up a list view to show just “Pending” and “Approved” requests.

Go back to Site Settings and choose Create View.  From the menu here choose Standard View. N.B.  This choice is very important – Planner only works on Standard views. In the Create View Page add a name for your view, we have used Staff Absences – Approved and Pending. In the Audience section be sure you have checked Create Public View this again is an essential for Planner to work.  In the column section choose the columns that you wish to display to people who are creating or entering a list item.  This will not impact of the Planner display.

We are then going to skip over the “Sort” section and from the Filter section choose Show Items only when the following is true.

Column Approval Status is equal to Pending OR column Approval Status is equal to Approved.  Click OK and we are done with the filter.

#2 – Approved absences for managers “Absences to Date” Dashboard

Set up of this is exactly the same as the last one, except we are going to call it “Absences to Date” and just show items where column approval status is equal to approved.

#3  – The Magical [Me] Filter, for “My Absences” Dashboard.

If you haven’t used this filter before you are going to love it!  It shows whoever is logged in just the list items relating to them, so its ideal for our “My Absences” dashboard view, but also has a whole host of other uses.

We need a Standard, public view again – yes even though it’s “My Absences” it’s still a public view or other people won’t be able to use it.  Call it My Absences then head down to the filter section and choose to show items where column Requested By, is equal to [Me].
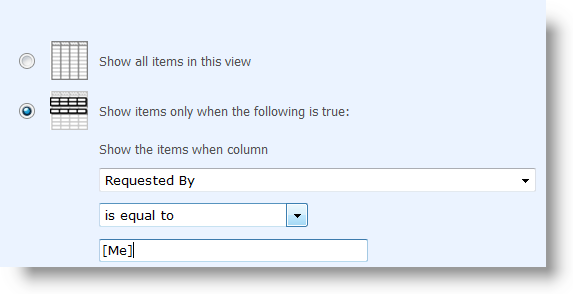
So, now we have laid the foundations for our system by setting up the basic list and filters.

In Part 2 we will create a “wall chart” dashboard, using SharePoint Planner webpart.


SharePoint Archive Round-up

Date:June 17th, 2010 Author: Tags: , , ,
Category: General, SharePoint Ideas Comments:0 ;

As you’ve probably noticed we have had a few changes on our SharePoint blog in recent weeks.  We’ve been doing some work on making it a little more user friendly and a bit nicer to look at (hope we haven’t spoiled it with the photos!)

Whilst I was working on the blog I noticed that we have quite a few little gems hidden away in the archives. Old posts – things that were written maybe a couple of years ago, that those of you who are new to the blog might not be aware of, but might find useful.  The useful ones fall into a few categories – general SharePoint tricks, tips and ideas, and ideas and tips for users of our web parts.  So here they are, I hope you find them useful.

SharePoint tricks tips and ideas

Extend and customise SharePoint Task lists

Task Lists are one of the best loved and most used features of SharePoint and this post shows you how to better tailor them to meet your particular needs.

Advanced SharePoint View and Filter techniques

This article explores some of the uses of SharePoint Views and Filters.

Working Days, Weekdays and Holidays in SharePoint Calculated Columns

SharePoint Out of the box doesn’t automatically distinguish between working days and weekends but if you are setting things like job duration or due dates you may need to – this article shows you how.

The Truth about using [Today] in SharePoint Calculated Columns

This article explains why the often repeated trick for using [Today] in SharePoint calculated columns does not work, and suggests workarounds.

The … ehem… Truth about using [Today] in SharePoint Filters

This one looks at the differences between SharePoint 2003 and 2007 when using [Today] in filters.

Setting a default duration for new SharePoint Calender Events

So you might be a medical receptionist scheduling appointments for doctors, appointments are always 45 minutes long unless the doctor tells you differently, how much easier would it be to just have SharePoint create an end time 45 minutes after the start time automatically?

How To Use Filters in SharePoint to show items in the current Calendar Month

It’s easy to think of occasions when you might want to filter a SharePoint list to show items falling in the current calendar month: “sales this month” springs to mind, or “subscriptions due for renewal this month”. This post shows you have to achieve this using calculated columns.

SharePoint Reminder Webpart Ideas

SharePoint Reminder Webpart – Setting a variable Due In or Overdue By time

Lots of people use Reminder to send an alert when a message is due soon or overdue.  Usually its fine for the message to go out at a fixed time before or after the event, for all list items, but there are occasions where you might want to vary the times at which you send your alerts.  For example, sending alerts for overdue helpdesk items: for high priority items you might want to send an alert when an item is 1 hour overdue, whereas for low priority an alert for items 1 day overdue might be fine.  This article shows you how.

Customize SharePoint Reminder Emails with Merge Data

Whilst SharePoint’s out of the box alert emails come in a standard format, with Reminder its possible to customize the alert emails you send by merging data from your list items.

Tip – don’t send SharePoint email alerts for old items.

There are some situations where, when you are setting up a Reminder for the first time, you could end up sending out alerts for a lot of very old list items, this post shows you how to avoid doing that.

Tip – Sending an SharePoint email Alert when a Task is completed

If you are using Reminder to drive simple workflow you may very well want to send an email when a task is completed – maybe when a holiday request form has been filled in for example.  This post shows you how.

SharePoint Planner Webpart Ideas

Tip – Showing multiple columns in SharePoint Planner Webpart

There may be times when you want to display timeline or category information from more than one list column in a gantt chart. For example in the chart below we have taken information from the “priority” and “title” columns of a list to populate the category labels.

5 things you never knew you couldn’t do with SharePoint Gantt Charts

Shows you a few of the things that aren’t possible with SharePoint OOTB gantt charts, but can be done with Planner.

New SharePoint Partnership – Pentalogic and LookOut Software

Date:April 9th, 2010 Author: Tags: , , , ,
Category: General, Partners Comments:0 ;
We are really pleased to let you know about our latest Strategic Partnership with a SharePoint relationship management development company, LookOut Software of Vancouver, British Columbia, Canada. Lookout_logo_sml


LookOut has been in the CRM software business since 1994.  In 2007 they were introduced to SharePoint and made the decision to change development platforms and haven’t looked back since.

(more…)

Tell Us Your SharePont Story and Win a Flip Video

Date:February 16th, 2010 Author: Tags: , , ,
Category: General, PivotPoint Web Part, SharePoint Planner, SharePoint Reminder, SharePoint webparts Comments:0 ;

One of our New Years Resolutions for 2010 was to: “find out how people really use our stuff”.

We really want to understand how people use our Planner, Reminder and Pivot Point in the real world.  We know we have clients from a huge range of industry sectors, so it will be great to see how our software helps with the special challenges of your area. And we know that some of you use 2 or 3 of our products together: we would love to know what you are doing there.

So this year we want to find out how you use our products in your SharePoint environment. If we know how you use them it will help us to improve them!

Just send us a quick email telling us a bit about your business and how you use our products and we will enter you into our free prize draw for the chance to win a funky Flip video camera.

We would really appreciate your help on this one, so if you have a minute free please send us a quick email.

ultra_pink_front_nousb

Terms and Conditions

  1. You must be a user of Pentalogic Technology Software in order to enter (free trial users are welcome to enter.)
  2. Entries must be sent to [email protected] with the subject line “Case Study”
  3. The draw will take place at 12 noon GMT on Monday 1st March, you entry must be submitted by 12 noon GMT Sunday 28th February to qualify.
  4. All entrants agree to take a 30 minute phone call from Pentalogic Technology, to clarify details of your case study.
  5. All entrants agree to their case study being published by Pentalogic Technology, on line or in print.