Archive for the ‘SharePoint Reminder’ Category

SharePoint Reminder and Upgrading to 2010

Date:April 11th, 2011 Author: Tags: ,
Category: SharePoint Reminder Comments:0 ;

We have noticed that lots of you seem to be upgrading to SharePoint 2010 now.  And lots of you are asking what you need to do to upgrade Reminder.

We know the whole process of upgrading your whole SharePoint installation to a new SharePoint version can be quite stressful.  So we have put some work in to trying to make the bit of that upgrade that relates to Reminder as simple and painless as possible.

We have put together a step-by-step guide to painless Reminder upgrading, which you can see here.

In summary:

  • If you hold a commercial license for SharePoint Reminder there will be no charge for moving to 2010, unless you are adding additional servers to your installation.
  • You should be able to move to 2010 without losing any of your existing Reminder settings.
  • If you are moving to a new server we may need to issue you a new license key, there will be no charge for this as long as you are de-commissioning your old server.

Read the full guide to a smooth Reminder 2010 upgrade here.

And if you have any questions or queries please do let up know.

Use SharePoint Reminder to Email Your Customers

Date:April 4th, 2011 Author: Tags: , ,
Category: General, SharePoint Reminder Comments:0 ;

We all know how great SharePoint Reminder for sending internal reminders and driving simple workflow. But have you tried it yet for managing the bits of your processes that happen outside of your organization? Sending emails to customers, suppliers or other contacts who are not members of your SharePoint deployment, or even members of your organization.

This is really easy to do and there are lots of places you might use this. Let’s look at some of the issues you’ll need to bear in mind.

General Tips

When you are sending emails to people outside your organization you need to ensure that:

  • you can actually send external emails from SharePoint
  • the email comes with a recognizable “from” label.
  • any replies go to an address where they will be dealt with.
  • don’t send a hyperlink to the list item in your email

inbox from

First,  to be sure that your STMP server allows relaying to outside addresses then you may want to use the diagnostics tool to send a test email to a private email address. – http://www.pentalogic.net/sharepoint-products/reminder/reminder-manual?p=configurationtool%2Fdiagnostics.htm

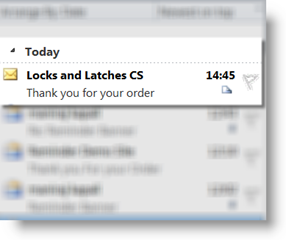
When sending emails to people outside your organization you will want to make sure that what shows up in the inbox is recognizably from you.  You don’t want your customers getting emails from “SP2010 Intranetxyz”, or some other random label. SharePoint automatically labels outgoing emails with the name of the site or subsite they have come from.  So for this example we are going to set up a sub site called “Locks and Latches CS” so that all of our emails to customers and suppliers will be clearly identifiable as coming from Locks and Latches Customer Services.

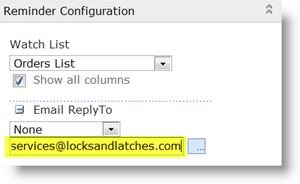
config reply toWhen a customer or other external contact replies to your email it’s important that that reply gets routed to an address where a real person is going to read it and deal with it.  You can write “please contact [email protected] in the body of your email until you are blue in the face – but you can be sure that a good percentage of customers who want to reply to you are just going to ignore that and click on “Reply”.  By default SharePoint will route all replies to emails it has generated to one central address – one address for the whole SharePoint deployment.  This address typically gets lots of mail, and often doesn’t get very closely monitored, so in Reminder we have the ability to override that and specify a “Reply To” address for each Reminder you set up.  For this example we are going to have all replies go to [email protected].  If in your own set up particular people are responsible for their own order you might choose to have replies going to the person who created the order record “Created By” or maybe the account manager for that customer “Assigned To”.  The main thing is that you ensure replies go to an email address which is monitored, and where they will be responded to.

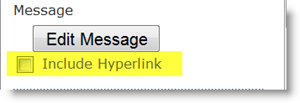
include HyperlinkDon’t send out dead end links or useless information. Both SharePoint’s built in Alert Me feature and SharePoint Reminder send out a hyperlink to the relevant list item in the alert/Reminder email by default.  If you are sending emails to external contacts this link will very likely be of no use, as the contact probably won’t have permissions to view your SharePoint site.  In SharePoint out of the box alerts you can’t customize your alert emails, but in Reminder you can, so when sending emails to an external contact remember to uncheck the “Include Hyperlink” box.

Reminder Set Up

order conf email edit email

In this example we have used Reminder to send an email to a customer each time a new order is received.  The set up of a Reminder when sending an external email is really much the same as the set up of any other Reminder.order received config

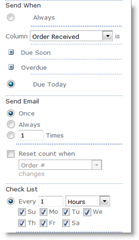
In this example Reminder is set to watch our orders list.  It’s set to watch the “Order Received” column, and email the address in the “customer email” column when “Order Received” is “Due Today”  – or equal to today.  Reminder is checking the list every hour, which means customers should get a confirmation email within an hour of their order being received.

Because “customer email” is simply a text field, and not recognized by SharePoint as containing an email address you will need to check the “Show all fields” box.

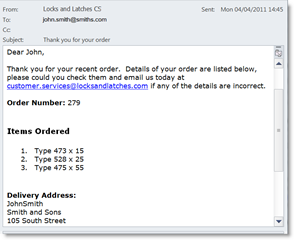
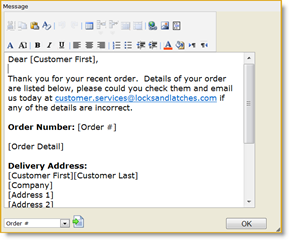
Customize your emails with merge data from your list, just as you would with a Word Mail merge.

And away you go, SharePoint Reminder emails for your customers.

Where Else Might I Use This?

There are loads of places where you could use this with customers, suppliers or other external contacts:

  1. delivery notification emails for customers
  2. overdue invoice emails for customers
  3. stock re-order emails for suppliers.
  4. meeting reminders for contacts.

to name but a few.

And if you have other examples of using Reminder to send emails to external contacts we would love to hear them.

reminder-download

Reminder Web Part updated – support for Host-named site collections

Date:January 26th, 2011 Author: Tags: , ,
Category: SharePoint Reminder Comments:0 ;

Our Reminder Web Part – which adds advanced email alerting features to SharePoint – has recently been updated.

The main new feature in version 1.7.9 is support for host-named site collections (aka host header based site collections).

A host header is the main part of a url – such as www.pentalogic.net or sharepoint.yourcompany.com

Normally SharePoint uses separate Web Applications for different host headers and whilst you can use Alternate Access Mappings (AAM) to map two different urls to the same site (e.g. sharepoint for internal access  and http://sharepoint.yourcompany.com for external access to the same site) you can’t have entirely different sites served by the same web application on different urls.

Why does this matter to you?

Well, for the vast majority of you it doesn’t! In fact you can’t create host header site collections using SharePoints Central admin tool – you’ve got to break out the command line STSADM or powershell.

For most installations you’re likely to have a scheme such as sharepoint.yourcomapny.com/sites/HR and sharepoint.yourcomapny.com/sites/Finance etc  and you may perhaps use Alternate Access Mappings (AAM) to give alternate urls for the same content. e.g. a shortcut of sharepoint/sites/HR and sharepoint/sites/Finance.

However, you can’t use AAM to serve different content from different host headers using the web application. So if you want to have customer specific sites such as CustomerA.yourcompany.com and CustomerB.yourcomany.com (a very common requirement for hosting companies) then you have to create separate web applications for each host header.

The problem is that this doesn’t scale very well above approximately 20 web applications and instead you’re advised to use host header site collections.

In addition we’ve also included corrections to errors caused by mixing field names and formatting in the Rich Text Editor and separating multiple email addresses in rich text fields with new line characters were also included in this new version.

You can download the latest version and update without loosing any settings – upgrade instructions are included in the manual.

SharePoint Staff Vacation Planner – DIY Guide part 5 – the system in action and Out of the box options.

Date:August 9th, 2010 Author: Tags: , ,
Category: PivotPoint Web Part, SharePoint Ideas, SharePoint Planner, SharePoint Reminder, SharePoint webparts Comments:0 ;

This is Part 5 of the SharePoint Staff Vacation Planner – DIY Guide

See the System In Action

So, now let’s reap the rewards for all of our hard work and see the system in action.

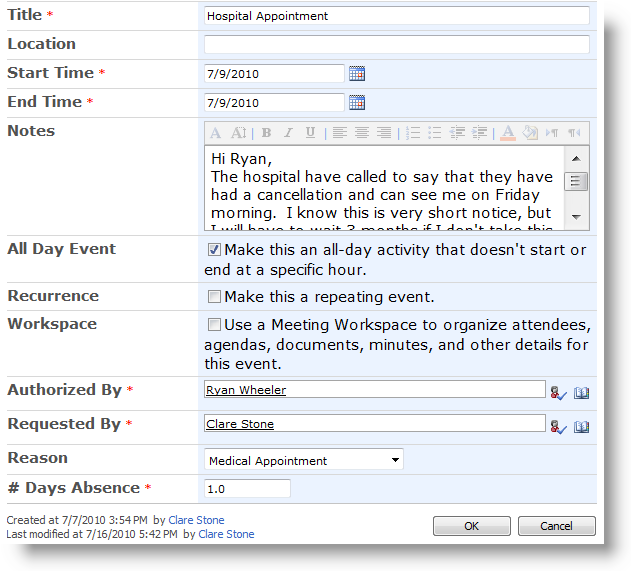
I need to book a day off for a hospital appointment on Friday 9th of July.  I can see all the absence bookings for my department and the number of days I have had off this year on the absence dashboards above. I’ve only had 1 day off for Medical Appointments so far this year and I am allowed 3 so that’s fine – but 3 people are off on that day already, it’s going to be tough, but I really need to go to that appointment.

So, as you can see, I can add a new item to the planner straight from the link in the webpart, I don’t need to go to the list.

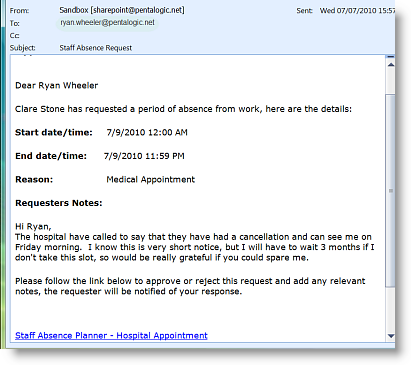
Ryan receives the absence request email and from looking at his dashboards he can see that although I am well within my Medical Appointments entitlement approving this absence is going to leave him really short staffed on Friday – but he can’t face the thought of listening to me moaning about my in-growing toenail for another 3 months, so he approves the request.

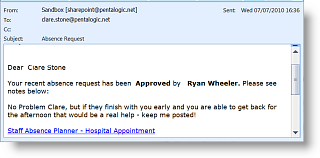
Once the request is approved I get an email notifying me, and the status of the absence changes from “pending” to “approved” on the absence planner.

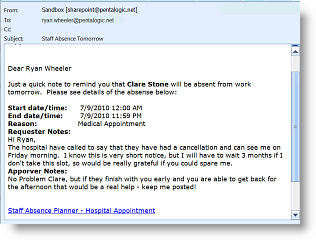
And for the final step in the process, is the email to Ryan on Thursday, to remind him that I am off the next day, giving him chance to make sure all my work is covered.

So now we should have no excuse for messing up staff absence planning ever again!

So Can’t I do this with SharePoint out of the Box?

Well some of it. Clearly, your basic list and filtered views are all set up in SharePoint out of the box.

When it comes to your dashboard views there are some limitations.

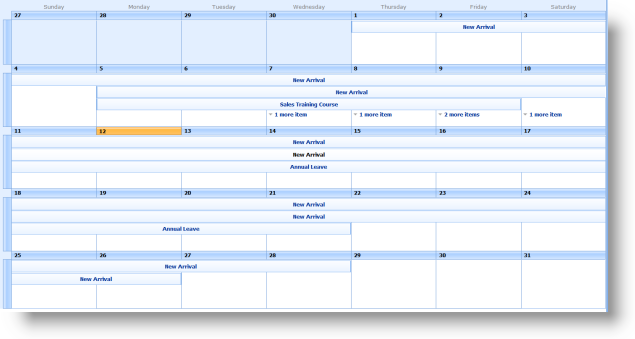
This is how your Vacation Planner Wall Chart looks out of the box:

or as a Gantt view:

We have lost all of our color coding, it’s not possible to show the name of the person who is absent, unless you make this the title of the event, and we have no way of distinguishing between approved and pending items.

For the “Absences to Date” and “My Absences” dashboards we can achieve something similar, if a bit clunky, out of the box.  From the settings tab in your Staff Absence Planner list, choose edit current view.

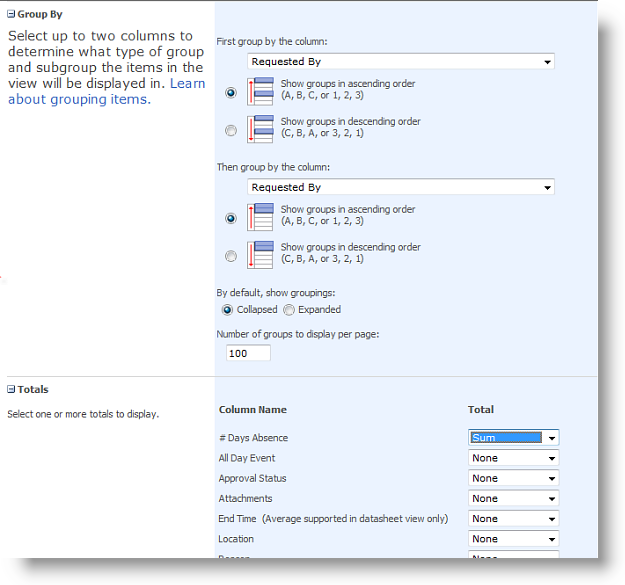
Head down to Group By and choose Requested By and Reason.  Then expand the Totals section and choose # Days Absence and sum.


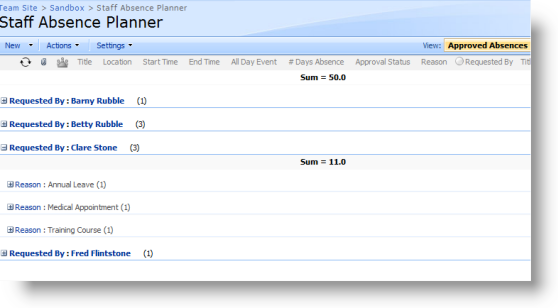
This will give you a view like this:

The information is all there, but I have to work to get at it.  For example Ryan can see that I have had 11 days off this year, covering 3 separate occasions, but he is going to have to drill into each individual event and get his calculator out to figure out how many of my days off have been annual leave, training or Medical.

Then on to the workflow emails. It is possible to generate email alerts for the absence request and the request approval, but the solution isn’t perfect.  For absence requests an administrator can set the list up to email all line managers within your company or department, every time a new request is added to the list.  This means that managers will get absence requests from their own staff, but also from all other staff as well.  The only way to avoid this would be to set up a separate absence request list for each line manager.

For the request approved/rejected email the requester will need to set up an alert on each request as they create it, asking to be alerted any time anything changes on that list item.

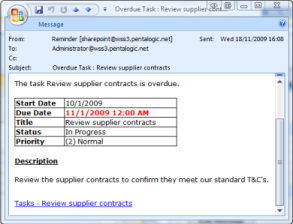
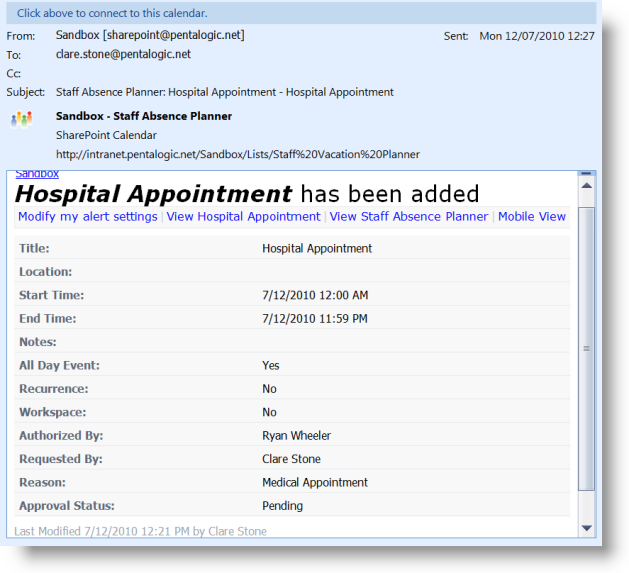
When the alert emails arrive, this is how they look:

There is no way to edit the email, and give the recipient clues on what they are supposed to do with it.

The final “John Smith is off work tomorrow” email, cannot be generated in SharePoint out of the box, as it doesn’t do date based alerts.

You could do this with Workflow and Event Receivers, but that means having some technical knowledge and breaking out SharePoint Designer and/or Visual Studio.

So – can you build a staff absence planning system with SharePoint out of the box?  I guess the answer is “kind of”. It is possible to build a basic system but it’s going to lack some useful functionality and may now be enormously user friendly.

We hope you’ve found this useful.

If you would like to try the Vacation planning system you can download a 30 day free trial version here.

And as always, if you have any questions or comments, we would love to hear them.

SharePoint Staff Vacation Planner part 4 – create an absence approval workflow

Date:August 5th, 2010 Author: Tags: , ,
Category: General, SharePoint Ideas, SharePoint Reminder Comments:0 ;

This is Part 4 of the SharePoint Staff Vacation Planner – DIY Guide

In parts 1 through 3 of this series we have laid the foundations for our tailor made Staff Vacation and absence planning system.  We have set up the basic SharePoint list, defined a number of list views, and set up dashboards using SharePoint Planner and PivotPoint webparts.

Now we are going to add the “moving parts” to the system and set up a simple approval email workflow using SharePoint Reminder webpart.

We are going to have 3 steps in our system :-

  • One email to a staff member’s line manager when a new request for absence has been submitted.
  • One email to the staff member and let them know whether their request has been approved or rejected.
  • One email to the line manager the day before a staff member is due to be absent from work as a reminder.

(more…)

SharePoint Staff Vacation Planner – DIY Guide – Part 1

Date:August 2nd, 2010 Author: Tags: , , ,
Category: General, SharePoint Ideas, SharePoint Planner, SharePoint Reminder Comments:10 ;

SharePoint offers a great foundation for non-programming business people to build applications around our business processes, just the way we want them.  This guide will show you how to build your own SharePoint staff vacation and absence planning system.

Staff vacation and absence planning can cause trouble and strife in any organization.  The good old wall planner can work for staff who are all in the same physical locations . . .

. . . . until you approve an absence then forget to enter it on to the planner, and then allow someone else to book vacation at the same time, leaving your department under staffed.

. . . . .or until you forget that Sam has booked a week’s vacation and call him up furious on Monday morning asking why he isn’t in work.

. . . . . .or authorize Jenny’s week off in the Caribbean only to get a thorough ticking off from HR because you have allowed Jenny to exceed her annual leave entitlement.

I’ve been guilty of all these crimes in my time. So I was pleased to find that with SharePoint we can make things a little more organized, and using our PivotPoint, Reminder and Planner web parts together we can set up a slick little Vacation Planning system in just a few minutes.
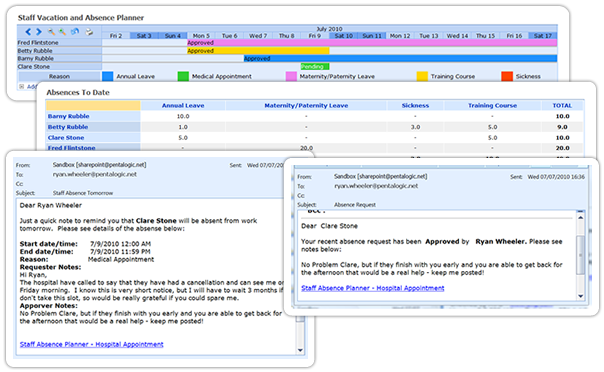
So, what we are aiming for here is:

  • A dashboard “Absence Planner” display, which will be accessible to all staff via SharePoint.
  • A personal and managers “Absences to Date” dashboards.
  • An automated Absence Request approval system
  • An email reminder to line managers of imminent staff absence.

To be clear: this is not a ready made “Vacation Planning” template or application, its a guide showing how you could build your own system, using some of SharePoints built in features and then add a little pizazz with our web parts. Its going to take a little work to set this up for your organisation but then it should be a better fit than a packaged solution.

Setting up the Vacation Planner should take you about an hour if you have our webparts already, a little more if you need to download them.  So we have broken this guide up into 4 parts, which we will be publishing over the next 5 days:

Today – set up your Staff Vacation and Absences list and filtered views

Part 2 – set up a Staff Vacation Planner dashboard with SharePoint Planner webpart

Part 3 – Set up Absences to date dashboard with SharePoint PivotPoint Webpart

Part 4 – Set up a absence request and approvals workflow with SharePoint Reminder Webpart

Part 5 – see the system in action, and see how much of this you could achieve with SharePoint out of the box.

For those of you who can’t wait that long, you can download the full PDF guide and a 30 day free trial of the webparts here.

First set up your List

We are going to use a Calendar List, add some extra columns, and switch on Approvals.

So, from which ever section of your site you want choose select Site Actions from the top right of the page, then from the dropdown, select Create then from the Tracking tab, select Tasks.

Call your list whatever you want – Staff Absence Planner works for me, decide whether you want it to display in the quick launch menu  – probably no need as few people will need to access the list that way once we have our system set up.  Then select no in the Alerts option.  Click OK and you list is set up.

Now go to the Settings tab in your list and first of all choose Create Column. We are going to add a few extra columns to the list. Add the columns Requested By and Authorized By, the column type for both of these is “Person or Group” and you want them both to display in the default view. Make these mandatory fields by clicking Yes for Require that this column contains information. Now we are going to add a column to show the reason for the absence – annual leave, maternity leave, training, sabbatical, whatever.  The column type for this column is going to be Choice and again we are going to made completion of this field mandatory, and show the field in the default view. Finally a column for the number of days of each absence, we want this to be a number column, I have set the minimum value to 0.5 days and the maximum to 30 days, and again we want it to be a mandatory field.

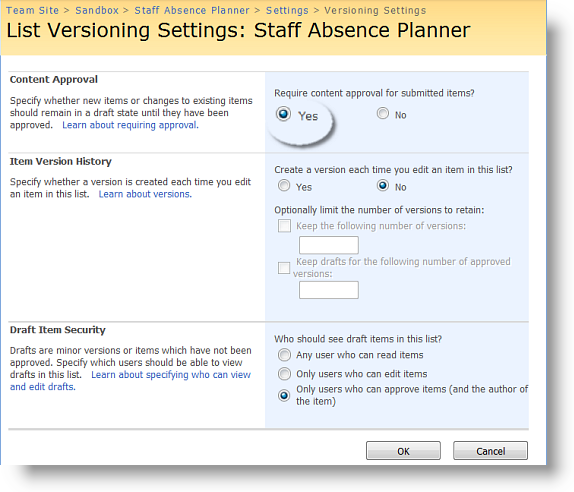
Next let’s switch on Approvals.  Back in the Settings tab of your list choose List Settings and from the General tab choose Versioning Settings. In Content Approval click Yes and we are done with the list set up.
Set up Filtered Views

Now for the filters.  If you haven’t made much use of filters before it may be worth having a look at these resources:

SharePoint filter techniques articles

Filters can really enhance the power of SharePoint lists, and we are going to use 3 here in our vacation planner.

#1 – Approved and Pending Absences for Planner

We want our Planner to provide a dashboard display for all staff, showing absences requested and approved.  So that staff can see when it will be possible to book an absence and managers can decide whether they wish to approve a staff absence request.

Our list actually contains 3 approval status’s “Pending”, “Approved” and “Rejected” we don’t need to display absence requests that have been rejected on our Planner, so we are going to set up a list view to show just “Pending” and “Approved” requests.

Go back to Site Settings and choose Create View.  From the menu here choose Standard View. N.B.  This choice is very important – Planner only works on Standard views. In the Create View Page add a name for your view, we have used Staff Absences – Approved and Pending. In the Audience section be sure you have checked Create Public View this again is an essential for Planner to work.  In the column section choose the columns that you wish to display to people who are creating or entering a list item.  This will not impact of the Planner display.

We are then going to skip over the “Sort” section and from the Filter section choose Show Items only when the following is true.

Column Approval Status is equal to Pending OR column Approval Status is equal to Approved.  Click OK and we are done with the filter.

#2 – Approved absences for managers “Absences to Date” Dashboard

Set up of this is exactly the same as the last one, except we are going to call it “Absences to Date” and just show items where column approval status is equal to approved.

#3  – The Magical [Me] Filter, for “My Absences” Dashboard.

If you haven’t used this filter before you are going to love it!  It shows whoever is logged in just the list items relating to them, so its ideal for our “My Absences” dashboard view, but also has a whole host of other uses.

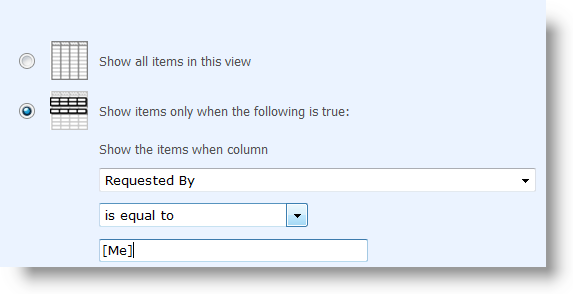
We need a Standard, public view again – yes even though it’s “My Absences” it’s still a public view or other people won’t be able to use it.  Call it My Absences then head down to the filter section and choose to show items where column Requested By, is equal to [Me].
So, now we have laid the foundations for our system by setting up the basic list and filters.

In Part 2 we will create a “wall chart” dashboard, using SharePoint Planner webpart.


5 Things you never knew you couldn’t do with SharePoint Alerts

Date:July 19th, 2010 Author: Tags: , , ,
Category: General, SharePoint Alert, SharePoint Ideas, SharePoint Reminder Comments:1 ;

We often hear that communication is key to the success of any enterprise or organization. Making people aware of “what’s going on” is an essential.  So for a collaboration platform like SharePoint tools for telling people what’s happening are a central part of the setup.

SharePoint has it’s built in “Alert Me” feature.  New users seeing this often expect it to deliver functionality similar to that which comes as standard in MS Outlook.  But that isn’t what SharePoint Alerts do.  They tell you when something is added or changed.  This is great for document or content management, but not so good for managing calendars or tasks or projects – when you might prefer to be alerted when something is about to happen, or is overdue – or you might actually want to alert someone else, not yourself.

So here’s a little look at some of the things you might expect to be able to do with SharePoint Alerts but can’t.  And some suggestions as to how you might get round these shortcomings.

(more…)

SharePoint List Superpowers

Date:July 9th, 2010 Author: Category: General, SharePoint Ideas, SharePoint Planner, SharePoint Reminder Comments:5 ;

Now we all know that SharePoint Lists are pretty amazing things: easy to use, searchable, customizable… Where would we be without them?

But did you know that each list type comes with its own special “Superpower”?

If you understand the different superpowers of each list type it makes choosing which list to use on any given occasion much easier.

(more…)

SharePoint Reminder Webpart – version 1.7.8 now available

Date:June 14th, 2010 Author: Tags: , , ,
Category: General, SharePoint Reminder, SharePoint webparts Comments:0 ;

How annoying is it when you get reminded about something you have already done?  A little email saying:

“Can you please submit your expenses claim form by 12.00 noon today”

is just sooo annoying when actually you have been a good girl and done your expenses yesterday.

We get lots of support calls from SharePoint Reminder webpart users who have annoyed their team members in just this way – by sending our Reminder emails for tasks that have already been completed.

This is easy enough to do.  Reminder will look at the whole of a list unless you tell it to do something else.  So if you ask Reminder to send out an email for everyone who is tasked to complete their expenses claim form by 12.00 today that is exactly what it will do, regardless of whether the status of that task is “Active” or “Completed”.

(more…)

And the Winner Is . . . !

Date:March 10th, 2010 Author: Tags: , ,
Category: General, SharePoint Reminder, SharePoint webparts Comments:0 ;
red carpet

No, it’s not more about the Oscars, it’s our Case Study Competition – just as important to us, but maybe Jeff Bridges wouldn’t share our view.

Random aside: Did you know that this is (allegedly) the first year in over 20 years that award presenters at the Oscar’s have used the phrase “and the winner is”?  “And the winner is” was banned at the 60th Oscars, for fear of offending the “non-winners” (didn’t they used to be called losers??).  Presenters have been saying “and the Oscar goes to . . .” ever since; until this year, when, presumably due to popular demand, the traditional phrase is back in place.

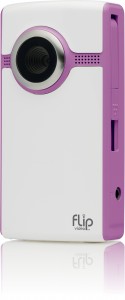
Anyway, enough of all this.  Our winner is Adam Venn of Bridges Engineering in Bath, England.  Adam wins something far more useful than a little gold-plate statue.  He gets a swanky new Flip video camera, which he tells us will come in very handy for filming the first baby that he and his wife and expecting any time now.

So thank you to Adam. Bridges have been using Reminder since 2007 and Adam has sent some really interesting information on how they use it.  As we expected they are doing things over there that we never even thought of.  We will be publishing a full case study in a couple of weeks.

Thanks also to everyone else who sent in case studies. We will be publishing them all over the next few months.  If you have a case study that you would like to share with us it’s not too late, just email me [email protected] with brief details and I will get in touch to get the full story from you.  There are no prizes in it now – but we would still love to hear from you.

ultra_pink_front_nousb-125x300