Posts Tagged ‘Web Part’

New version of SharePoint Reminder – corrects a problem caused by Chrome v37

Date:October 27th, 2014 Author: Tags: , , , ,
Category: SharePoint Reminder Comments:0 ;

A new version (1.9.6) of Reminder for SharePoint which enables date based email Alerts  is available.

The main change in this version is to make it compatible with Google Chrome v37. Controversially Google removed a feature (showModalDialog) that has been included in most browsers since 1994 and is still part of the latest HTML5 specification.

We’ve also added

  • Improved compatibility with custom master pages or other controls that use jQuery and the ability stop reminder including jQuery on a page that already has it. (options under the Support tab).
  • Reduced storage requirements for state data to support large lists
  • Configurable Web Part processing timeouts (for large lists)
  • A correction to an error that occurred if you use List and View name with angle brackets in the title.

To upgrade simply download and install the latest trial version – your license key will be picked up during the upgrade and all your settings will be saved.

Warning – Once you’ve upgraded to v1.9.6 or above you can’t rollback to a version older than 1.9.6.

Add Highlighting & Conditional Formatting to PivotPoint tables

Date:March 12th, 2014 Author: Tags: , , , , ,
Category: PivotPoint Web Part, SharePoint Ideas Comments:1 ;

Our PivotPoint web part for SharePoint allows you to summarise data from your SharePoint lists in a similar way to Excel’s Pivot Tables and Charts.

A few users have asked how you can add highlighting or conditional formatting to the Pivot Tables – to do things like highlighting the High Risk column, or any cell above a certain value.

We have a Highlighter app that allows you to do this on normal Lists but it doesn’t work with PivotPoint so I thought I would put together some examples of how you can do this using every SharePoint hackers favourite tools – JavaScript and jQuery.

You will need some experience with programming and/or JavaScript to be able to modify these examples to do what you want but there are lots of comments in the code to help.

If you’re looking for an easy way to add conditional formatting/ highlighting for SharePoint Lists then check out Highlighter.

So lets get started. The files you need for the article can be found in a zip file here. Inside you will see a test .html page that can be used just to experiment with the javascript and a .js.txt file that contains the javascript to use on your site.

Adding JavaScript to a page

The first thing we need to know is how to add JavaScript to a page. Read up about that and come back!

In SharePoint 2013 you can add a Script Editor web part (under Media and Content). This blog post walks you through.

For SharePoint 2010 and 2007 you have to use the Content Editor web part (CEWP)

You could use the Source View of the CEWP and put the JavaScript directly into it, but you could also staple your tongue to a door and it will probably be less painful!

A much better way is to save the script as a .txt file in a document library and then include the file on the page with the Content Editors “Content Link” feature. Christophe walks you through this method here.

jQuery or not?

The examples given here use jQuery – a great addition to JavaScript that simplifies many common tasks.

You could adapt these ideas to run without jQuery if you like – but you’re on your own with that!

You can see the reference to jQuery on the first line of the example scripts.

One thing you should determine is

a)      Has jQuery already been added to all your SharePoint pages (by an administrator adding them into a custom master page)? If so then you should remove the jQuery reference from these examples as there is no point in including it twice.

b)      These jQuery files are loaded from Googles CDN servers. If you don’t have external internet access you will have to copy jQuery to some other location (such as a document library).

Show me the examples already!

Download and unpack these zip files – inside you will see

.htm files that you can experiment with.

Open them in a browser to see what they look like. Open them in a text editor like Notepad to change how they look and then re-load in the browser (F5).

.js.txt files that you can use in SharePoint.

Use a text editor to copy the changes you’ve made in the example .htm file in and then add them to the page that you have PivotPoint on using any of the methods in “Adding JavaScript to a page”.

The two examples are :-

Highlighting PivotPoint cells based on the value

The first example we’re going to look at is to highlight different cells depending on the value that’s in them.

For our example –

  • If it’s less than or equal to 160 then we want the text in red
  • If it’s more than or equal to 180 then it should have a background in yellow.

The result should be a web part like this.
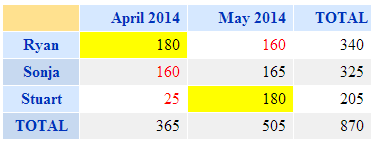
highlight-by-cell-value

There are plenty of comments in the JavaScript source code but basically what it’s doing Is looping through each cell in the PivotTable, checking what value It is and applying a CSS style.

See the source of highlight-by-cell-value.html and highlight-by-cell-value.js.txt in the ZIP file


Highlighting PivotPoint based on the row and column

In this example we’re looking to highlight a cell based on what Row and Column it appears in.

E.g. in this risk matrix we want to highlight the “High Risk” and “Frequent Probability” in red.

risk-matrix

There are two ways to do this in the javascript example given.

The first is to highlight based on the position, e.g.

highlightCellByIndex(0,0,'background','red');

Will highlight the cell in column 0, row 0 by setting the background red. (Yes sorry, the rows and columns start from number 0!).

But – if the layout of your table changes in future (e.g. someone adds a “Super Extra High Risk”) column) then everything will move and this will be in the wrong place.

In that case the better way is to highlight by the value of the Column and Row headers – e.g.

highlightCell("Rare","Low", 'background','red');

See the source of highlight-by-column-and-row.html and highlight-by-column-and-row.js in the ZIP file

Tips –

  • When making changes to the javascript do a small amount at a time, then you will know where to start if this doesn’t work!
  • You’re not just limited to setting colours, you can also add in any other effect possible in CSS.
  • Use the developer toolbar (F12 in IE and Chrome) if you have an error – this tool will enable you to track it down, but how to use it is beyond the scope of what we can show here!
.css('font-weight','bold');
.css('font-size','200%');
.css('border','1px solid red');
  • You can also add images (e.g. flags)
.append("<img src='some-url-to-an–icon.gif'>");


Disclaimer – these technique is provided as is and free of charge to get you started. You will need some experience of JavaScript or programming and the browser developer tools to modify these to do exactly what you want. Whilst we can’t provide technical support for this we will endeavour to help customers with active Premium Support and Maintenance contracts in place for PivotPoint.


Send email alerts when a document is left checked out

Date:May 28th, 2012 Author: Tags: , , , ,
Category: SharePoint Reminder Comments:2 ;

A new version of our Reminder web part for SharePoint has been released (v1.7.16) that allows you to send email alerts if a document is left checked out for a long time.

If you have document libraries that require check out before editing then you’ve undoubtedly been faced with the situation where documents have been left checked out – blocking other users from editing the document.

Reminder allows you to send email alerts after a period of time to ensure checked out documents are not forgotten about.

This example shows how to setup Reminder to send email alerts if something in a document library is left checked out for more than 12 hours.

SharePoint - email alerts when a document is left checked out

The manual contains other common scenarios such as email alerts when Task/Due and Overdue, simple helpdesk in SharePoint, enhanced SharePoint alerts and more.

You can download and upgrade to the latest version.

New version of PivotPoint web part for SharePoint – v2.2.3

Date:May 15th, 2012 Author: Tags: , , ,
Category: General, PivotPoint Web Part Comments:0 ;

A new version of our PivotPoint web part for SharePoint (v2.2.3) is ready.

This new version improves performance for large lists, corrects bugs when you have angled brackets (“<” and “>”) in your row or columns, adds support for site column lookups and a 2 new features.

Sort by Title or Total

The new version of PivotPoint allows you to sort by both the Title and Total rows, either ascending or descending.

Title and Total cells

For example, instead of sorting alphabetically by product you can sort by their total sales – showing your best performing products at the top of the table or left of the chart.

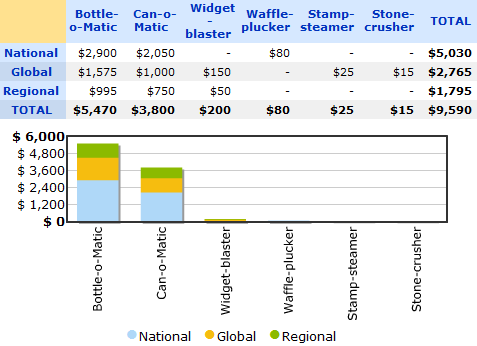
PivotPoint showing all columns

More details are in the online manual.

Show Top N

In combination with sorting by the Total you can choose to show the Top N columns or rows.

For example given the following data the vast majority of revenue comes from 2 products (Bottle-o-matic and Can-o-Matic) and we have a ‘Long Tail’ of other products.

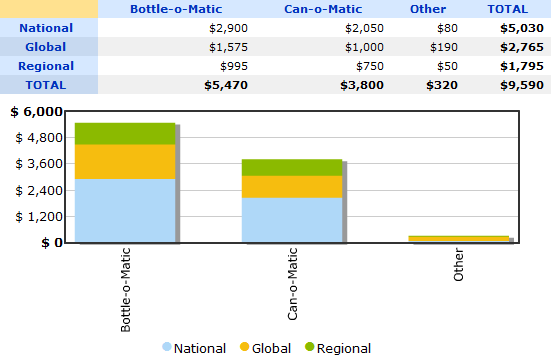
We can choose to only display the top 2 columns (products) and optionally group all the other sales into “Other”

PivotPoint for SharePoint showing top 2 columns

 More details are in the online manual.

You can download and upgrade to the latest version without losing any settings.

Show Actual v Target Performance in SharePoint with PivotPoint web part.

Date:August 3rd, 2011 Author: Tags: , ,
Category: General Comments:0 ;

So we all like to know how we are doing – hitting our targets, meeting our KPI’s, staying within our budgets, running out of vacation days.

If you record things like this in SharePoint lists you would hope it would be easy enough to see how your actual performance compares to your targets, budgets or KPI’s.

Well for those of you who have Enterprise  and PerformancePoint it is possible – if not exactly a walk in the park –  but for the rest of us this can be a tricky task.   You need to find a way of bringing together 2 different sets of data:

  • Target or KPI – which is one item of data, which stays constant – no one likes a moving target do they?
  • and an “Actual” figure which is the sum of a number of list items – sales, purchases, leave bookings, whatever, and which will clearly change as list items are added and changed.

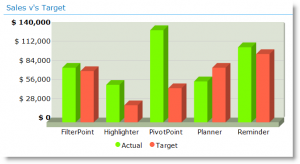
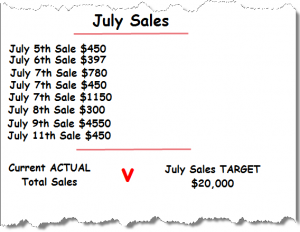
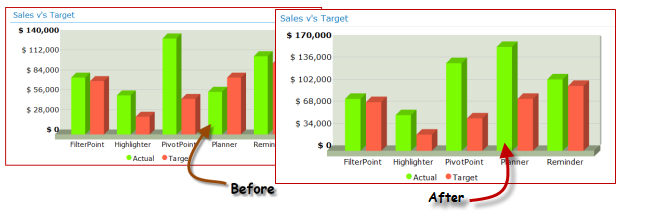
So if we were looking to compare Target and Actual sales for July, as in the chart above, the date would loook like this.  A list of sales items, which will grow as the month progresses, producing a changing Actual total,  and one Target item, which will stay the same throughout the month.

These two data sets would generally live in separate lists.  The way many KPI columns work is by getting you to manually enter – and manually update – your changing Actual total into your Target list.  Not great, as you never get to see how the situation is changing until you have done your manual update.

In a workaround for one of our PivotPoint customers we have turned this on method on its head – entering the static “Target” into the ~Actuals list (in this example the sales list) to allow you to produce a chart or table with our PivotPoint web part, which will show actuals vs targets and is updated as your actual data changes, without the need for manual intervention.

So here’s how.

Add a new column to your list.  Make it a choice column with the choices as “Actual” and “Target”.  Have it default to actual, as this is what the vast majority of items are going to be.

Then we simply enter a “Target” item for each category we want to compare.  So in this example I want to see actual vs target sales for each of my products. So I have entered a Target Sales item for each of my products for July.

As the month goes on my team will enter actual sales for July, which will (hopefully) start to stack up nicely against my target.

So to see how things are shaping up set up a PivotPoint, get it to watch the sales list, and in this case a “This Month” view of the sales list.  Display a Pivot Chart, in this case a column chart.

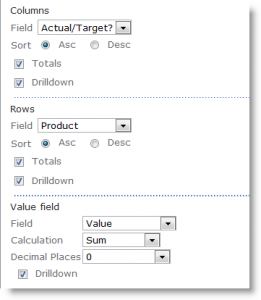
To see the actual sales vs target sales set it up like this:

  • Get your column data from the Actual/Target field.
  • Your Row data from the product field.
  • And your values from the Value field.

And you should end up with a nice column chart like the one above.

The best bit about this is that your chart will update as your list data changes.  So let’s say I get a really huge Planner order:

Woohoo – you can take that to the bank!

So, it’s not perfect, it’s a workaround, but some of you might find it useful.

Places you could use this would include:

  • Sales vs Target
  • Budget vs actual expenditure
  • Annual Vacation Allocation vs Vacation taken to date.

If you have any other ideas on where this might be useful we would love to hear them.

SharePoint 2010 and the mystery of the disappearing view selector menu

Date:March 8th, 2011 Author: Tags: , ,
Category: General, SharePoint webparts Comments:34 ;

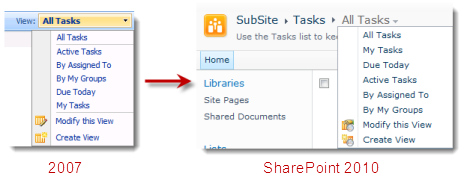
Remember the good old days, before SharePoint 2010, when a dropdown on the top right of a List View Web Part (LVWP) allowed you to select different views, quicly and easily?

In SharePoint 2010 we have lost this handy feature.  On some pages, a substitute does exist in the Breadcrumb on the title bar (which is part of the Ribbon, at the top of the page). It took us a little while to actually realize was there – but once we found it, it was very welcome.

SharePoint List View Selector Menu

But wait, all is not well. as Kerri from one of our partners – LookOut Software who develop CRM software for SharePoint – pointed out even the breadcrumb option disappears on the majority of pages. It disappears if you

  • Add another list view web part
  • Add any other web part such as a Content Editor Web Part containing things like instructions for the list
  • 3rd party web parts like our PivotPoint or FilterPoint tools that work really well alongside list views for creating dynamic dashboards.
  • use your list on a wiki page – and remember most of the pages in SharePoint 2010 are wiki pages by default now.

Also you don’t get it if you’ve created a new page and added a list view web part to it.

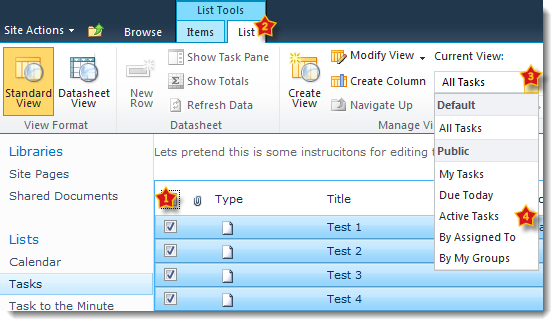
Once it’s gone, you have to resort to the following ninja moves to change a view. Select the list title (or something in the list) > List Tools > List, Current View dropdown > Then the view you want. 4 clicks? My finger is getting sore SharePoint!

This bugged me so much that I decided to look into it further and ended up developing a little tool which  – well – rescues the view selector drop down.

If you just want the solution you can skip the rest of this post and download our free fix for this annoyance – ViewRescue

View Rescue for SharePoint 2010

If you’re interested in the techie details then read on…

FilterPoint Web Part – on sale now!

Date:January 27th, 2011 Author: Tags: , , , ,
Category: Filter, General Comments:0 ;

After many months of work we are delighted to announce that FilterPoint is now available to purchase.

Filtering is one of the things that any serious SharePoint user is going to need to do at some point. As you put more data into SharePoint lists become longer and you will need a quick and easy way to get to the items you are looking for.

When you create applications and dashboards, bringing together information from different data sources and displaying it in different ways with Web Parts adding filters will make your applications and dashboards dynamic – giving users the information they need, when they need it.

But when you start filtering you are going to quickly come across things that you wish you could do with SharePoint’s built in filters, but frustratingly just can’t.

So in the same way that we built Reminder to improve on the functionality of SharePoint Alerts, and Planner to improve on Gantt charts and calendars, we have built FilterPoint to give a little more power to your SharePoint filtering.

If you are working with SharePoint 2010 Foundation or WSS your filtering options are limited to static filtered views. Filtered views are great for getting at data sets that you want to see regularly – like “this month’s sales” for example. Set the view up once and it’s there whenever you need it.

But what if you have 100 clients and want to be able to look at “this client’s sales” for any of them? Setting up a filtered view for each client, and navigating to it is going to be quite a drag.

With FilterPoint your filter can be set up in seconds, allowing users to flip between the different data sets they need with just a couple of clicks.

With MOSS and 2010 Enterprise you get more filter power. But we still felt there were some things missing. So for example even with MOSS filters you can’t:

  • Set up several Filters within one filter web part
  • In 2007, send many filters to one filter consumer list or Web Part (e.g. filter on both customer and product).
  • Use different styles of filter, like Free Text, drop down lists or Radio Buttons
  • Clear filters with a single click.

So even though MOSS offers more filtering options, there are still some significant gaps and we believe that FilterPoint goes a long way towards filling these.

Of course FilterPoint isn’t the only 3rd party filtering web part on the market and you can see how we match up to the competition by taking a look at our comparison chart here.

When we were looking at the competition one thing we noticed was that some of the most useful filter Web Parts – the ones offering the most functionality – were incredibly complex to set up. You would need the patience of a saint and a PhD in SharePoint (if such a thing existed!) So we have worked very hard to keep the setup of FilterPoint quick and simple. Take a look at our short on-line demo here, and let us know whether we have succeeded.

We’ve also tried to keep the prices competitive. Our Single Server License is $595.

And of course, like all of our products FilterPoint comes with a 30 day free trial and a no quibble money back guarantee.

And for existing customers we are offering a 25% discount for purchases made by 31st March 2011.  Email sales@pentalogic.net for your discount code.

So why not give it a try today?

As FilterPoint is our new baby we are very keen to know what you think of it – so please let us have your comments and feedback.

Download free trial

Reminder Web Part updated – support for Host-named site collections

Date:January 26th, 2011 Author: Tags: , ,
Category: SharePoint Reminder Comments:0 ;

Our Reminder Web Part – which adds advanced email alerting features to SharePoint – has recently been updated.

The main new feature in version 1.7.9 is support for host-named site collections (aka host header based site collections).

A host header is the main part of a url – such as www.pentalogic.net or sharepoint.yourcompany.com

Normally SharePoint uses separate Web Applications for different host headers and whilst you can use Alternate Access Mappings (AAM) to map two different urls to the same site (e.g. sharepoint for internal access  and http://sharepoint.yourcompany.com for external access to the same site) you can’t have entirely different sites served by the same web application on different urls.

Why does this matter to you?

Well, for the vast majority of you it doesn’t! In fact you can’t create host header site collections using SharePoints Central admin tool – you’ve got to break out the command line STSADM or powershell.

For most installations you’re likely to have a scheme such as sharepoint.yourcomapny.com/sites/HR and sharepoint.yourcomapny.com/sites/Finance etc  and you may perhaps use Alternate Access Mappings (AAM) to give alternate urls for the same content. e.g. a shortcut of sharepoint/sites/HR and sharepoint/sites/Finance.

However, you can’t use AAM to serve different content from different host headers using the web application. So if you want to have customer specific sites such as CustomerA.yourcompany.com and CustomerB.yourcomany.com (a very common requirement for hosting companies) then you have to create separate web applications for each host header.

The problem is that this doesn’t scale very well above approximately 20 web applications and instead you’re advised to use host header site collections.

In addition we’ve also included corrections to errors caused by mixing field names and formatting in the Rich Text Editor and separating multiple email addresses in rich text fields with new line characters were also included in this new version.

You can download the latest version and update without loosing any settings – upgrade instructions are included in the manual.

New SharePoint FilterPoint web part – public beta released

Date:November 1st, 2010 Author: Tags: , , ,
Category: Filter, General, SharePoint webparts Comments:0 ;

FilterPoint SharePoint webpartWell finally, after months of hard work we are delighted to be able to let you know that we have just released our new FilterPoint web part for SharePoint in beta.

FilterPoint has been a long time coming so we hope you are going to like it.  It’s a tool that we always knew we wanted to develop. Dynamic filtering  – the ability to flip between filter values at the click of a mouse – is one of the building blocks for the kinds of rich applications that our customers like to build for themselves.  It builds on the power of webpart connections (a much neglected area in SharePoint) and once you have the ability to apply a group of filters to a page with a selection of webparts and lists you have the potential for some really nice dashboards.

But, as I said FilterPoint has been a long time coming, because what started out looking like a straight forward project turned out to be anything but . . . .

It starts off looking ever so simple with plenty of online examples – but when you start delving into the details it quickly becomes the stereotypical “Can of Worms” project.

There are basically two interfaces you can use – one old IFilterProvider interface , and the new ITransformableFilterValues interface. So far sounds easy but how about some wildcards….

With the new ITransformableFilterValues interface – you can’t create filters dynamically,  and you can’t have multiple connections on the consumer side in SP 2007.

On the other hand, with the old IFilterProvider interface you can’t send multiple filter values to List view web parts and you can’t connect more than one provider web part to a consumer web part. And that’s just scratching the surface.

To top it all off you have little control over what the filter consumer web part actually does with the info you give it – want to say “Equals” or “Not Equals” or “Greater Than” etc and thats out of the scope of what a filter provider can do (we’ve got some ideas on how to work around this in a future version of FilterPoint though).

My oh my, enough to make your head spin!

FilterPoint Webpart, filtering optionsAnyway- we’ve worked really hard to make this web part as simple to use as possible whilst still being compatible with any web parts that can accept the standard web part connections.  We have managed to come up with a tool which allows you to apply multiple filters to multiple webparts and lists, and (at least when working with our Planner and PivotPoint) you can have some control over the operator – using “not equal”, “greater than” and “less than” as well as the standard “equals”.  We hope to extend this aspect of the functionality in v2.

So, why might you want to use this thing then?

Well, you might want to use simply it to guide your users to the most relevant data in one list or webpart – giving them the ability to “filter on the fly”, selecting new data sets, and then clearing filters in one click.

Or, at the other extreme, you might want to bring together a collection of lists and web parts on one page, and use FilterPoint to create a truly dynamic dashboard for your users.

In fact, once you start to use filters and webpart connections there are any number of different ways to enhance the functionality of your SharePoint site with a tool like FilterPoint – we already have it set up on our Sales Pipeline and Client lists here, and are finding more possible uses every day.

We are planning to have FilterPoint ready for full public release by the end of the month.  In the meantime, if you pre-register for your free trial, you will qualify for a 25% discount on the product purchase price.

We hope you like it, and as always, we are keen to hear your thoughts and feedback.

Filterpoint Download

New Pricing

Date:January 4th, 2010 Author: Tags: , , ,
Category: General, PivotPoint Web Part, SharePoint webparts Comments:0 ;

If you have visited our website recently you may have noticed that we have changed our pricing.  Just a quick note here to explain what we have done and why.

Firstly we wanted to simplify the pricing of Reminder.  People often commented on how confusing the licensing structure was with a combination of server licenses and web part license packs.  So we have simplified this and also reduced the price, so that the price of Reminder now falls more in line with the pricing of other Alert enhancement web parts on the market.

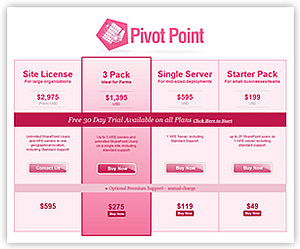
pricegrid

Across all of our products we have also introduced 2 new pricing options, which we hope will help to make our software more affordable for a lot of customers.

(more…)