Archive for the ‘SharePoint Development’ Category

How to create progress bars in SharePoint

Date:May 10th, 2011 Author: Tags: , , , ,
Category: Highlighter, SharePoint Development, SharePoint Free Tools Comments:7 ;

progress

Progress bars are a great addition to any list; making percentage values, target achievement, and progress between dates much clearer. Having included this functionality in SharePoint Highlighter, I’ve tried and tested the various ways this can be achieved and thought I’d share my conclusions.

The main methods for getting a progress bar on your list are:

Client based

  • JavaScript: Put some JavaScript code into a Content Editor Web Part
  • Designer: Use SharePoint Designer to create a custom view

Custom Field Type

  • Free Download: Install a community-supported custom field type
  • Code it yourself: Make your own custom field type from scratch
  • Buy: Purchase a pre-made solution

JavaScript document_into

If you need a free solution that doesn’t require farm administrator permissions, then Christophe’s JavaScript progress bar may be what you’re looking for. This uses JavaScript in a Content Editor Web Part along with a calculated column to render the progress bar.

To customise this to suit your needs you need to have some experience with JavaScript. Alternatively, Christophe is very quick to respond to comments, and may be willing to help with minor tweaks or troubleshooting.

Advantages of this method are the flexibility of Christophe’s HTML calculated column, and the low cost (providing you don’t spend too long customising it). Although by far the largest advantage is that most end users will be able to implement this solution without having to contact their IT department.

The main disadvantage is having to implement the CEWP on every page you want to see the progress bar, and the need to change the JavaScript in every CEWP for any future alterations.

Designer designer

If you’re reasonably familiar with SharePoint Designer, or you’re willing to learn a little, then the Microsoft SharePoint Designer Team Blog has a good article on how to use it to create progress bars: CSS Style Bar Graphs using Data Views

The main advantage of this solution is that it is free (SharePoint Designer is a free download), not counting the cost of the time to create it of course. As with the JavaScript solution, you will need to add the modification on each page you want the progress bars to be displayed.

SharePoint Designer has a chequered history with regards to the amount of power it wields (and hence damage it can cause), and so it is unfortunately often the case that SharePoint site administrators ban or severely restrict its use.

Free Download arrow_down_green

If your requirements are quite straightforward, there are a few community supported progress bar custom columns available for download (for example this Codeplex project).

These are single-purpose additions that tend to be low on customizable options (such as conditional formatting), but are good for quickly meeting specific requirements.

These community supported progress bars are usually open source, which allows you to further develop them if you wish. The above example is an exception; being both closed-source and obfuscated. Support for community projects is unfortunately entirely voluntary, and usually forum-based.

Code studio

If you’re reading this section rather than trying to ignore it you’re probably a developer, or thinking about hiring one. I can tell you from experience that unless you have some very specific requirements or intend to re-use the code for other solutions, it will almost certainly be cheaper to buy a pre-made solution.

This is for the most part due to the rather large overhead of setting up the infrastructure of a working custom field type and the daunting learning curve associated with it. For the sole purpose of creating a progress bar, this investment of time may be disproportionately expensive.

Obviously having a vested interest in you buying our product makes my advice somewhat tainted, so I’ll refer you to the impartial words of Bjørn Furuknap on the subject:

“Looking back I think it would have been easier, and less painful, to eat my own eyes.”

If you’re brave enough to continue down this path, creating your own custom field type allows you to tailor a solution much closer to your needs, limited only by your determination and ability to think sideways. To help you on your way, there is a particularly useful MSDN walkthrough.

Although MSDN as a whole is a gold mine for such a project, there are some rather troublesome areas that are thinly documented.

Buy currency_dollar

There are a number of commercial products on the market that allow you to add visual indicators such as progress bars to lists; one in particular that springs to mind (for some reason) is our own product SharePoint Highlighter.

Many commercial solutions come with additional features that may make the purchase more worthwhile. Rather than throw marketing bullet points everywhere (Synergise ROI!) I’ll simply nod meaningfully towards this comparison matrix.

Enormous professional bias aside, the main benefits of a commercial solution in comparison to the above alternatives are: guaranteed support, more reliability, and user-friendlier configuration. Of course, the glaring disadvantage is having to spend some money up front, rather than the less visible cost of time.

Conclusion about

Each of these possible solutions caters to a slightly different problem, and there is no single right answer. Obviously if there was a single correct, reliable, unbiased answer it would be to buy SharePoint Highlighter*.

*Possibly not entirely unbiased

FilterPoint Update

Date:November 30th, 2010 Author: Tags: , , , , ,
Category: Filter, General, SharePoint Development, SharePoint Ideas Comments:0 ;

We have spent a lot of time over the past month working on the beta version of FilterPoint. Our team of professional testers have been working hard to check for compatibility with all versions of SharePoint 2007 and 2010 and a wide range of browsers, as well as looking for bugs and challenging us on some aspects of the usability of the UI.

And we also owe a huge vote of thanks to our beta volunteers who have been testing out the product in the real world.  Our volunteers and not only uncovered some bugs, but also come up with suggestions for additional things that we could include in the first release.  Some of these we have already added and they include:

(more…)

Editing The SharePoint List Item Menu (Part 3: Other Uses)

Date:November 18th, 2010 Author: Tags: , , , , ,
Category: General, SharePoint Development, SharePoint Ideas, Training Comments:4 ;

In previous posts I’ve used the “Open in new window” function to illustrate the two different methods of adding to the List Item menu, or Edit Control Block (ECB) to use its catchier name.

Part 1 covered the CustomAction element; the developer-leaning Visual Studio method. Part 2 avoided any kind of dedicated program by doing the same directly in SharePoint using Javascript in a Content Editor Web Part (CEWP); for power users or those with software commitment issues.

In this section I’ll be looking at some more interesting, and possibly useful, extra options to illustrate the potential of these kinds of enhancements. These can also be used as stubs to produce more complex functionality along the same lines.

I’ve purposefully kept these changes low-touch (avoiding AJAX libraries for example), to make them quick to try out without installing any additional dependencies.

In each example I’ll give a snippet of code for using a CustomAction or Javascript; these will be brief, as they assume you’ve read my earlier posts.

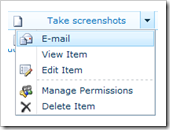
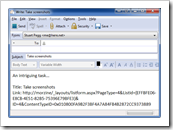
E-mail a task

This example adds a link that pre-populates a new e-mail with some information from the selected task. It uses the good old ’mailto:’ to open the default mail program for the client machine. If you don’t have a default mail client then, well, it won’t (harsh but fair).

This can be used as a quick way to create nagging e-mails for task owners, or to highlight tasks that may be of interest to others.

menuemailemail

To add this option using Javascript, add the following to a CEWP:

<script type="text/javascript">
function getMailTo (ID)
{
var taskTitleLink = document.getElementById(ID).firstChild;
var mailTo = 'mailto:?subject=';
mailTo += encodeURIComponent(taskTitleLink.innerHTML);
mailTo += '&body=';
mailTo += encodeURIComponent('An intriguing task...\n\nTitle: ' + taskTitleLink.innerHTML + '\n');
mailTo += encodeURIComponent('Link: ' + taskTitleLink.getAttribute('href'));
return mailTo;
}

function Custom_AddListMenuItems(m, ctx)
{
CAMOpt(m,’E-mail’,’window.location=getMailTo(‘ + currentItemID+ ‘);’,’/_layouts/images/EMAILPST.PNG’);
return false;
}
</script>

To produce the same result using a CustomAction, using almost the same Javascript in the link; the following UrlAction should be used:

<UrlAction Url="javascript:window.location='mailto:?subject='+encodeURIComponent(document.getElementById({ItemId}).firstChild.innerHTML)+'&amp;body='+encodeURIComponent('An intriguing task...\n\nTitle: '+document.getElementById({ItemId}).firstChild.innerHTML+'\n')+encodeURIComponent('Link: '+document.getElementById({ItemId}).firstChild.getAttribute('href'));"/>

The differences between the two (other than the infrastructure used) are as follows:

  1. UrlActions are ugly not amenable to declaring Javascript functions in an readable way.
  2. URL in an UrlAction is  wrapped in a Javascript function (STSNavigate) when rendered in the OnMenuClick event attribute, so it needs the javascript: prefix to use such. The Javascript version is put in the same event attribute, but without the wrapping function no prefix is needed.
  3. currentItemId and {ItemId} both get the current List Item’s ID in their own contexts.

The code in both of the above examples take advantage of the fact the Title and link are within the div that shares this item’s ID. Using this method limits the amount of information we can get our hands on. We can get a little more using GetAttributeFromItemTable, but to get all the information we’d have to use some more contrived methods.

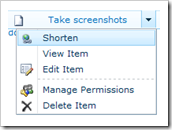
Shorten an item linkmenushorten

This option opens a new window to tinyurl’s site with the task’s abbreviated link posted through. If you’re using an earlier version of Flash than 10 (rather you than me) it’ll even put it in the clipboard for you.

As you may have previously seen, SharePoint links are often a nest of GUIDs. This allows a neat little link to be produced instead: great for optimising scary archaic communication methods such as paper documents or VoYP (Voice over Yoghurt Pot).

I’ve used tinyurl simply because you can send the link to be shortened in a querystring, and nothing else is needed. Much as I love fetching API tokens and/or posting plain text login details, I used the most straightforward method for brevity’s sake.

<script type="text/javascript">
function getShortenUrl(ID)
{
var shortenUrl = 'http://tinyurl.com/create.php?url=';
shortenUrl += encodeURIComponent(document.getElementById(ID).firstChild.getAttribute('href'));
return shortenUrl;
}

function Custom_AddListMenuItems(m, ctx)
{
CAMOpt(m,’Shorten’,’window.open(getShortenUrl(‘ + currentItemID+ ‘));’,’/_layouts/images/LINK.GIF’);
return false;
}
</script>

There is very little difference between the two implementations, except as mentioned in the previous section.

<UrlAction Url="javascript:window.open('http://tinyurl.com/create.php?url='+encodeURIComponent(document.getElementById({ItemId}).firstChild.getAttribute('href')));"/>

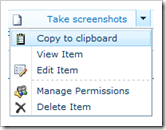
Copy to clipboard (IE only)menuclipboard

A slightly more obvious method of copying an item’s direct link to the clipboard than the right-click menu. Handy for quick intuitive copying, or for broken mice.

Unfortunately this functionality is restricted to Internet Explorer (which covers most SharePoint users). Alternative solutions and their problems are covered pretty comprehensively on this Stack Overflow question.

<script type="text/javascript">
function setClipboard(ID)
{
window.clipboardData.setData('text',document.getElementById(ID).firstChild.getAttribute('href'));
}

function Custom_AddListMenuItems(m, ctx)
{
if (window.clipboardData)
{
CAMOpt(m,’Copy to clipboard’,’setClipboard(‘ + currentItemID+ ‘);’,’/_layouts/images/CLP16.GIF’);
}
}
</script>

The above sample takes advantage of the Javascript method’s flexibility, and does not display the option if the window.clipboard object is not present (i.e. not IE). But due to the restrictive nature of the Custom Action, we don’t have that ability.

<UrlAction Url="javascript:if(window.clipboardData){window.clipboardData.setData('text',document.getElementById({ItemId}).firstChild.getAttribute('href'))}"/>

Conclusion

The two methods of adding to the List Item menu each have their own benefits and restrictions.

The CustomAction method allows site-wide distribution and can be bundled with other CustomAction modifications (such as changes to the command ribbon), but it lacks flexibility and has very little granularity in its release (an entire list type). It also requires Visual Studio, and access to install such features.

Using Javascript in a CEWP is very flexible and much more readable for anything more than a very straightforward action. It can be added by power users rather than developers, without even using SharePoint Designer. Unfortunately it has to be added on every target view individually. If the Javascript was added to the master page it would result in an even less targeted release than the CustomAction option.

Both of these methods have very little item data to hand, but both can be greatly extended by making use of AJAX calls to SharePoint Web Services, 3rd party services, or custom pages.

Editing The SharePoint List Item Menu (Part 2: Using Javascript)

Date:November 4th, 2010 Author: Tags: , ,
Category: SharePoint Development, SharePoint Ideas, SharePoint webparts, Training Comments:6 ;

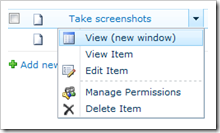
MenuBeforeFollowing on from Part 1 of this series which covered Editing the SharePoint List Item Menu Using Elements, I thought it would valuable to reproduce the same results without using Visual Studio or SharePoint designer (Part 4 will be to do it without a monitor). This method will allow non-developers with view edit access to customise the List Item Menu.

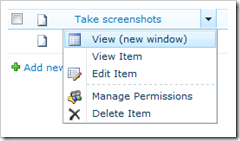
In this example, a ‘View (new window)’ option will once MenuAfteragain be added to each item’s context menu to avoid the modal box, as illustrated to the right. Although as Christophe helpfully pointed out in response to Part 1, the modal boxes can be banished under the list’s Advanced settings. Fortunately there are many other uses for these techniques, as we will see in Part 3.

This example uses a Content Editor web part, which means the Javascript can be added on a view-by-view basis. This allows a more targeted release and can be added by any user with permissions to edit the view. However, it makes widespread distribution more difficult; putting the function in a master page can overcome this but will implement it for every item menu on every list.

(more…)

Editing The SharePoint List Item Menu (Part 1: Using Elements)

Date:November 4th, 2010 Author: Tags: , , , ,
Category: SharePoint Development, SharePoint Ideas, Training Comments:2 ;

The lovable modal boxWhile copying my rapidly lengthening scribbled to do list into a SharePoint Tasks list, my unconscious habit of middle-clicking items to come back to was being constantly foiled. Instead of opening a new tab the modal box kept popping up in the middle of my screen (new to 2010 I hear).

The drop-down menu options did exactly the same, leaving no alternative but to right-click the item, copy the link, manually open a new tab, paste it in, and switch back; much too much like hard work. So I decided to add an option to open the item in a new window… in retrospect probably harder work than just putting up with it.

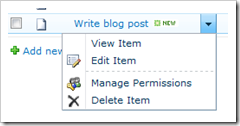
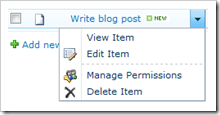
The default item menu
The modified item menu

As a result, this is a brief run-through of how to add options to the context menu of list items in SharePoint, using a CustomAction in Visual Studio. For using JavaScript to the same ends, see Part 2: Using JavaScript (coming soon).

(more…)

SharePoint and Visual Studio 2010 – Adding ClassResources to a Web Part

Date:September 20th, 2010 Author: Tags: , ,
Category: SharePoint Development Comments:3 ;

I’ve been working on moving all our products over to Visual Studio 2010. Whilst Microsoft still has some way to go to make SharePoint totally developer friendly (I mean 47 1/2 steps to install SharePoint 2010 on a Windows 7 desktop for development? And shake a double 6 to start? Really?) they have made huge advances and the SharePoint tools built into Visual Studio 2010 are a big improvement on hand crafting or using VSeWSS or WSPBuilder.

I’ve learnt a few things along the way and thought I would pass them on. Today its :-

How to add ClassResources to a Web Part

ClassResources are intended to be used for browser requested resources used in a web part – e.g. images, css files and javascript. This location is often forgotten about and instead these types of files end up spread all over the place.

(more…)

SharePoint Terminology – Farms, Web Front Ends, Web Application and Sites

Date:July 8th, 2010 Author: Tags: , ,
Category: General, SharePoint Development, SharePoint Ideas, Training Comments:9 ;

There is a great deal of confusion around some terms related to the different levels of SharePoint hierarchy. Some of this is buzword overload and some  has been brought about by inconsistent usage from Microsoft (and to be fair actually most of us in this industry).

So if you’ve ever wondered what things like Farm, WFE, NLB, Web Application, Site Collection and Top Level Site mean I am going to try and clarify the different terms without getting too technical as some of this stuff needs to be know by advanced, or power, users. I’ve missed out some of the more esoteric things like managed paths in the interests of readers sanity.

SharePoint Feature Receivers – the hidden details

Date:June 15th, 2010 Author: Tags: ,
Category: General, SharePoint Development Comments:2 ;

Warning –  this post is somewhat techie so if you’re not a developer you may want to go find something more interesting to do!

I’ve been doing some work with SharePoint Feature Receivers recently and found the official documentation to be somewhat … lacking.

SharePoint Feature Receivers allow you to run code when a Feature such as a web part or template is installed, activated, deactivated and removed. They are often used for installation/setup tasks that can’t be done using XML incantations in Manifest.xml, Elements.xml and Feature.xml.

I am not going to give a step-by-step guide to Feature Receivers (see the excellent How to add a Feature Receiver to a Feature from SharePoint dev wiki) but plan to detail information that I was struggling to find anywhere else.

(more…)

Don’t get Public Key Blobs and Tokens mixed up!

Date:October 26th, 2008 Author: Tags:
Category: SharePoint Development, SharePoint Ideas Comments:0 ;

Introduction

When developing web-parts for Microsoft SharePoint, a developer must confront the .NET runtimes Code Access Security and Strongly Named Assembly features.

There are several gotchas involved, one of which – mixing up public key tokens and blobs – is described here.

(more…)