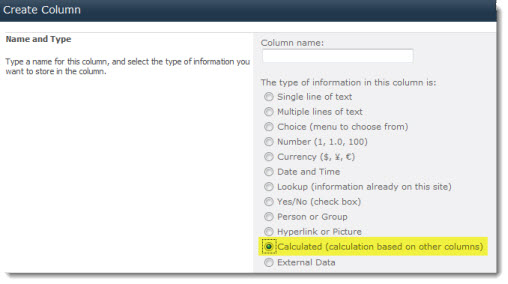
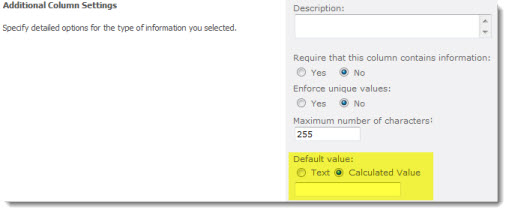
We helped a custom recently with an interesting SharePoint question – how to identify if a List item is new or has been modified? In addition they also needed to be able to setup a View to show only New items and another to show Modified items.
Posts Tagged ‘Tip’
How to Identify New or Modified List Items (records) in SharePoint
Date:October 22nd, 2015 Author:Ryan Tags: Calculated Columns, Filter, TipCategory: Calculated Columns, Filter, SharePoint Reminder Comments:0 ;
SPBiz – SharePoint conference for Business and Power Users!
Date:June 9th, 2015 Author:Ryan Tags: Conference, Office 365, SharePoint, Tip, TrainingCategory: SharePoint Ideas, SharePoint Online / 365 / Cloud, Training Comments:3 ;
As with any technology a successfully SharePoint implementation relies just as much on the business and ‘softer’ user adoption skills as the technical aspects. Which is why I’ve always found it strange that there are huge amounts of great technical resources (books, examples, best-practices, blogs, conferences etc) but far less aimed at business and power users.
The free on-line SPBiz conference is going to balance this a little with its focus on the needs of SharePoint Business and Power Users. There is still some great technical content in there but the focus is on empowering the less technical audience with resources to get things done and make SharePoint a success.
Just some of the sessions at SPBiz!
- Create a GTD Dashboard in Office 365 to “Get Things Done”
- Want to use SharePoint for internal communications?
- Secrets of Successful SharePoint Intranets
- How to build a knowledge sharing culture
- Strategies to Deliver Successful Employee Portals
- Leverage SharePoint 2013 for Better Collaborative Project Management
- How to be productive with Office 365
- Change business processes into easy SharePoint workflows
- Find out about the best “no-code” solutions for SharePoint
- SharePoint Governance 101
June 17th and 18th – Free and Online.
Register Today for free or browse the Agenda for Wednesday 17th and Thursday 18th.
Add Highlighting & Conditional Formatting to PivotPoint tables
Date:March 12th, 2014 Author:Ryan Tags: Highlighting, Javascript, jQuery, PivotPoint, Tip, Web PartCategory: PivotPoint Web Part, SharePoint Ideas Comments:1 ;
Our PivotPoint web part for SharePoint allows you to summarise data from your SharePoint lists in a similar way to Excel’s Pivot Tables and Charts.
A few users have asked how you can add highlighting or conditional formatting to the Pivot Tables – to do things like highlighting the High Risk column, or any cell above a certain value.
We have a Highlighter app that allows you to do this on normal Lists but it doesn’t work with PivotPoint so I thought I would put together some examples of how you can do this using every SharePoint hackers favourite tools – JavaScript and jQuery.
You will need some experience with programming and/or JavaScript to be able to modify these examples to do what you want but there are lots of comments in the code to help.
If you’re looking for an easy way to add conditional formatting/ highlighting for SharePoint Lists then check out Highlighter.
So lets get started. The files you need for the article can be found in a zip file here. Inside you will see a test .html page that can be used just to experiment with the javascript and a .js.txt file that contains the javascript to use on your site.
Adding JavaScript to a page
The first thing we need to know is how to add JavaScript to a page. Read up about that and come back!
For SharePoint 2010 and 2007 you have to use the Content Editor web part (CEWP)
You could use the Source View of the CEWP and put the JavaScript directly into it, but you could also staple your tongue to a door and it will probably be less painful!
A much better way is to save the script as a .txt file in a document library and then include the file on the page with the Content Editors “Content Link” feature. Christophe walks you through this method here.
jQuery or not?
The examples given here use jQuery – a great addition to JavaScript that simplifies many common tasks.
You could adapt these ideas to run without jQuery if you like – but you’re on your own with that!
You can see the reference to jQuery on the first line of the example scripts.
One thing you should determine is
a) Has jQuery already been added to all your SharePoint pages (by an administrator adding them into a custom master page)? If so then you should remove the jQuery reference from these examples as there is no point in including it twice.
b) These jQuery files are loaded from Googles CDN servers. If you don’t have external internet access you will have to copy jQuery to some other location (such as a document library).
Show me the examples already!
Download and unpack these zip files – inside you will see
.htm files that you can experiment with.
Open them in a browser to see what they look like. Open them in a text editor like Notepad to change how they look and then re-load in the browser (F5).
.js.txt files that you can use in SharePoint.
Use a text editor to copy the changes you’ve made in the example .htm file in and then add them to the page that you have PivotPoint on using any of the methods in “Adding JavaScript to a page”.
The two examples are :-
Highlighting PivotPoint cells based on the value
The first example we’re going to look at is to highlight different cells depending on the value that’s in them.
For our example –
- If it’s less than or equal to 160 then we want the text in red
- If it’s more than or equal to 180 then it should have a background in yellow.
The result should be a web part like this.
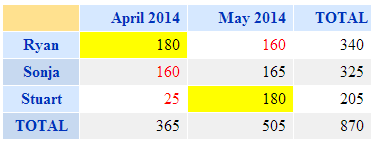
There are plenty of comments in the JavaScript source code but basically what it’s doing Is looping through each cell in the PivotTable, checking what value It is and applying a CSS style.
See the source of highlight-by-cell-value.html and highlight-by-cell-value.js.txt in the ZIP file
Highlighting PivotPoint based on the row and column
In this example we’re looking to highlight a cell based on what Row and Column it appears in.
E.g. in this risk matrix we want to highlight the “High Risk” and “Frequent Probability” in red.

There are two ways to do this in the javascript example given.
The first is to highlight based on the position, e.g.
highlightCellByIndex(0,0,'background','red');
Will highlight the cell in column 0, row 0 by setting the background red. (Yes sorry, the rows and columns start from number 0!).
But – if the layout of your table changes in future (e.g. someone adds a “Super Extra High Risk”) column) then everything will move and this will be in the wrong place.
In that case the better way is to highlight by the value of the Column and Row headers – e.g.
highlightCell("Rare","Low", 'background','red');
See the source of highlight-by-column-and-row.html and highlight-by-column-and-row.js in the ZIP file
Tips –
- When making changes to the javascript do a small amount at a time, then you will know where to start if this doesn’t work!
- You’re not just limited to setting colours, you can also add in any other effect possible in CSS.
- Use the developer toolbar (F12 in IE and Chrome) if you have an error – this tool will enable you to track it down, but how to use it is beyond the scope of what we can show here!
.css('font-weight','bold');
.css('font-size','200%');
.css('border','1px solid red');
- You can also add images (e.g. flags)
.append("<img src='some-url-to-an–icon.gif'>");
Disclaimer – these technique is provided as is and free of charge to get you started. You will need some experience of JavaScript or programming and the browser developer tools to modify these to do exactly what you want. Whilst we can’t provide technical support for this we will endeavour to help customers with active Premium Support and Maintenance contracts in place for PivotPoint.
Complete guide to filtering SharePoint lists by the current week.
Date:September 17th, 2012 Author:Ryan Tags: Calculated Columns, Guide, TipCategory: Calculated Columns, Filter, SharePoint Ideas Comments:7 ;
A common requirement in SharePoint is to filter lists so you’re only showing the current week, month, quarter etc. If you only want to see the last X number of days (e.g. last 30 days) then it’s simple enough.
If you want setup a SharePoint view to see the current calendar week then its a little more complex – especially if you define your week differently from the standard Sunday to Saturday or Monday to Sunday.
First you must look at and really understand the method for setting up SharePoint views to filter the current calendar month or week as it’s not really obvious.
Long story short – here are the steps :-
- Use one of the calculated column formula below to find the “Start of week“
- Use a calculated column formula of “End of Week“
= [Start of Week] + 6
- Setup a View Filter showing items when [Today] is in that range.
Start of Week <= [Today] AND End Of Week >= [Today]
Again – see this post for showing the method in step-by-step detail.
If your week goes Sunday to Saturday or Monday to Sunday then use :-
| Start of week | End of week | |
| Sunday to Saturday |
=[Due Date] - WEEKDAY([Due Date]) +1 |
=[Start of Week] + 6 |
| Monday to Sunday |
=[Due Date] – WEEKDAY([mydate],2) + 1 |
=[Start of Week] + 6 |
Obviously you will replace [Due Date] with your own particular date field.(Check out the WEEKDAY function to understand what the 2nd argument does)
The other options are a bit more complex to find the start of the week (again end of week = start + 6)
| Start of week | |
| Tuesday to Monday |
=[Due Date]-WEEKDAY([Due Date])+IF(WEEKDAY([Due Date])<3,-4,3) |
| Wednesday to Tuesday |
=[Due Date]-WEEKDAY([Due Date])+IF(WEEKDAY([Due Date])<4,-3,4) |
| Thursday to Wednesday |
=[Due Date]-WEEKDAY([Due Date])+IF(WEEKDAY([Due Date])<5,-2,5) |
| Friday to Thursday |
=[Due Date]-WEEKDAY([Due Date])+IF(WEEKDAY([Due Date])<6,-1,6) |
| Saturday to Friday |
=[Due Date]-WEEKDAY([Due Date])+IF(WEEKDAY([Due Date])<7,0,7) |
See this picture for some test data, its in a strange order (Thursday to Wednesday if first) but check it out on your desk calendar if you’re not convinced!
Tip – Keyboard shortcut for Paste As Plain Text in SharePoint
Date:June 14th, 2012 Author:Ryan Tags: Rich Text Editor, SharePoint, TipCategory: General Comments:5 ;
If you spend any amount of time copy and pasting stuff into SharePoint’s wiki or rich text fields (or indeed working with web based rich text editors of any kind) then you’ve undoubtedly have been burned by the crAzY FormaAting monster! This is because the formatting that works so beautifully in one place may not work well in another site.
Of course in SharePoint 2010 you’ve got the Paste as plaintext option in the toolbar, but I am a keyboard warrior damn it! I don’t have time for faffing about with a mouse!
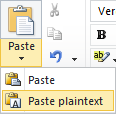
If you’re using :-
- Google Chrome – its built in! Just use CTRL+SHIFT+V.
- Firefox – you can install this plugin.
- Otherwise – you can install the Pure Text Plus app to add a paste as plain text option to all Windows programs.
10 things developers should know about SharePoint
Date:May 4th, 2012 Author:Stuart Pegg Tags: SharePoint, SharePoint Development, Terminology, Tip, TrainingCategory: Community, General, SharePoint Development, Training Comments:1 ;
Many developers walk into the world of SharePoint unaware of the strange and interesting journey of discovery they’re about to begin.
It’s often difficult to know where to being, so here’s the top 10 most useful things I’ve learned since I joined Pentalogic back in 2010.
Pitfalls
1. Know your Editions
2. Don’t even look at the database
3. Get to know the front-end
4. Dispose of your disposables
Building your Knowledge
5. Learn the language
6. Get a good book
7. Love the MSDN documentation
8. Find a SharePoint community that suits you
General advice
9. Learn to live with CAML
10. Remember that SharePoint is enormous
Conclusion
1. Know your Editions
SharePoint comes in many flavours, each of which has it’s own features and shortcomings. Here’s a quick run down of the notable versions:
| Release | Cheap | Expensive | MS Hosted |
| 2007 | WSS3 | MOSS | BPOS |
| 2010 | Foundation | Standard/Enterprise | SharePoint Online / Office 365 |
It’s useful to get to know these for when you’re searching for solutions, as you’ll sometimes come across those that are edition specific (e.g. the Standard Edition’s ContentIterator class for querying large lists).
There are few things more frustrating than finding the perfect solution, and then discovering you have the wrong Edition.
2. Don’t even look at the database
To those new to SharePoint this is entirely baffling: Why wouldn’t you want to get data from the database? There are two good reasons for this:
a) Microsoft is very touchy about their database. They will not support any installation with software on it that modifies the SharePoint database.
b) The structure will give you nightmares. At some point in almost every database developer’s career they say: “Why don’t we abstract the table structure, and just have one massive generic table of text data?”
They’re then hit in the head by whatever small throwable object happened to be nearby, and their colleagues point out that although it would be very flexible, it would also be fantastically slow and unwieldy.
Unfortunately either the SharePoint team operated a clean desk policy, or they put an extraordinary value on flexibility, and the result is lurking in the darkness of the SharePoint database.
3. Get to know the front-end
It’s very tempting to dive straight into the code side of things, but when you’re trying to orientate yourself in the API it helps to have a good understanding of what you’re looking at from the front-end.
It’ll also give you a good feel for the site’s design, and hence what sort of layout the users will expect to see.
Many of the actions you perform in code will correlate to actions in the front-end, as well as the structure.
For example, to find a particular list’s view in the front-end, you would:
- Open the site using the URL
- Open the sub site
- Select the list
- Select the view
The code version of which is very similar in structure and information needed:
using (SPSite site = new SPSite(http://site))
{
using (SPWeb web = site.OpenWeb("subsite"))
{
SPList list = web.Lists["List name"];
SPView view = list.Views["View name"];
}
}
4. Dispose of your disposables
Some SharePoint objects (in particular SPWeb and SPSite) won’t automatically dispose of themselves when they’re no longer used. If you’re unaware of this, then you may easily run into post-deployment problems caused by the ensuing memory leaks.
The code in the previous section shows one method of dealing with this problem, and here is Microsoft’s advice on the subject: Disposing Objects
Interestingly, you shouldn’t always dispose of these objects; for example you shouldn’t dispose of SPContext.Current.Web. As a general rule of thumb:
If you made it, dispose of it. If you were given it, leave it.
5. Learn the language
There is a huge amount of SharePoint-specific terminology, and some of it can be inconsistent and often misleading. For example, a Site Collection is an SPSite object, but a Site is an SPWeb object.
Another example that caught me off guard at first was that there’s a difference between the Object Model (the server-side SharePoint API) and the Client Object Model (client-side API). Whereas I was under the impression that one was an abbreviated form of the other.
Microsoft has published an enormous glossary, which seems to cover quite a lot of it: Glossary for SharePoint 2010. Although as with any jargon or language, most of it is learned along the way.
6. Get a good book
A good reference guide is infinitely more useful than an enormous glossary when getting to know the components of SharePoint. It’s vitally important that you get an overview of all of these components, to avoid inadvertently reinventing the wheel.
There are two I can personally recommend (having read them both cover-to-cover):
Building the SharePoint User Experience (Furuknap): Written for 2007, but still covers the mainstay of SharePoint. An easy and interesting read: If you’re quickly bored by dry textbooks, then this is definitely the book for you.
Inside Microsoft SharePoint 2010 (Various): A good follow-on from Furuknap’s book. A solid foundation of 2010 knowledge, and a good one to refer to now and again. Don’t start with this book though, or you’ll find yourself climbing a pretty steep cliff.
As your SharePoint knowledge grows, revisiting the books can also be quite useful. Parts you may have glossed over previously will suddenly start to make more sense, and you may find some useful tips you missed first time.
7. Love the MSDN documentation
Having developed and worked with a great many third party APIs and interfaces in the past, I can say with considerable confidence that the MSDN documentation is phenomenal.
Every class, method, and property is documented. Even the most obscure properties have at least a placeholder page, which in itself offers more information than many specifications. On top of this is the community comments on each page add clarification and often links to useful related articles.
However, there are two minor shortcomings. The first is that the background documentation (such as “Disposing Objects” mentioned above) is usually painfully boring to read and often skims around subjects rather than getting to the point.
The second is that the CAML documentation is very bizarrely structured: Elements used for almost completed different things share the same page just because they have the same name. There is also missing documentation where the CAML is more obscure, such as the elements used in SPWeb.ProcessBatchData().
8. Find a SharePoint community that suits you
Sometimes no amount of Googling or searching of MSDN’s documentation will find you the answer to the problem that’s been bugging you. In these circumstances it’s good to have a community of like-minded SharePoint developers to help you with your problem.
Being an active member of a community will also help you to expand your knowledge of SharePoint in general.
Here are a couple of the more notable SharePoint developer-friendly communities:
- MSDN Forums: Microsoft’s own SharePoint forums
- SharePoint Stack Exchange: A SharePoint-only version of the renowned Stack Overflow
I’ve previously discussed the differences between the two in the following article: SharePoint Questions: MSDN versus Stack Exchange
9. Learn to live with CAML
Collaborative Application Markup Language (CAML) is another example where flexibility seemed to take precedence over usability. In certain circumstances you’ll be forced to write unserializable and poorly validated XML to perform seemingly simple tasks, such as importing comparatively small quantities of data (a few thousand rows).
However, it isn’t all bad: As I mentioned, CAML does allow a great deal of flexibility, and also has very easily readable syntax. The core resource for CAML can be found here: Collaborative Application Markup Language Core Schemas
When querying data you can avoid CAML by using LINQ, which is reputedly faster and easier to use. If you have no fear of CAML (or are working on 2007), the following tool may be of use to you: U2U CAML Query Builder
P.S. While we’re talking about tools, I should mention the extensive and impressive list of SharePoint development tools found here: List of SharePoint 2007 development tools
10. Remember that SharePoint is enormous
It’s important to bear in mind that SharePoint is a mind bogglingly large framework, with dark corners that even the SharePoint Development Team themselves haven’t visited in years.
This is important because occasionally you’ll find an area that’s poorly documented or has strange known issues, and it helps to have a little perspective on the scale of the system you’re dealing with.
You also need to be aware that there’s an awful lot you don’t know, and some of which you may never know. Getting a good overview of the components is essential. I wouldn’t recommend designing a project to use a component (such as a Custom Field Type or Site Template) until you’ve at least made a prototype in that area; to appreciate the depth of what you’re tackling.
The variety of customizable components in SharePoint also means that there is almost always more than one solution to a problem, as you can see in some of my previous posts: How to do list highlighting in SharePoint
Conclusion
The first challenge in SharePoint is discovering the existence of all the things you don’t understand yet. Once you’ve got a vague idea of all the different components, then you can really start to learn what each is about.
To borrow Mr Rumsfeld’s turn of phrase: Once all your unknown unknowns are known unknowns, you can start learning known knowns.
How Much Does SharePoint Cost?
Date:November 24th, 2010 Author:Clare Tags: Sh, SharePoint, SharePoint 2010, Tip, VS2010Category: General, SharePoint Ideas Comments:18 ;
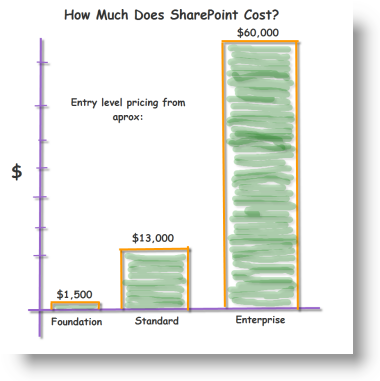 One of the top questions you’ll ask if you’re looking at deploying a SharePoint solution for your organization is – how much is this going to cost us? While the exact answer depends on the size of your business and what you want from SharePoint, this post will look at the cost of entering the SharePoint sphere.
There are many options available and many variables that may come into play here – so the figures we are giving are not designed to cost a solution down to the last cent – rather to give you a “ball park” idea of what each level of the SharePoint solution is likely to cost, and perhaps more importantly the size of the steps between each level.
Sharepoint Governance #1 – aim for the sky
Date:October 18th, 2010 Author:Michelle Tags: SharePoint, TipCategory: General, SharePoint Ideas Comments:2 ;
 So you’ve got your hands on SharePoint and you’re excited. Some might say we’re biased over here at the Pentalogic blog, but we definitely wouldn’t blame you for itching to deploy this user friendly and incredibly powerful server side software across your whole organization super quickly.
But wait a moment! Have you set out who will be in charge of migrating your shared drives to SharePoint, authorising new sites to be created and setting out an information lifecycle to manage your data? What about indexing information so it can be easily searched should you need an answer to be at your fingertips? If any or all of this sounds like a minefield to you, let me assure you that you’re definitely not alone.
Regulating SharePoint affects many users and most of us will look for guidance about managing our use of it at some point. With this in mind, we’ve put together a quick guide to explain why it’s vital to set out protocol for using SharePoint in your organisation sooner rather than later and have added some useful resources for you at the end.
Why Tooltips are cool tips in PivotPoint Webpart for SharePoint
Date:September 9th, 2010 Author:Clare Tags: PivotPoint, SharePoint, Tip, WebPartCategory: PivotPoint Web Part, SharePoint webparts Comments:0 ;
Tooltips – those little boxes that pop up when you hover over something – can be a blessing or a bit of a nightmare. It drives me nuts when people enable those snapshot tooltips on every hyperlink on a page. the resulting pop ups are huge, usually contain info I don’t want to see, and seem to hang around on the screen for ever.
But imagine a tooltip where you choose exactly what information is displayed? How cool would that be? Well that’s exactly what you get with tooltips in our PivotPoint web part for SharePoint – which is why I think they rock.
Using [Today] in SharePoint calculated default values
Date:September 2nd, 2010 Author:Ryan Tags: Calculated Columns, SharePoint, Tip, TodayCategory: Calculated Columns Comments:16 ;
Despite the infamous “fake today column trick” still appearing in new blog posts on a monthly basis you can’t use Today in calculated columns in SharePoint.
I’ve seen people assume (not unreasonably) that the same rule must apply with calculated default values used in columns that are not calculated columns as well – but strangely, you actually can use Today in calculated default values, so I am going to explain why it works and how you might use this.
What is the difference between Calculated Column and Calculated Default value?
A calculated column, erm… calculates values from other columns in your list.
For example if you have an orders list with a Quantity and Price column you can calculate a Grand Total of Price * Quantity.
With a calculated default value you use a calculation to set the default value for a column that is not a calculated column – this is the value that is entered automatically when a new list item is created and may be over-written by the user.
So why may I want a calculation using Today as the default value?
Suppose we have a list containing customer complaints and we have a target to resolve everything in 3 days. Sometimes though for complex queries or if there are public holidays we may give more time. In that case we can set the default value as
= Today + 3
But the user can override that if necessary (public holiday etc).
So why can I use Today here but not in calculated columns?
With a calculated column the calculation is only reworked every time a record is updated. When it’s just viewed then it picks up the saved result from the last edit. This makes perfect sense for most calculated values, but not for values using Today or Me.
So for example if we tried to calculate the days left until a due date we might want to use
Days left = Due Date - Today
If we added the complaint on Monday then it would show that we have 3 days left to do it (Thursday). If we just look at the record on the Wednesday it would still show 3 days (as this was the calculation saved on Monday) when in fact we only have 1 day left to keep the customer happy.
That’s why SharePoint wont let you use Today in calculated columns.
However with a default calculated value the result is only worked out once when the record is being created – it’s understood that what is saved in this field is not updated automatically so there is no problem with using Today.
For a bonus point – you can’t reference other fields in calculations for default values (e.g. Start Date or Order Date) as before a record is being created the fields don’t yet contain values.
What else could I do with this?
The OP in this thread is using it to set default financial years. Suppose that your company’s financial year starts in April then you could use this formula to default to 2009/10 or 2010/11 on or after April.
=IF(MONTH(Today)>=4,"2010/11","2009/11")
or generating the year 20xx/xx notation automatically :-
=IF(MONTH(Today)>=4,YEAR(Today) & "/" & (YEAR(Today)+1),(Year(Today)-1) & "/" & YEAR(Today))
It’s also worth noting that you can use a similar formula in calculated columns – suppose you have an Order Date field and the financial year depends upon when the order was placed then simply replace Today with Order Date.
NB – This has been tested with SharePoint 2007/2010.
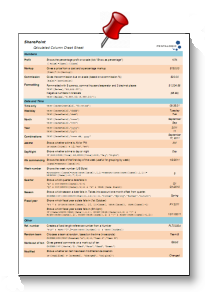
| Free SharePoint Calculated Column Cheat Sheet |
| a handy 3 page reference for calculated column functions and formulas. |
 |


