Posts Tagged ‘SharePoint 2010’

Editing The SharePoint List Item Menu (Part 3: Other Uses)

Date:November 18th, 2010 Author: Tags: , , , , ,
Category: General, SharePoint Development, SharePoint Ideas, Training Comments:4 ;

In previous posts I’ve used the “Open in new window” function to illustrate the two different methods of adding to the List Item menu, or Edit Control Block (ECB) to use its catchier name.

Part 1 covered the CustomAction element; the developer-leaning Visual Studio method. Part 2 avoided any kind of dedicated program by doing the same directly in SharePoint using Javascript in a Content Editor Web Part (CEWP); for power users or those with software commitment issues.

In this section I’ll be looking at some more interesting, and possibly useful, extra options to illustrate the potential of these kinds of enhancements. These can also be used as stubs to produce more complex functionality along the same lines.

I’ve purposefully kept these changes low-touch (avoiding AJAX libraries for example), to make them quick to try out without installing any additional dependencies.

In each example I’ll give a snippet of code for using a CustomAction or Javascript; these will be brief, as they assume you’ve read my earlier posts.

E-mail a task

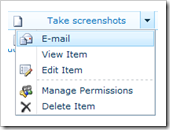
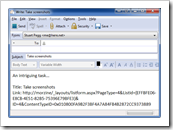
This example adds a link that pre-populates a new e-mail with some information from the selected task. It uses the good old ’mailto:’ to open the default mail program for the client machine. If you don’t have a default mail client then, well, it won’t (harsh but fair).

This can be used as a quick way to create nagging e-mails for task owners, or to highlight tasks that may be of interest to others.

menuemailemail

To add this option using Javascript, add the following to a CEWP:

<script type="text/javascript">
function getMailTo (ID)
{
var taskTitleLink = document.getElementById(ID).firstChild;
var mailTo = 'mailto:?subject=';
mailTo += encodeURIComponent(taskTitleLink.innerHTML);
mailTo += '&body=';
mailTo += encodeURIComponent('An intriguing task...\n\nTitle: ' + taskTitleLink.innerHTML + '\n');
mailTo += encodeURIComponent('Link: ' + taskTitleLink.getAttribute('href'));
return mailTo;
}

function Custom_AddListMenuItems(m, ctx)
{
CAMOpt(m,’E-mail’,’window.location=getMailTo(‘ + currentItemID+ ‘);’,’/_layouts/images/EMAILPST.PNG’);
return false;
}
</script>

To produce the same result using a CustomAction, using almost the same Javascript in the link; the following UrlAction should be used:

<UrlAction Url="javascript:window.location='mailto:?subject='+encodeURIComponent(document.getElementById({ItemId}).firstChild.innerHTML)+'&amp;body='+encodeURIComponent('An intriguing task...\n\nTitle: '+document.getElementById({ItemId}).firstChild.innerHTML+'\n')+encodeURIComponent('Link: '+document.getElementById({ItemId}).firstChild.getAttribute('href'));"/>

The differences between the two (other than the infrastructure used) are as follows:

  1. UrlActions are ugly not amenable to declaring Javascript functions in an readable way.
  2. URL in an UrlAction is  wrapped in a Javascript function (STSNavigate) when rendered in the OnMenuClick event attribute, so it needs the javascript: prefix to use such. The Javascript version is put in the same event attribute, but without the wrapping function no prefix is needed.
  3. currentItemId and {ItemId} both get the current List Item’s ID in their own contexts.

The code in both of the above examples take advantage of the fact the Title and link are within the div that shares this item’s ID. Using this method limits the amount of information we can get our hands on. We can get a little more using GetAttributeFromItemTable, but to get all the information we’d have to use some more contrived methods.

Shorten an item linkmenushorten
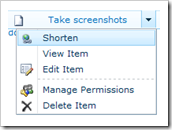
This option opens a new window to tinyurl’s site with the task’s abbreviated link posted through. If you’re using an earlier version of Flash than 10 (rather you than me) it’ll even put it in the clipboard for you.

As you may have previously seen, SharePoint links are often a nest of GUIDs. This allows a neat little link to be produced instead: great for optimising scary archaic communication methods such as paper documents or VoYP (Voice over Yoghurt Pot).

I’ve used tinyurl simply because you can send the link to be shortened in a querystring, and nothing else is needed. Much as I love fetching API tokens and/or posting plain text login details, I used the most straightforward method for brevity’s sake.

<script type="text/javascript">
function getShortenUrl(ID)
{
var shortenUrl = 'http://tinyurl.com/create.php?url=';
shortenUrl += encodeURIComponent(document.getElementById(ID).firstChild.getAttribute('href'));
return shortenUrl;
}

function Custom_AddListMenuItems(m, ctx)
{
CAMOpt(m,’Shorten’,’window.open(getShortenUrl(‘ + currentItemID+ ‘));’,’/_layouts/images/LINK.GIF’);
return false;
}
</script>

There is very little difference between the two implementations, except as mentioned in the previous section.

<UrlAction Url="javascript:window.open('http://tinyurl.com/create.php?url='+encodeURIComponent(document.getElementById({ItemId}).firstChild.getAttribute('href')));"/>

Copy to clipboard (IE only)menuclipboard
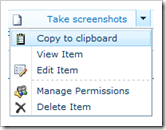
A slightly more obvious method of copying an item’s direct link to the clipboard than the right-click menu. Handy for quick intuitive copying, or for broken mice.

Unfortunately this functionality is restricted to Internet Explorer (which covers most SharePoint users). Alternative solutions and their problems are covered pretty comprehensively on this Stack Overflow question.

<script type="text/javascript">
function setClipboard(ID)
{
window.clipboardData.setData('text',document.getElementById(ID).firstChild.getAttribute('href'));
}

function Custom_AddListMenuItems(m, ctx)
{
if (window.clipboardData)
{
CAMOpt(m,’Copy to clipboard’,’setClipboard(‘ + currentItemID+ ‘);’,’/_layouts/images/CLP16.GIF’);
}
}
</script>

The above sample takes advantage of the Javascript method’s flexibility, and does not display the option if the window.clipboard object is not present (i.e. not IE). But due to the restrictive nature of the Custom Action, we don’t have that ability.

<UrlAction Url="javascript:if(window.clipboardData){window.clipboardData.setData('text',document.getElementById({ItemId}).firstChild.getAttribute('href'))}"/>

Conclusion

The two methods of adding to the List Item menu each have their own benefits and restrictions.

The CustomAction method allows site-wide distribution and can be bundled with other CustomAction modifications (such as changes to the command ribbon), but it lacks flexibility and has very little granularity in its release (an entire list type). It also requires Visual Studio, and access to install such features.

Using Javascript in a CEWP is very flexible and much more readable for anything more than a very straightforward action. It can be added by power users rather than developers, without even using SharePoint Designer. Unfortunately it has to be added on every target view individually. If the Javascript was added to the master page it would result in an even less targeted release than the CustomAction option.

Both of these methods have very little item data to hand, but both can be greatly extended by making use of AJAX calls to SharePoint Web Services, 3rd party services, or custom pages.

SharePoint in the Cloud – Pie in the Sky?

Date:November 16th, 2010 Author: Tags: ,
Category: General, SharePoint Ideas Comments:2 ;

Yes, we’re wading into the SharePoint in the cloud debate! With major changes to SharePoint Online on the horizon, now may be a good time for us to re-examine the possible benefits that cloud computing could bring to you and your business.

pigs might flyI can’t describe cloud computing as the latest revolutionary breakthrough in software services; in fact, it seems as if the phrase has been around for a long time. But how many of you actually use the cloud to deliver your SharePoint software?

(more…)

Editing The SharePoint List Item Menu (Part 1: Using Elements)

Date:November 4th, 2010 Author: Tags: , , , ,
Category: SharePoint Development, SharePoint Ideas, Training Comments:2 ;

The lovable modal boxWhile copying my rapidly lengthening scribbled to do list into a SharePoint Tasks list, my unconscious habit of middle-clicking items to come back to was being constantly foiled. Instead of opening a new tab the modal box kept popping up in the middle of my screen (new to 2010 I hear).

The drop-down menu options did exactly the same, leaving no alternative but to right-click the item, copy the link, manually open a new tab, paste it in, and switch back; much too much like hard work. So I decided to add an option to open the item in a new window… in retrospect probably harder work than just putting up with it.

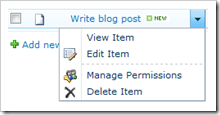
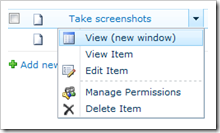
The default item menu
The modified item menu

As a result, this is a brief run-through of how to add options to the context menu of list items in SharePoint, using a CustomAction in Visual Studio. For using JavaScript to the same ends, see Part 2: Using JavaScript (coming soon).

(more…)

SharePoint 2010 – the Wikis are Everywhere!

Date:September 29th, 2010 Author: Tags:
Category: General, SharePoint Ideas Comments:3 ;

Sometimes opening up SharePoint 2010 makes me come over all Star Trek: I feel like I’m on a mission, to explore strange new worlds: to seek out new life  . . . . . OK someone slap me now!

But seriously, there are some funky new features in 2010 and wikis seem to have come on quite a long way. Last week we looked at working with Sharepoint wikis and explored the functionality that is common to 2007 and 2010.

This week we are going to look at the new 2010 features – most of which look great with a couple of exceptions which are frankly a little confusing.

So – set Phasers to stun – lets boldly go!

(more…)

Working With SharePoint Wikis

Date:September 23rd, 2010 Author: Tags: ,
Category: General, SharePoint Ideas Comments:1 ;

SharePoint wikis get quite a bit of flack from Wiki enthusiasts – who think they are way too basic and rather a lame example of a wiki.  We disagree:  we quite like SharePoint wiki’s – yes they are very simple and easy to use, but isn’t this kind of the point?  That they should allow you to add and share content quickly and easily?

So we have 2 articles for you here.  This first one is Wiki basics – why and how you would use a SharePoint wiki – and these apply to both SharePoint 2007 and 2010.

And the second installment will take a spin through the new wiki features which are available in SharePoint 2010 – and some of these should be exciting enough to shut up even the most hard core sceptic.

So first up SharePoint Wiki basics.

Why use a Wiki?

Basically a wiki is a bit like a big, on-line, shareable notepad or whiteboard. So if you want your very busy and important subject matter experts to share their pearls of wisdom with the rest of the organization a wiki is probably a great way for them to do that – because its quick and its easy and they can get their point across without having faff around with formatting or worry about where there are going to save the thing. . It’s also really easy for the original author, or others to add, amend and cross reference.  So wikis are also great as team project workspaces, for sharing ideas, gathering information and discussing issues.

You wouldn’t want to use a wiki for structured data (Tasks/Issues/Invoices etc) that would be better in a List and likewise the very unstructured and easy to edit nature of a wiki means that they are probably not the best place for dealing with content that needs a lot of authentication or protection – so for example you might not want your company pay scales, or disciplinary procedures stored in a wiki – as these are things that you want to put a bit of structure around, and that you don’t want every Tina, Deidre and Harriet editing.

Set up your SharePoint Wiki

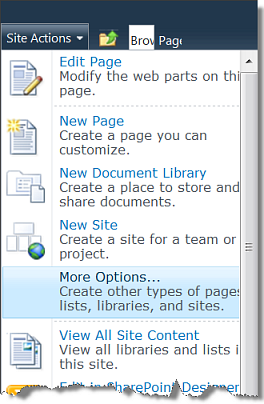
This is a 30 second job. From the top left of your screen choose Site Actions and then More Options:

From the next screen scroll right the way down to the bottom and choose Wiki Page Library, give it a name, and press the Create button – Job done – you have a Wiki.

Create SharePoint wiki

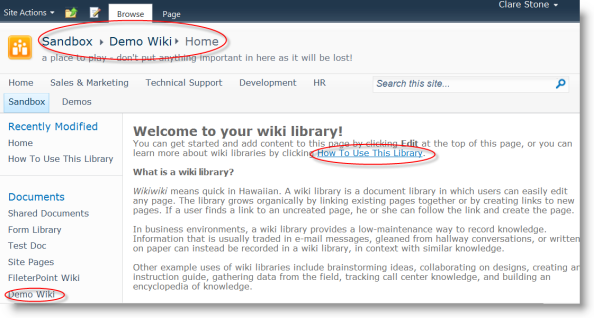
You can see straight away that the wiki is a friendly and intuitive place to be.  First and best you have the nice big easy to read navigation bread crumbs at the top of the page. Then in the body of the page an introduction to wikis and a link to instructions on how to use them. Finally, a link to your wiki will have appeared on your quick launch menu.

SharePoint wiki home page


So, lets add some Content.

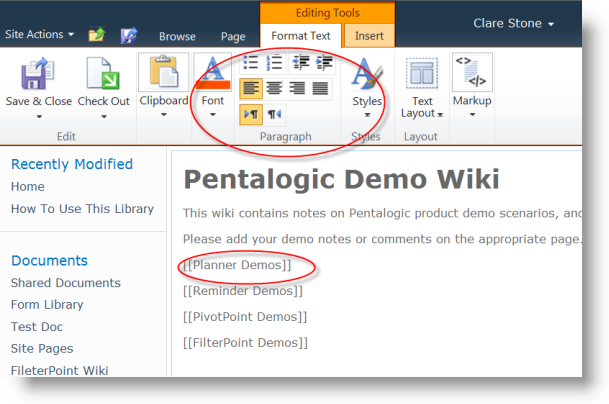
Edit SharePoint Wiki

So as you can see the Wiki page comes with a very Word-like rich text editor, and you can treat adding text to a Wiki page in pretty much the same way as you would add text to a Word document. Just click the Edit link to start and the Save and Close icon when you are finished.

But what are all those square brackets about?

Well, square brackets are how we add a link to a page in a SharePoint wiki library.

Add New Pages

In wikis you are encouraged not to create orphans (pages that are all alone in the world with no links to any other pages) so best practice is first to create a page, then put some content in it.  You created the first page of your wiki library automatically when you created the library.

To create other pages, simply type the name of the page [[surrounded by double square brackets]]

Click “Save and Close” and your pages are created.

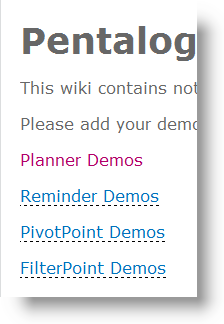
Once you’re out of Edit mode – after clicking “Save and Close” you will see that your square brackets have vanished, and you are left with links.  The headings with dotted underlining are for pages with no content yet.  The normal looking links are pages which have content.  So in this example our Planner Demos page has content, but the others have yet to be created.

Sharepoint wiki with links

Just click on one of the dotted links to go to a new page a create content.

This system of page creation is also a great method of getting people started, and keeping them on track with minimal effort.  We all know how getting started is the biggest challenge in any writing project – and keeping on trakc the next.  So say you wanted your subject matter experts to create a wiki on environmental awareness at work you might create pages titled something like:  “recycling”, “power saving”, “car sharing” which might help to steer your environmental experts in the right direction, and stop them wastings hours on things you didn’t want like “windfarms”, “biofuel” and “international environmental policy”.

Add other Links

Using our square brackets we can add different links.

Linking to an existing page is just the same as creating a new page – just enter the page name, surrounded by square brackets:

[[existing page name]]

no need to fiddle around with addresses and / forward slashes.  Wiki pages are not arranged in a “tree” like traditional website pages – it’s all much more laid back and informal (they come from Hawaii remember?).  So just type the name of any page within your wiki and the wiki will find it for you and create the link.  The wiki won’t allow you to create duplicate pages with the same name, try and do that and it will simply link you back to your existing page.

and to link to an external webpage:

[[http://www.yourpage.com]]

To display a link where the link text is different to the destination page name use the pipe character | . So if we wanted to link to the Planner Demos page, but wanted our link to be called “latest demo”:

[[Planner Demos|latest demo]]

Check Revisions and Revert to Previous Version

Need to see who added that really dumb comment? No problem:

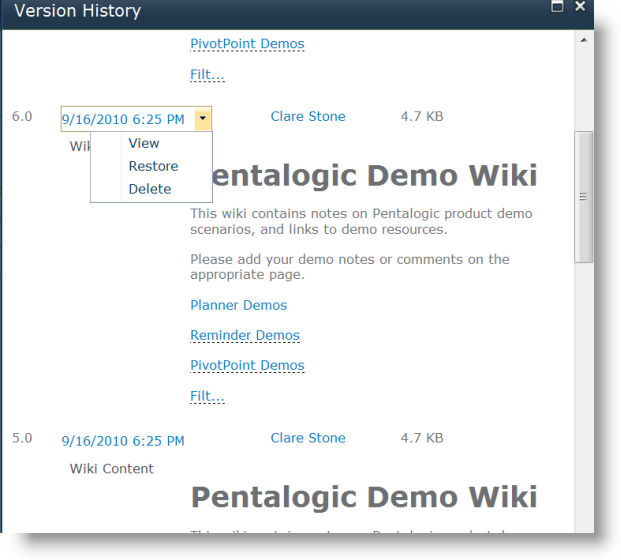
SharePoint Wiki Revision HistoryOh . . . looks like that was me!

To get to the revision history choose Page/View All Pages, then click on the arrow next to the page you want to see and choose Version History.  You can see exactly how and when the wiki page changed and who has made the changes.  You can then choose to delete a version, or revert back to an previous version if you wish.

So that’s the basics of working with wikis.

Do you have any other tips and tricks to share?

Next time:  What’s new in SharePoint 2010 wikis.

SharePoint Staff Vacation Planner – DIY Guide part 3 – set up an Absences to Date Dashboard

Date:August 4th, 2010 Author: Tags: , , ,
Category: General, PivotPoint Web Part, SharePoint Ideas Comments:0 ;

This is Part 3 of the SharePoint Staff Vacation Planner – DIY Guide

So having set up our basic SharePoint list with filtered views, and our “Wall Chart” dashboard, using SharePoint Planner webpart, we are now ready to get up our “Staff Absences to date” and “My Absences” dashboards.  This is the bit that allows managers to monitor the amount of absence each of their team members has had:

Or for individual staff members to monitor their own absences:

(more…)

How to edit List forms in SharePoint 2010

Date:July 29th, 2010 Author: Tags: , ,
Category: General, SharePoint Ideas Comments:8 ;

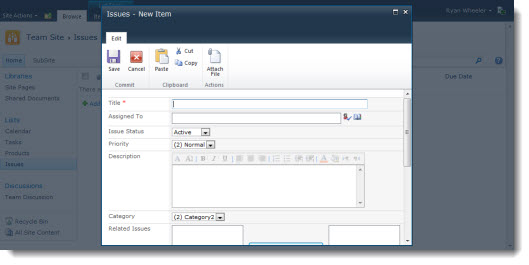
In SharePoint 2007 there is a well known trick for opening up a list’s forms (New/View/Edit) in design mode – append ?ToolpaneView=2 onto the url – this is often used to add instructions or javascript using a Content Editor Web Part (CEWP) e.g.

However when I first tried to use my tried and tested shortcut in SharePoint 2010 I came a little unstuck as now the New/View/Edit forms appear in a fake popup window and modifying the URL doesn’t work.

There are two ways to do this in SharePoint 2010 – and once you know where to find them they should actually make life that little bit easier.

The first is to open up the form in a new window and then add ToolpaneView=2 onto the end of the URL, so

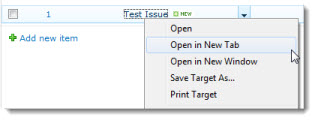
Right click on Add new Item or the lists Title field and select Open in New Tab or hold down CTRL while left clicking.

Alternatively you can do this using the new-fangled ribbon toolbar – select under List Tools the List tab, then on the right hand side of the ribbon you should see an icon for Form Web Parts which gives a menu of the different forms associated with the list that you can edit.


SharePoint Versions through the ages – Confused?

Date:June 28th, 2010 Author: Tags: ,
Category: General, SharePoint Ideas Comments:0 ;

Last year, when I first started having dealings with SharePoint, I was mightily confused by all this “MOSS”, “WSS”, “SPS” -stuff.   What did all these acronyms stand for? What was the difference between all these different versions of SharePoint? And did it really matter?

Well, one year on and I’m slightly less confused, but only slightly!  So I thought it might be useful, for me and for anyone else out there who suffers similar confusion, to list out the different versions of SharePoint, their usual acronyms and key distinguishing features – I hope it helps:

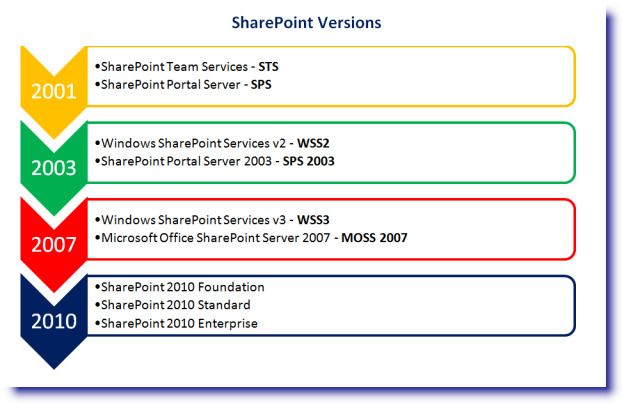
So, in the begining, back in 2001, SharePoint emerged as two distinct products.  SharePoint Team Services was a bottom up team collaboration product, SharePoint Portal Server was a top down, portal, search and document management product.

By 2003 Microsoft had gathered that although customers liked both products what they would really like was the capabilities of both, combined.  So in 2003 what most of us would recognise as SharePoint: collaboration, search, content management and portal capabilities all under one roof – was born.

WSS was the basic version, free with Windows Server OS. SPS, the premium version, built on the foundations of WSS, incorporating extra functionality primarily around the areas of search and document management. Jason Masterman and Ted Pattison writing in MSDN Magazine put it quite neatly:

In essence, WSS gives you a place to put all your content while SPS provides the means to navigate and search through your content when you need it.

In 2007 much the same formula was followed, with Windows SharePoint services as the free version for windows server users and Microsoft Office SharePoint Services the premium version.  The MOSS designation references the greater level of integration with the Office suite.

In SharePoint 2010 it’s all change again and Microsoft have dropped references to both Office and Windows, leaving SharePoint to stand alone in 3 basic flavours: foundation, the free version, Standard – the premium version, which adds lots of functionality primarily around the area of search, and Enterprise – super premium, where the extras are pricipally in the area of content management.

This is very much a whistle stop tour, not an attempt to give an all encompassing overview of what is in each of the many SharePoint versions we have seen over the years – but we hope it might help you to at least get the acronyms straight!

SharePoint 2010 Resources

Date:May 27th, 2010 Author: Tags:
Category: General, Training Comments:0 ;

Last week we had an email from a customer who was confused about his options for SharePoint 2010.

He was planning to move his 5 WSS site across to SharePoint 2010 Foundation – but had found this document from Microsoft:

SharePoint 2010Resources

http://sharepoint.microsoft.com/en-us/buy/Pages/Licensing-Details.aspx

which seems to suggest that sites and Workspaces were not available in Foundation, only in SharePoint 2010 standard edition or above.  Well we knew this wasn’t right;  but that wasn’t what the info from Microsoft seemed to be saying.

This gave us a reminder of just how confusing our friends at Microsoft can make things.  So we thought we would gather together some handy resources for all of you who may be thinking of moving over to SharePoint 2010. As always we have focussed mainly on users and administrators.  I hope you find it useful.

(more…)

SharePoint 2010 gets into the Groove

Date:May 17th, 2010 Author: Tags:
Category: General, SharePoint Ideas Comments:2 ;

With all the furore surrounding the business release of SharePoint 2010 it would have been easy to miss the launch (or relaunch) of another little Microsoft product in the SharePoint space which quite neatly addresses some of my personal SharePoint bug bears.

Wonderful though SharePoint is there are always a few things we wish it would do better.  Personally I have always been a little frustrated by the limitations on sharing with people outside of your own organization, the difficulties around working off-line and with the difficulties of moving documents from your PC and other applications, into, and out of SharePoint. Sharepoint 2010 groove

(more…)