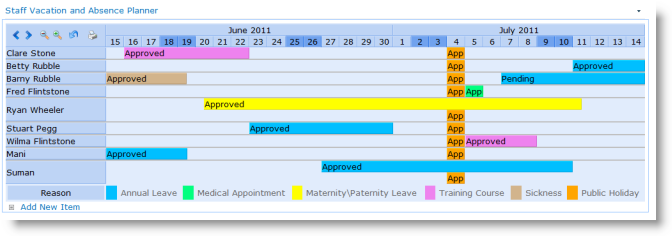
Customers who use our SharePoint Staff Vacation Planner Toolkit often ask about the best way to deal with public holidays. Public Holidays tend to affect the whole team. So you want them clearly marked on your Vacation Planner dashboard, but you certainly don’t want to have to enter each public holiday for each team member as a separate event. And you probably also don’t want to be firing off absence approval requests for each holiday either.
So here are our suggestions on the best way of handling Public Holidays within the SharePoint Staff Vacation Planner Toolkit.
First you need modify your list. Go to list settings and open up your “Reason” field. In addition to your existing reasons for absence add a new reason – Public Holiday.
Then open up the settings for your “Requested By” column and make sure you have “Allow Multiple Selections” checked.
Now you need to modify your Planner web part.
So, “Edit Shared Web Part” then, under your “Category” picker, check the “split multiple selections box”. This is key if you want to be able to create just one event for each public holiday but have it show up against each of your team members.
Now go down to the Planner Colors section of the Toolpart and update your color coding by column section to include an extra color code for your new Reason for absence that you created in your list – Public Holiday – I am going for a nice orange.
Now check your PivotPoint web part. For this to work you are going to need PivotPoint 2.1.4 or above. Download it here if you don’t have it already (free to all PivotPoint v2 customers, or v1 customers with Premium Support). In the Toolpart make sure that in the “Split Multiple Values” dropdown you have chosen “Split Records”. This will ensure that when we enter a 1 day public holiday for 4th of July, for example, 1 day gets entered against each team member in the pivot table.
Finally, before we start adding events, to ensure that we don’t accidentally fire off approval requests and notifications all over the place, access the Reminder web parts that you have set up and in the “Reminder Testing” section at the bottom of the Toolpart enter your own email address so that any emails generated whilst you are adding the public holidays go to you. This will be a better solution than simply switching the Reminders off as you work, as it will mean that if any “real” requests are submitted whilst you are working you will be able to redirect them, rather than them being lost.
Add a Public Holiday
So, from your Planner dashboard add a new item. Let’s do 4th July. Set it up as an all day event. Set yourself as “approved by”, you will need to approve the event before it will show up in people’s dashboards. Now add your whole team to the “Requested By” field. It’s easiest to do this using the Address Book. Now ensure you have selected “Public Holiday” in your Reason field. Approve the request. Discard all the “Request approved” notifications that are redirected through to you. And now you will see your public holiday, nicely marked against each of your team members. Repeat as needed for all of your other public holidays, remove the redirect from your Reminder emails and then you can relax for another year!
I hope this helps you in using Vacation Planner. If you have any questions or requests about the Vacation Planner we would love to hear them.
Tags: PivotPoint, Planner, Reminder, SharePoint, Vacation Planner


