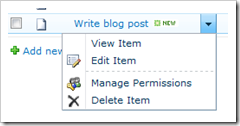
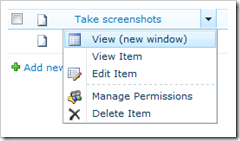
 Following on from Part 1 of this series which covered Editing the SharePoint List Item Menu Using Elements, I thought it would valuable to reproduce the same results without using Visual Studio or SharePoint designer (Part 4 will be to do it without a monitor). This method will allow non-developers with view edit access to customise the List Item Menu.
In this example, a ‘View (new window)’ option will once  again be added to each item’s context menu to avoid the modal box, as illustrated to the right. Although as Christophe helpfully pointed out in response to Part 1, the modal boxes can be banished under the list’s Advanced settings. Fortunately there are many other uses for these techniques, as we will see in Part 3.
This example uses a Content Editor web part, which means the Javascript can be added on a view-by-view basis. This allows a more targeted release and can be added by any user with permissions to edit the view. However, it makes widespread distribution more difficult; putting the function in a master page can overcome this but will implement it for every item menu on every list.
The steps to set this up are surprisingly straightforward:
- Navigate to the view you wish to customise
- In Edit Page add a Content Editor web part (Click “Add a web part” then find it under “Media and Content” in 2010 or “Miscellaneous” in 2007)
- Edit the web part and set it to Hidden (under the Layout tab)
- Click the body of the web part and click the Edit HTML button under the Format Text section, choosing “Edit HTML Source” in 2010 (“Source Editor…” in 2007).
- Paste in the below code and finish editing
This Javascript function’s name is checked for and called by the code that produces the rest of the menu, as described by MSDN. This allows us to add items to the menu before the rest of the options are added:
<script type="text/javascript">
function Custom_AddListMenuItems(m, ctx)
{
CAMOpt(m,'View (new window)','javascript:window.open(\'DispForm.aspx?ID=' + currentItemID + '\');','/_layouts/images/LIST.GIF');
return false;
}
</script>
The
CAMOptfunction adds the option to the menu; with the menu reference, title, URL, and icon URL being passed in as parameters respectively.Finally, the last line
return falseensures the rest of the menu is shown. If set to True, the menu rendering function does not show the default options.A nice addition to the above would be the
CAMSep(m)function; this would add a separator to the menu (as between the ‘Edit Item’ and ‘Manage Permissions’ options). This is functionality not offered by the CustomAction method, and left out to produce an identical menu to that in Part 1. Jan Tielens illustrates this, as well as submenus (also Javascript-only).
Interestingly, the currentItemId variable is set in the context of this function call, which contains the current Item ID (as expected). Additionally, a reference to the field’s container is held the variable itemTable. This can be used to get some quite useful information by calling the GetAttributeFromItemTable function with an appropriate attribute name (Ishai Sagi has a list of possibilities).
The following would get the URL for an item (equivalent to {ItemUrl} in a CustomAction):
var currentItemUrl=GetAttributeFromItemTable(itemTable, "Url", "ServerUrl");
The second and third parameters are the possible attribute names. It seems from the INIT.js that they are checked in the displayed order for values, and either can be set to null if only one attribute name is to be checked.
So now we have the same functionality using a CustomAction in Visual Studio (Part 1) or using Javascript through the standard web interface. In Part 3, we’ll expand into functionality using both of these techniques to further enhance the item menu.


Hi,
Thanks for the information. The code worked almost perfectly. The Item menu is now showing a new prompt and a new window is opening. But, the form that i am trying to link to is not working. I tried the EditForm,NewForm,DisplayForm.aspx. But nne of them are working. My Aim is to link the ‘View (new window)’ option to a Custom form that i created for the list. This form needs to render a particular field of that item (a Rich Text field) so that users can edit the contents in a separate page. However, when i click the link i get an error saying-
Server Error in ‘/’ Application.
No item exists at http://pilot.dowjones.net/teams/ncr/ACC/DJ_ACC/Lists/test List/DispForm.aspx?ID=23. It may have been deleted or renamed by another user.
Kindly provide your expert advise.
Thanks,
kik
From the error message it would seem the ID being passed into the form is invalid.
Does the ID in the erroring URL match the ID of the item clicked?
Thanks for the quick reply Stuart.
Pardon my ignorance. How do i find the ID of the item?i searched on the net and the solutions seem to use code to get the id..is there a simpler way to find the id of the item?
Thanks,
Karthik
You can add the ID column to the view using the ‘Modify view’ option on the ribbon, or via the List Settings.
Thanks for the info. ID is the same as it appears in the URL.This is a custom edit page that i created from the Sharepoint deisgner exclusively for this list. The page (Customedit.aspx) loads properly without the ID,but shows the error when the id is appended to the URL.
http:///teams/ncr/ACC/DJ_ACC/Lists/test%20List/CustomEdit.aspx? –> Works
http:///teams/ncr/ACC/DJ_ACC/Lists/test%20List/CustomEdit.aspx?ID=23 –> does not work
Any thoughts on why this is happening?
Thanks,
Karthik
Sorry, but without any knowledge of what the custom edit form is doing, I can’t help you.
Your best bet is to post a question on SharePoint Stack Exchange with the information you’ve mentioned here (error, stack trace, conditions the error arises in) along with the snippet of source code that throws the error.