This is Part 4 of the SharePoint Staff Vacation Planner – DIY Guide
In parts 1 through 3 of this series we have laid the foundations for our tailor made Staff Vacation and absence planning system. We have set up the basic SharePoint list, defined a number of list views, and set up dashboards using SharePoint Planner and PivotPoint webparts.
Now we are going to add the “moving parts” to the system and set up a simple approval email workflow using SharePoint Reminder webpart.
We are going to have 3 steps in our system :-
- One email to a staff member’s line manager when a new request for absence has been submitted.
- One email to the staff member and let them know whether their request has been approved or rejected.
- One email to the line manager the day before a staff member is due to be absent from work as a reminder.
SharePoint has “Alert Me” emails and a workflow engine built in but the Alert Me is a little too limited and for workflows you need to fairly techie and modify them using SharePoint Designer or Visual Studio which can be overkill for these simple email alert. See part VI for more details.
If you don’t already have SharePoint Reminder Webpart you can download the free trial version and view the installation instructions.
Absence Request Email
To set up your first Reminder add the webpart to a convenient web part page in just the same way as you added the Planner web part. Remember, with the Reminder, there will be no need for the team to actually see the web part, once it is set up all the work goes on behind the scenes.
Now go to “Modify Shared Web part” and set the web part up.
Watch List: Staff Absence Planner
For this Reminder you do not want to show all columns, or expand recurrences, so leave both these boxes unchecked.
Read Records that are: “Pending” we want to look at new requests that have not yet been approved or rejected.
You can find more information on Reminder’s “Watch List” settings here.
Email Reply To: this feature allows recipients of a Reminder email to reply to a specific person. So in this case, you might want replies to go to the person specified in the “requested by” column, so that an authorizing manager can query a request directly with their team member, before choosing to approve or reject it. If you don’t want to get that fancy at this stage, you can choose to leave this section blank.
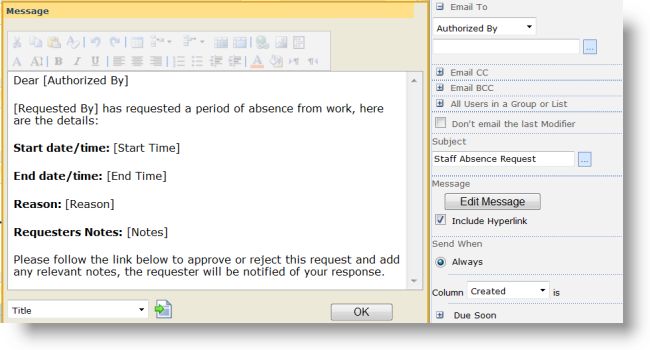
Email To: “Authorized by” we want to email the line manager who will authorize the absence request.
You can then ignore the CC, BCC, all users in a group and “Don’t email Last Modifier” options.
For the Subject of your email choose something like “Absence Request Authorization Required”
Now to edit the email message. Click on the “Edit Message” Button and a Text Editor box will appear, very much like a Microsoft Word window. You can use Rich Text formatting such as bold, colors and different font sizes in your message. You can also use the drop down at the bottom of the window to insert merge data from fields in your list, just as you would with a “Mail Merge” in word.
 You can find more information on formatting the content of your Reminder email here.
For “Send When” choose “Always”.
Then for “Send Email” choose “once” – we are going to assume that our line managers are efficient and will respond to requests the first time round, without repeated nagging!
You will find more information on Reminder’s “Send When” options here.
In the “Check List” section, set Reminder to check the list once per hour, and you are done.
Request Approved/Rejected Reminder
The set up of the next two Reminders is very similar. For our “Absence Request Approved/Rejected” Reminder the only things that you will change are:
Read Records that are: for this one choose “approved” and “rejected”.
Email To: choose “Requested By”
Choose a new email subject and edit the email text, you will want to include “approval status, and I have also included “Authorized By” to include the line managers name, and “Approver Comments” to include any explanatory notes that the line manager has made.
For “Send When” we are again choosing “Always” and “Once”. This will send one email for all approved and rejected items on the list.
“Staff off work tomorrow” Reminder
For the third Reminder, which warns the line manager of an imminent absence, the setup is again quite similar.
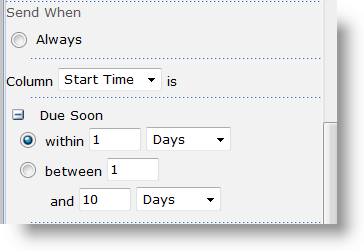
For this one we want to Read Records that are “Approved”, send the email to the person in the “Approved By” column. Rather than sending an email “Always” in this case we want to send an email when “Start Time” is “Due Soon”. I have set Due Soon to “Within 1 Day” but as you can see you can choose whatever timescale works for you.
So that’s the setup complete.
Final installment: take a look at the system working, and see how much of this we could have done with SharePoint out of the box.
Tags: Reminder, SharePoint, WebPart


