A site is the key place within SharePoint to bring together all the people, content and activities associated with a particular process, project or group. And if the process or project is regularly repeated within your organization having a site template for it saves a lot of time and helps to ensure consistency and facilitate continuous improvement.
There are any number of scenarios where you might use a SharePoint site template, for this example we are using a recruitment process, but you could equally well set one up for any regularly repeated process or project you manage: training courses, audits, conferences and sales exhibitions, product testing, office moves, procurement, risk assessment, staff appraisals – the list goes on.
SharePoint comes with some Out of the Box Templates, there are other available on-line, free or to purchase. But all of these are “off the peg” options: great if you are short on time, but they’re not going to be a perfect fit for your business processes.
To get a SharePoint template that fits your processes perfectly you are going to have to make your own – and thankfully it’s exceptionally easy to do – so here’s how.
First Create your Site
Before you even switch on your computer you need to sit down and think about the business process you are working with: the content, activities and people you will bring together in your site template.
So for our Recruitment Site Template we have:
- Recruitment Procedures: hiring policy, pay scales, interviewers guidelines, equal opportunities policy etc.
- Recruitment Forms: application form, equal ops monitoring form, interview score card, pro forma letters.
- Recruitment Interview Scheduling: calendar of scheduled 1st and 2nd interviews/assessment centres.
- Hiring Managers and HR: internal contacts involved in the hire
- Approved Staffing Agencies: with agreed terms and conditions and contact details
- Candidates and Applications: original application documents, status tracking and notes.
I am sure there is more, but you get the idea, you need to think about the content, people and processes you want to bring together in your site template.
So, now you can switch on your computer!
You need to be a “Site Owner” to create a site template. Your SharePoint administrator will be able to tell you whether you have the permissions you need – and if you don’t ask the administrator nicely and they might grant you some extra permissions.
You can’t actually create a site template from scratch in SharePoint – you first have to create a site and then save it as a template.
So, first create your site.
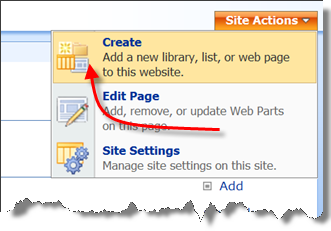
Decide where you want your site to appear – for a recruitment site you might well want it to be a sub-site of a main HR site. So from the “Site Actions” menu, in the site that you want as your parent site, choose “Create” from the drop down,
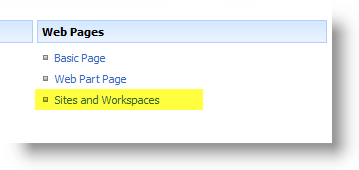
Then from the list of options choose “Sites and Workspaces” from the Web Pages list.
On the “New SharePoint Site” page there isn’t much you need to do. Give the site a name, in this case “Recruitment” seemed to make sense, give it a URL – best done by just adding the name of your site, and from the “Select a Template” box choose either Blank or Team Site – either will do just as well.
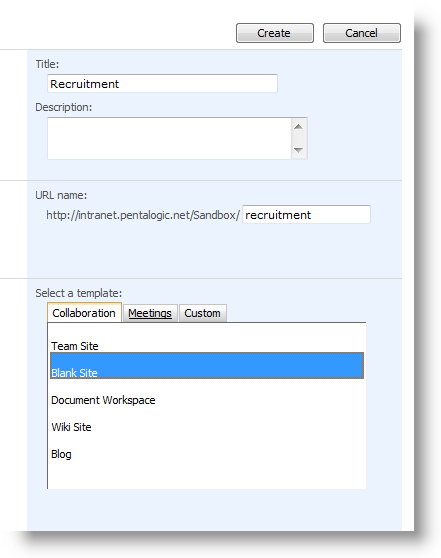
Click “Create” and you’ve finished.
Add Some Stuff in Your Site
Now go back to your list of the people, content and activities that make up your process and think about how best to handle them within SharePoint. Remember that the cardinal rule of content managment within SharePoint is that we only want to have one version of any one item of content, so you need to spend some time thinking about what content needs to exist within the sites that you will be creating from your template, and what content already exists elsewhere, so that you can simple provide links to it.
In our example we have we have set up:
- Document Libraries for applications and proforma recruitment documents (so things like blank Job Descriptions and Invitations to interview, where we will want to keep completed versions of the documents for our records) configured with metadata.
- a Forms Library for our equal opportunities monitoring forms,
- a Wiki for recruitment notes,
- a Calendar List for organizing our interviews
- a Tasks List
- Content Editor Web Part – to display links to relevant information located within the main HR site, like Recruitment Procedures.
- and some List View Web Parts on the main page, to let us see what happening easily.
You can save to your template pretty much anything you see from the “Create” page within your site: any kind of list or library, communication, tracking, sub-site or page.
You can configure these as you want them. You can also add and save content as part of the template if you wish. So in our example the “Applications” document library is empty, but the “Pro Forma documents” library is populated with recruitment documents which, within the sites created from our template, will all be populated with data unique to each individual recruitment. You need to decide where you need content, and where you just need to set up a structure, or add a link to content which exists elsewhere. For example in this site we are providing a link within our Content Editor Webpart to the “Recruitment Procedures” manual, which is located in the main HR site. By using a link we ensure that everyone using sites created from our template is accessing the most up to date version of the manual.
You can also save all your site settings, including look and feel, to the template.
What can’t you save to your Template?
You can’t save alert settings.
Save Your Custom Site Template
Having set up your site and filled it with all the stuff you need, you can now save it as a template, a very simple process again.
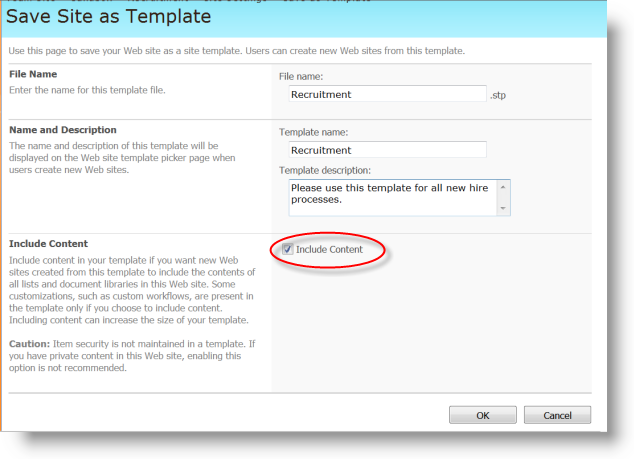
From the “Site Actions” tab, choose “Site Settings”, then under “Look and Feel” choose “Save site as Template”
As we discussed earlier, you will very probably want to “Save Content” and you’re done.
Create a Site from Your Custom Template
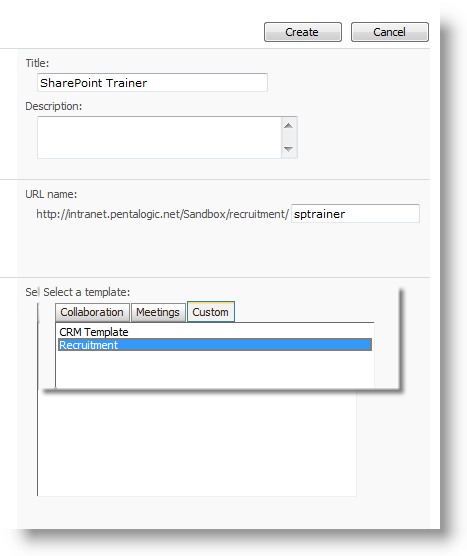
Right, so now we have our site template, lets create a new site from it. In our example we are going to hire a SharePoint Trainer, so from our Recruitment site “Site Actions” tab we are going to choose “Create” and then under the Web Pages heading, choose “Sites and Workspaces”.
We are going to go through exactly the same process here as we did to create our Recruitment site. Name the site “SharePoint Trainer”, create a URL, but this time when we get to “Select a Site Template” we are going to choose the “Custom” tab and choose “Recruitment” from the drop down list. Then click “Create”
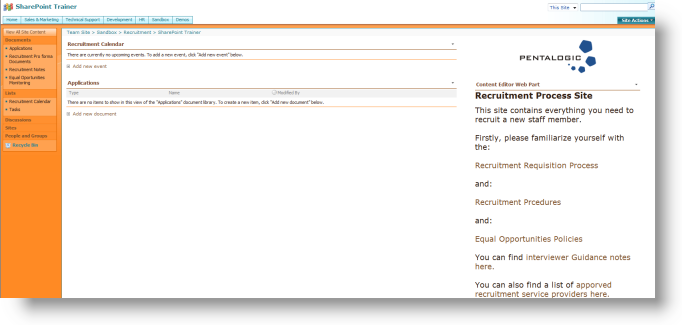
So now we have our site for recruit our SharePoint trainer, ready to populate with documents, events and list items specific to this particular recruitment
and here it is once we have put some data into it:
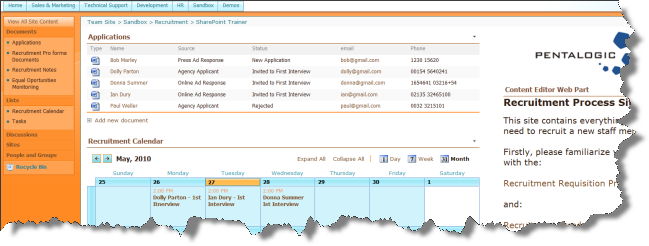
A site template that’s tailor made for your own business processes with just a couple of hours work aren’t you the clever one!
Need to Update Your Template?
So let’s say your recruitment policy changes and you need to update your template – how do we do that?
You can’t just “save changes to a template”. You will need to create a whole new template. It’s not as bad as it sounds.
Just go to your “Recruitment” site, make the changes you needed, then save as a template called “Recruitment v2” or some other name different from the name of your first template. However once you’ve done this you will be left with 2 versions of your Recruitment Template for people to choose from, and you know what’s going to happen.
So we would recommend that you delete the original template to avoid confusion.
Go to the very top level of your site and from the “Site Actions” tab select “Site Settings”.
From the “Galleries” list select “Site Templates”, click on “edit” next to the template you want to get rid of, click “delete” and you’re done.
So, that’s our brief run down on Site Templates and how to use them. We hope you found it useful – and if you have any other tips on the subject we would love to hear them.
Further Reading
Microsoft’s free “fab 40” SharePoint templates:
http://technet.microsoft.com/en-us/windowsserver/sharepoint/bb407286.aspx
Microsoft free role based templates for My Sites:
http://office.microsoft.com/en-us/sharepointserver/ha102147321033.aspx
For a different take on how to create templates:
Tags: SharePoint, Training


Excellent articile.
Do you have a sample recruitment Sharepoint site template – referenced in the blog?
When creating a subsite from a site template, can the new subsite use the permissions from the site template?
I seem to only be able to inherit permissions from the parent site or have no permissions at all. I want to be able to use the template permissions – do you know if this is possible?
Thanks