Author Archive

SharePoint governance #2: The final frontier

Date:November 5th, 2010 Author: Tags:
Category: General, SharePoint Ideas Comments:4 ;

uss_enterpriseI started looking at SharePoint governance a few weeks ago and wow, is there a whole heap of information out there about it! And with the advent of SharePoint 2010, it’s clear that tightening up your policies is vital. The new social media enhancements mean that you’ll have to set some hard and fast rules about how your employees are going to handle this software at work – and make sure they behave themselves while using it!

I mentioned three points to guide your SharePoint governance plan in my last blog – roles, rules and routes – and in this one I’ll explore them further and give you more tips on what to start looking at when forming your plan.

Ultimately, there is no such thing as ‘one size fits all’ when it comes to creating your policy. In fact, you’ll probably find that the Microsoft guides on this are too laborious for you. The only thing you can do to create your own plan is dive in and get super involved with the whole process, from forming a good SharePoint team to gauging user feedback and making revisions to the policy. Brace yourself; we’re going through the final frontier…

(more…)

Meet the New Boy–or how to Hire a SharePoint Developer

Date:November 3rd, 2010 Author: Tags:
Category: General Comments:5 ;

Stuart Pegg - smallAfter a long and rather painful summer of searching for a new developer to join our team, this week we are delighted to welcome Stuart Pegg on board.

First let me tell you a bit about the pain.  We knew it wasn’t going to be easy. We wanted someone who was going to be happy to immerse themselves in deep coding.  We made no secret of this.

We knew that tucked away as we are in a a little backwater of rural England we weren’t likely to get an experienced SharePoint developer.  If we could find a really hot ASP.NET/C# developer we were happy to train them up on the SharePoint bit.

But what we found in very long search was that although we did meet a few very good people, an awful lot of the people out there looking for jobs as developers didn’t seem to be able to  – well – didn’t seem to be able to develop really!

It was a bit of a shocker.  We followed the Joel Spolsky approach and set some practical tests at interview – things that we thought were pretty simple, and would be fair on candidates even under interview pressure.

But a surprising amount of people who looked great on paper and talked a really good talk at interview were totally flummoxed by our practical tests – a couple were even downright offended!

So – the learning form this for us is that just because a persons cv/resume is littered with every programming acronym know to man, and just because they tell you at interview that they are a Six Sigma Black Belt Agile Scrum Master, doesn’t mean they can actually write decent code.  Make them write some code at interview. And if they think that’s beneath them, then you probably don’t want them working for you anyway.

Stuart impressed us at interview by being the only candidate to explain his solution to our interview “test” programming problem so clearly that even a technophobe like me could understand it.

Having started on Monday, Stuart has continued to impress us by finishing all the work we had planned for his first week in just 2 days – that means he gets to make all the tea for the rest of the week!

Stuart joins us after spending 4 years working as a developer and manager at Club Communications, providing hosted ordering and billing platforms for the telecoms industry.

When he’s not working he enjoys hill walking and camping, reading and playing computer games,  and weekend visits to family and friends, where he inevitably gets roped into a bit of unpaid computer maintenance.

As he’s new to SharePoint Stuart is still in the honeymoon period of that love/hate relationship we all have with it.  He will be sharing his first impression in these pages over the coming weeks.

So welcome on board Stuart – mine’s tea with 2 sugars please!

New SharePoint FilterPoint web part – public beta released

Date:November 1st, 2010 Author: Tags: , , ,
Category: Filter, General, SharePoint webparts Comments:0 ;

FilterPoint SharePoint webpartWell finally, after months of hard work we are delighted to be able to let you know that we have just released our new FilterPoint web part for SharePoint in beta.

FilterPoint has been a long time coming so we hope you are going to like it.  It’s a tool that we always knew we wanted to develop. Dynamic filtering  – the ability to flip between filter values at the click of a mouse – is one of the building blocks for the kinds of rich applications that our customers like to build for themselves.  It builds on the power of webpart connections (a much neglected area in SharePoint) and once you have the ability to apply a group of filters to a page with a selection of webparts and lists you have the potential for some really nice dashboards.

But, as I said FilterPoint has been a long time coming, because what started out looking like a straight forward project turned out to be anything but . . . .

It starts off looking ever so simple with plenty of online examples – but when you start delving into the details it quickly becomes the stereotypical “Can of Worms” project.

There are basically two interfaces you can use – one old IFilterProvider interface , and the new ITransformableFilterValues interface. So far sounds easy but how about some wildcards….

With the new ITransformableFilterValues interface – you can’t create filters dynamically,  and you can’t have multiple connections on the consumer side in SP 2007.

On the other hand, with the old IFilterProvider interface you can’t send multiple filter values to List view web parts and you can’t connect more than one provider web part to a consumer web part. And that’s just scratching the surface.

To top it all off you have little control over what the filter consumer web part actually does with the info you give it – want to say “Equals” or “Not Equals” or “Greater Than” etc and thats out of the scope of what a filter provider can do (we’ve got some ideas on how to work around this in a future version of FilterPoint though).

My oh my, enough to make your head spin!

FilterPoint Webpart, filtering optionsAnyway- we’ve worked really hard to make this web part as simple to use as possible whilst still being compatible with any web parts that can accept the standard web part connections.  We have managed to come up with a tool which allows you to apply multiple filters to multiple webparts and lists, and (at least when working with our Planner and PivotPoint) you can have some control over the operator – using “not equal”, “greater than” and “less than” as well as the standard “equals”.  We hope to extend this aspect of the functionality in v2.

So, why might you want to use this thing then?

Well, you might want to use simply it to guide your users to the most relevant data in one list or webpart – giving them the ability to “filter on the fly”, selecting new data sets, and then clearing filters in one click.

Or, at the other extreme, you might want to bring together a collection of lists and web parts on one page, and use FilterPoint to create a truly dynamic dashboard for your users.

In fact, once you start to use filters and webpart connections there are any number of different ways to enhance the functionality of your SharePoint site with a tool like FilterPoint – we already have it set up on our Sales Pipeline and Client lists here, and are finding more possible uses every day.

We are planning to have FilterPoint ready for full public release by the end of the month.  In the meantime, if you pre-register for your free trial, you will qualify for a 25% discount on the product purchase price.

We hope you like it, and as always, we are keen to hear your thoughts and feedback.

Filterpoint Download

SharePoint 2010 – the Wikis are Everywhere!

Date:September 29th, 2010 Author: Tags:
Category: General, SharePoint Ideas Comments:3 ;

Sometimes opening up SharePoint 2010 makes me come over all Star Trek: I feel like I’m on a mission, to explore strange new worlds: to seek out new life  . . . . . OK someone slap me now!

But seriously, there are some funky new features in 2010 and wikis seem to have come on quite a long way. Last week we looked at working with Sharepoint wikis and explored the functionality that is common to 2007 and 2010.

This week we are going to look at the new 2010 features – most of which look great with a couple of exceptions which are frankly a little confusing.

So – set Phasers to stun – lets boldly go!

(more…)

Working With SharePoint Wikis

Date:September 23rd, 2010 Author: Tags: ,
Category: General, SharePoint Ideas Comments:1 ;

SharePoint wikis get quite a bit of flack from Wiki enthusiasts – who think they are way too basic and rather a lame example of a wiki.  We disagree:  we quite like SharePoint wiki’s – yes they are very simple and easy to use, but isn’t this kind of the point?  That they should allow you to add and share content quickly and easily?

So we have 2 articles for you here.  This first one is Wiki basics – why and how you would use a SharePoint wiki – and these apply to both SharePoint 2007 and 2010.

And the second installment will take a spin through the new wiki features which are available in SharePoint 2010 – and some of these should be exciting enough to shut up even the most hard core sceptic.

So first up SharePoint Wiki basics.

Why use a Wiki?

Basically a wiki is a bit like a big, on-line, shareable notepad or whiteboard. So if you want your very busy and important subject matter experts to share their pearls of wisdom with the rest of the organization a wiki is probably a great way for them to do that – because its quick and its easy and they can get their point across without having faff around with formatting or worry about where there are going to save the thing. . It’s also really easy for the original author, or others to add, amend and cross reference.  So wikis are also great as team project workspaces, for sharing ideas, gathering information and discussing issues.

You wouldn’t want to use a wiki for structured data (Tasks/Issues/Invoices etc) that would be better in a List and likewise the very unstructured and easy to edit nature of a wiki means that they are probably not the best place for dealing with content that needs a lot of authentication or protection – so for example you might not want your company pay scales, or disciplinary procedures stored in a wiki – as these are things that you want to put a bit of structure around, and that you don’t want every Tina, Deidre and Harriet editing.

Set up your SharePoint Wiki

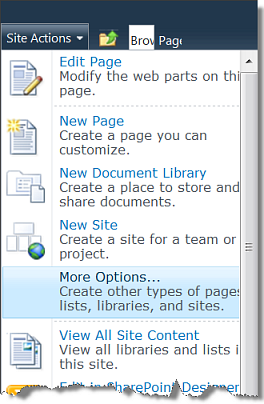
This is a 30 second job. From the top left of your screen choose Site Actions and then More Options:

From the next screen scroll right the way down to the bottom and choose Wiki Page Library, give it a name, and press the Create button – Job done – you have a Wiki.
Create SharePoint wiki

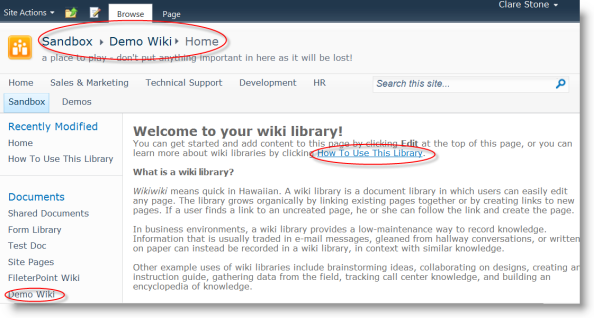
You can see straight away that the wiki is a friendly and intuitive place to be.  First and best you have the nice big easy to read navigation bread crumbs at the top of the page. Then in the body of the page an introduction to wikis and a link to instructions on how to use them. Finally, a link to your wiki will have appeared on your quick launch menu.
SharePoint wiki home page


So, lets add some Content.

Edit SharePoint Wiki

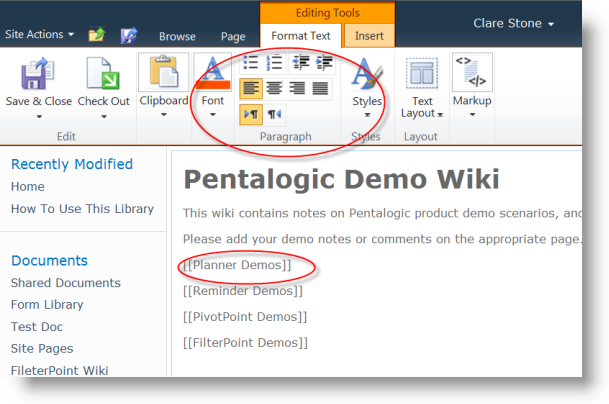
So as you can see the Wiki page comes with a very Word-like rich text editor, and you can treat adding text to a Wiki page in pretty much the same way as you would add text to a Word document. Just click the Edit link to start and the Save and Close icon when you are finished.

But what are all those square brackets about?

Well, square brackets are how we add a link to a page in a SharePoint wiki library.

Add New Pages

In wikis you are encouraged not to create orphans (pages that are all alone in the world with no links to any other pages) so best practice is first to create a page, then put some content in it.  You created the first page of your wiki library automatically when you created the library.

To create other pages, simply type the name of the page [[surrounded by double square brackets]]

Click “Save and Close” and your pages are created.

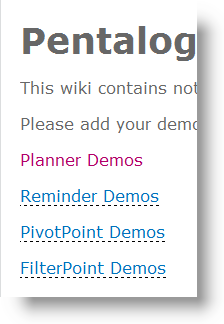
Once you’re out of Edit mode – after clicking “Save and Close” you will see that your square brackets have vanished, and you are left with links.  The headings with dotted underlining are for pages with no content yet.  The normal looking links are pages which have content.  So in this example our Planner Demos page has content, but the others have yet to be created.
Sharepoint wiki with links

Just click on one of the dotted links to go to a new page a create content.

This system of page creation is also a great method of getting people started, and keeping them on track with minimal effort.  We all know how getting started is the biggest challenge in any writing project – and keeping on trakc the next.  So say you wanted your subject matter experts to create a wiki on environmental awareness at work you might create pages titled something like:  “recycling”, “power saving”, “car sharing” which might help to steer your environmental experts in the right direction, and stop them wastings hours on things you didn’t want like “windfarms”, “biofuel” and “international environmental policy”.

Add other Links

Using our square brackets we can add different links.

Linking to an existing page is just the same as creating a new page – just enter the page name, surrounded by square brackets:

[[existing page name]]

no need to fiddle around with addresses and / forward slashes.  Wiki pages are not arranged in a “tree” like traditional website pages – it’s all much more laid back and informal (they come from Hawaii remember?).  So just type the name of any page within your wiki and the wiki will find it for you and create the link.  The wiki won’t allow you to create duplicate pages with the same name, try and do that and it will simply link you back to your existing page.

and to link to an external webpage:

[[http://www.yourpage.com]]

To display a link where the link text is different to the destination page name use the pipe character | . So if we wanted to link to the Planner Demos page, but wanted our link to be called “latest demo”:

[[Planner Demos|latest demo]]

Check Revisions and Revert to Previous Version

Need to see who added that really dumb comment? No problem:
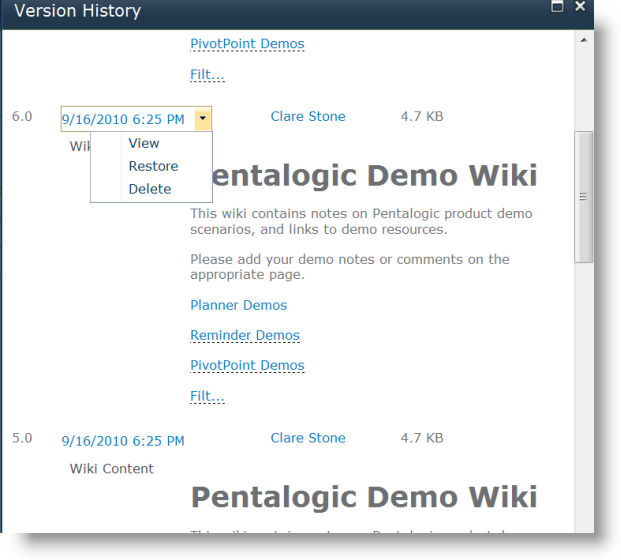
SharePoint Wiki Revision HistoryOh . . . looks like that was me!

To get to the revision history choose Page/View All Pages, then click on the arrow next to the page you want to see and choose Version History.  You can see exactly how and when the wiki page changed and who has made the changes.  You can then choose to delete a version, or revert back to an previous version if you wish.

So that’s the basics of working with wikis.

Do you have any other tips and tricks to share?

Next time:  What’s new in SharePoint 2010 wikis.

Why Tooltips are cool tips in PivotPoint Webpart for SharePoint

Date:September 9th, 2010 Author: Tags: , , ,
Category: PivotPoint Web Part, SharePoint webparts Comments:0 ;

Tooltips  – those little boxes that pop up when you hover over something – can be a blessing or a bit of a nightmare.  It drives me nuts when people enable those snapshot tooltips on every hyperlink on a page.  the resulting pop ups are huge, usually contain info I don’t want to see, and seem to hang around on the screen for ever.

But imagine a tooltip where you choose exactly what information is displayed?  How cool would that be?  Well that’s exactly what you get with tooltips in our PivotPoint web part  for SharePoint – which is why I think they rock.

(more…)

SharePoint Case Study – Websense Pivot Through Their Marketing Dashboards

Date:September 6th, 2010 Author: Tags: , ,
Category: General, PivotPoint Web Part, SharePoint webparts Comments:0 ;

Hi everyone.

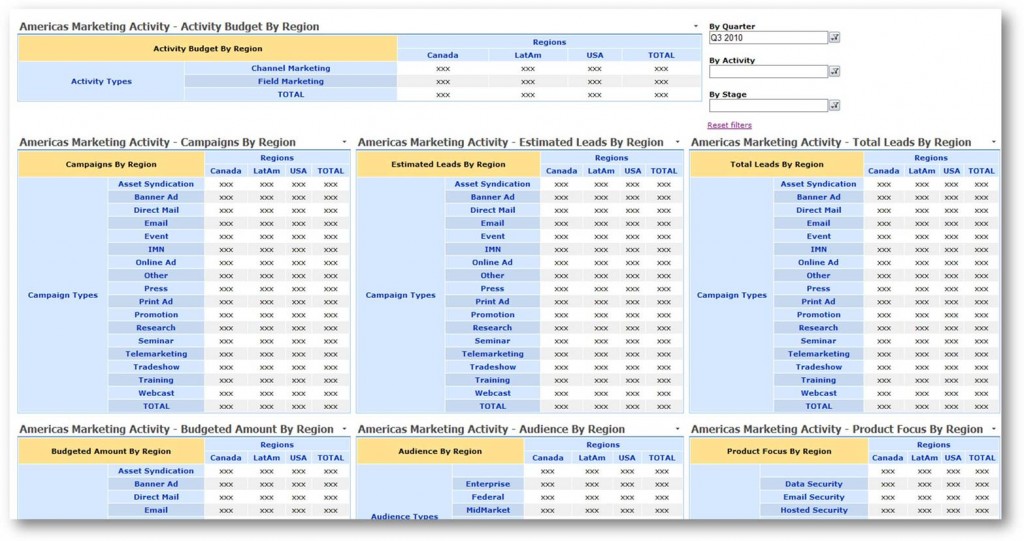
We wanted to share this new SharePoint case study with you.  It shows how online security specialists Websense are using our PivotPoint webapart to slice and dice their marketing list data, and create some awesome, dynamic dashboards.

(more…)

SharePoint Planner Webpart – new version released

Date:September 1st, 2010 Author: Tags: , ,
Category: General, SharePoint Planner, SharePoint webparts Comments:0 ;

Just a quick note to let you all know that we have just released a new version of SharePoint Planner web part – v2.6.4.

The new version includes a couple of handy new features that might be useful for you.

The new Split Multiple Values option will be useful in resource planning in circumstances where you want to enter multiple category values into one list item, but still view each individual category’s activity as a separate line in your Planner view.  For example you might want to create a list item for a project meeting, with several people in attendance.  In a Gantt view of project tasks it would be appropriate to show this meeting as one item.

sharepoint planner gantt chart

But in a category view of staff availability/commitments you would want the meeting to appear as a separate item for each staff member involved. (more…)

SharePoint Staff Vacation Planner – DIY Guide part 5 – the system in action and Out of the box options.

Date:August 9th, 2010 Author: Tags: , ,
Category: PivotPoint Web Part, SharePoint Ideas, SharePoint Planner, SharePoint Reminder, SharePoint webparts Comments:0 ;

This is Part 5 of the SharePoint Staff Vacation Planner – DIY Guide

See the System In Action

So, now let’s reap the rewards for all of our hard work and see the system in action.

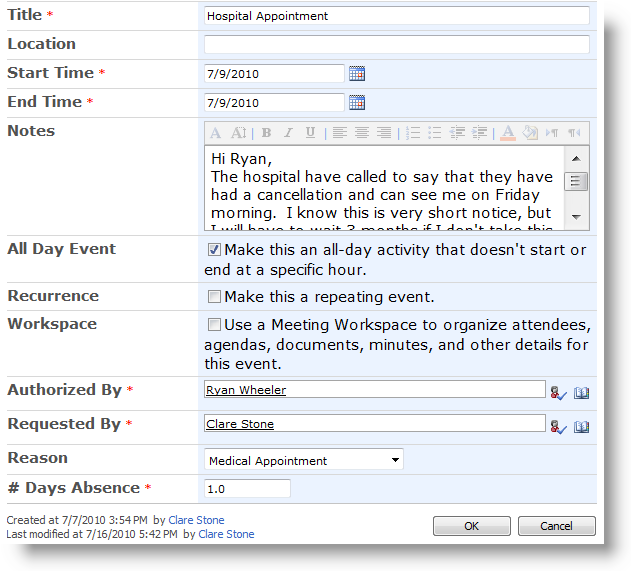
I need to book a day off for a hospital appointment on Friday 9th of July.  I can see all the absence bookings for my department and the number of days I have had off this year on the absence dashboards above. I’ve only had 1 day off for Medical Appointments so far this year and I am allowed 3 so that’s fine – but 3 people are off on that day already, it’s going to be tough, but I really need to go to that appointment.

So, as you can see, I can add a new item to the planner straight from the link in the webpart, I don’t need to go to the list.

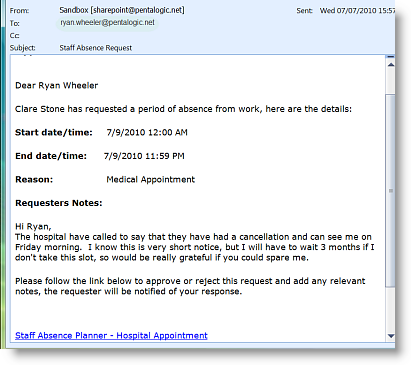
Ryan receives the absence request email and from looking at his dashboards he can see that although I am well within my Medical Appointments entitlement approving this absence is going to leave him really short staffed on Friday – but he can’t face the thought of listening to me moaning about my in-growing toenail for another 3 months, so he approves the request.

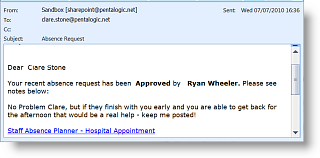
Once the request is approved I get an email notifying me, and the status of the absence changes from “pending” to “approved” on the absence planner.

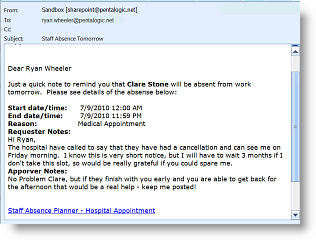
And for the final step in the process, is the email to Ryan on Thursday, to remind him that I am off the next day, giving him chance to make sure all my work is covered.

So now we should have no excuse for messing up staff absence planning ever again!

So Can’t I do this with SharePoint out of the Box?

Well some of it. Clearly, your basic list and filtered views are all set up in SharePoint out of the box.

When it comes to your dashboard views there are some limitations.

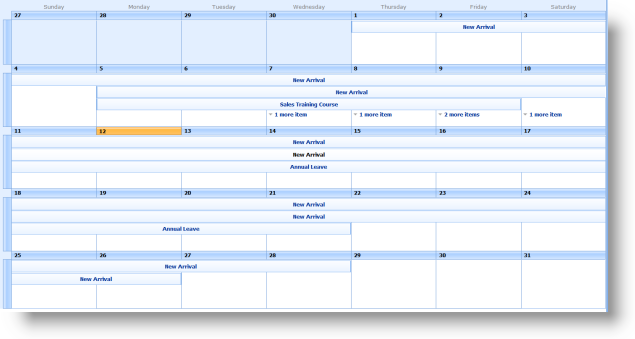
This is how your Vacation Planner Wall Chart looks out of the box:

or as a Gantt view:

We have lost all of our color coding, it’s not possible to show the name of the person who is absent, unless you make this the title of the event, and we have no way of distinguishing between approved and pending items.

For the “Absences to Date” and “My Absences” dashboards we can achieve something similar, if a bit clunky, out of the box.  From the settings tab in your Staff Absence Planner list, choose edit current view.

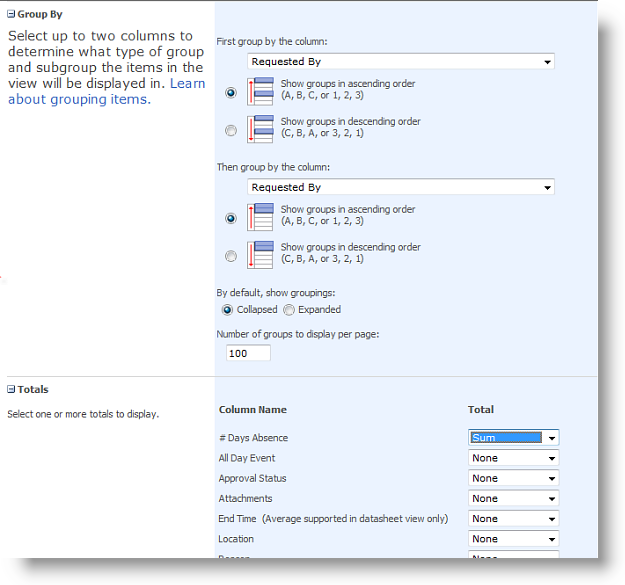
Head down to Group By and choose Requested By and Reason.  Then expand the Totals section and choose # Days Absence and sum.


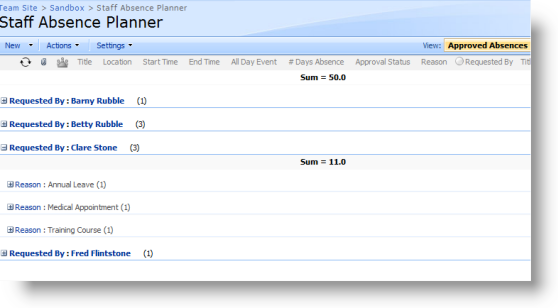
This will give you a view like this:

The information is all there, but I have to work to get at it.  For example Ryan can see that I have had 11 days off this year, covering 3 separate occasions, but he is going to have to drill into each individual event and get his calculator out to figure out how many of my days off have been annual leave, training or Medical.

Then on to the workflow emails. It is possible to generate email alerts for the absence request and the request approval, but the solution isn’t perfect.  For absence requests an administrator can set the list up to email all line managers within your company or department, every time a new request is added to the list.  This means that managers will get absence requests from their own staff, but also from all other staff as well.  The only way to avoid this would be to set up a separate absence request list for each line manager.

For the request approved/rejected email the requester will need to set up an alert on each request as they create it, asking to be alerted any time anything changes on that list item.

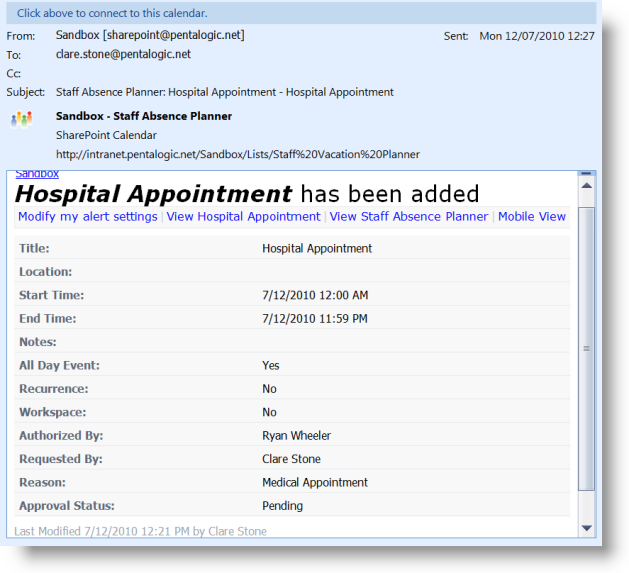
When the alert emails arrive, this is how they look:

There is no way to edit the email, and give the recipient clues on what they are supposed to do with it.

The final “John Smith is off work tomorrow” email, cannot be generated in SharePoint out of the box, as it doesn’t do date based alerts.

You could do this with Workflow and Event Receivers, but that means having some technical knowledge and breaking out SharePoint Designer and/or Visual Studio.

So – can you build a staff absence planning system with SharePoint out of the box?  I guess the answer is “kind of”. It is possible to build a basic system but it’s going to lack some useful functionality and may now be enormously user friendly.

We hope you’ve found this useful.

If you would like to try the Vacation planning system you can download a 30 day free trial version here.

And as always, if you have any questions or comments, we would love to hear them.