 Sometimes opening up SharePoint 2010 makes me come over all Star Trek: I feel like I’m on a mission, to explore strange new worlds: to seek out new life . . . . . OK someone slap me now!
But seriously, there are some funky new features in 2010 and wikis seem to have come on quite a long way. Last week we looked at working with Sharepoint wikis and explored the functionality that is common to 2007 and 2010.
This week we are going to look at the new 2010 features – most of which look great with a couple of exceptions which are frankly a little confusing.
So – set Phasers to stun – lets boldly go!
Everything’s a Wiki Now
The first thing to note with SP 2010 is that wikis are now everywhere. The “Team Site” template and several other site templates are now automatically created as wiki sites, and if you are creating a blank or custom site you have the option, within Site Settings/features to make the site home page a wiki page, this then means that all other pages in the site will be wiki pages by default.
The main benefit of this is that you no longer need to faff around with Content Editor web part in order to add text to a page, any page, you simply click edit and go. Much easier. In fact we are struggling to think of a type of site that you might not want to have as a wiki site.
Style and Format
In 2010 you will quickly see that you have for more options for formatting your wiki page content. Now given that one of the key strengths of wikis is that they are supposed to be quick and easy and functional we are not entirely sure about all of these formatting options – will people be tempted to twiddle about the the color of their font instead of focusing on getting the content on the page?
Anyway, for those of you interested in text formatting there are a range of options:
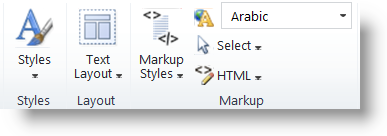
Styles give you the option of different basic paragraph styles, Text Layout offers multiple column options, headers and footers and Markup Styles gives you different heading and call out styles. Plenty of options to keep everyone happy here.
Linking
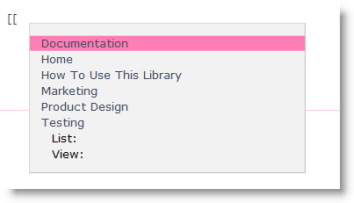
Linking got a whole lot easier and more versatile. We are still using our [[square brackets]], but now as soon as we type them in we get a nice little tooltip list of all the existing pages we might want to link to:
Just click on the one you want and the link if filled in for you. Very handy for those of us with less than perfect memories – or less than perfect spelling. As you can see we can also link to lists and views – which is something new for 2010. You can choose to link to the list itself, or even to an individual list item.
You can even – if you wish – create a blank list item by using square brackets, in much the same way as you create blank pages. So for example if you had a calendar list within your site and wanted to add an item for a salary review meeting you would use:
[[List:Calendar/Salary Review Meeting]]
This would initially appear on your page with dotted underlining to indicate an empty item, clicking on it would take you to a new list item titled “Salary Review Meeting” and give you the opportunity to fill in the details and save the item.
All very clever, but can you think of a time when you might actually want to use this? We can’t – answers on a postcard please.
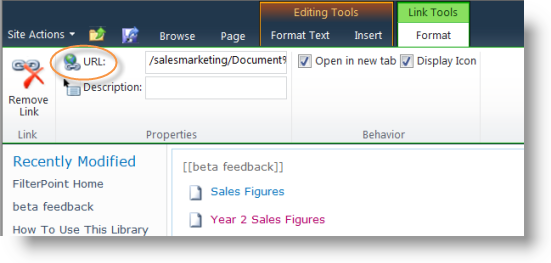
In addition to traditional wiki linking with square brackets we can also now link using the more familiar URL link symbol, which you will find on the Insert tab of the Editing Tools. Just highlight the text you want to link from on your wiki page, click the icon and type or copy/paste in your URL. You will then get this handy Link Formatting screen:
This gives you more formatting options for you link that you have with square brackets. First you can choose to open the link in a new tab. It also gives you the option of showing an appropriate icon next to the link, so you know what you are opening (e.g. Word, document, spreadsheet, web part etc.) And you can link to anything you wish as long as it has a URL – inside or outside of your site.
Inserting – Put whatever you want in it.
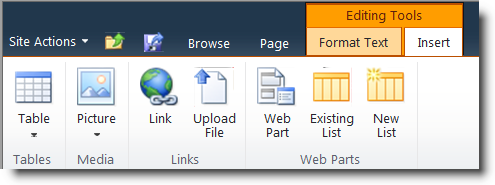
When you are in editing mode, move from the “Format Text” tab to the “Insert” tab and you will see where the real difference in SharePoint 2010 wikis lies.
Now in 2010 you can add pretty much whatever you like to a wiki page.
Inserting images is super easy. No more uploading your image to a Picture library first. Just click the link to bring a new image into your site from your computer – your will then be given the option of where you would like to save it, with “Site Assets” as the default. Once your image is on the page you have a limited number of editing options including positioning, sizing, borders and adding ALT text. Some of this is a tad clunky, but still a whole lot better that 2007.
Similarly with files – using the “Upload file” option here you can bring new files into your site, place a link to them on the page and place the file wherever you wish in the site – the default is again Site Assets.
Add existing or new lists to the page – so no more messing around with the list view web part.
And finally add web parts to your page – no need for web part zones – just pop them in wherever you want amongst the text, pictures and other content. Drag and drop to get the positioning exactly how you want it. In terms of the functionality web parts behave on a 2010 wiki page just as they do on a web part page. But the ability to get them right into the flow of your other content is going to make for better looking pages and more intuitive dashboards.
So that about covers it for SharePoint 2010 wikis – their new features and their widespread use across sites do make SharePoint 2010 more user friendly and a more intuitive collaboration space – almost a new civilization!
Beam me up Scotty!
If you would like to learn more about SharePoint 2010 wikis take a look at this online course from Microsoft.
Tags: SharePoint 2010




Hi,
I’m trying to find out how to format a paragraph in a SharePoint wiki, e.g. add a space after a bulleted line. When I add bullets to a paragraph the bulleted items look too compressed, and when I try to add a space to separate the bullets, it then gives me another bullet and an extra space. I then try to delete the second bullet or the space, and it compresses the bullets again. Is there any way to add line spacing in SharePoint wikis?
Thank you,
—Anca
Very helpful break down on the features of the Wiki pages. Do you have a tutorial on how to create Wiki page templates? The SharePoint I’m designing is for a company that plans to have many Wiki pages and on each page they wish to have a discussion board which I want to include in a template page and used all across the pages. Do you know how I would do this?
This should help – https://www.nothingbutsharepoint.com/sites/eusp/Pages/how-can-i-add-a-template-to-a-sharepoint-wiki-you-cant-or-can-you-im-so-confused.aspx