This is Part 3 of the SharePoint Staff Vacation Planner – DIY Guide
So having set up our basic SharePoint list with filtered views, and our “Wall Chart” dashboard, using SharePoint Planner webpart, we are now ready to get up our “Staff Absences to date” and “My Absences” dashboards. This is the bit that allows managers to monitor the amount of absence each of their team members has had:
 Or for individual staff members to monitor their own absences:
For this part of the process you are going to need SharePoint PivotPoint webpart.
If you don’t have PivotPoint already you can download the free trial version and view the installation instructions.
So we need to set up 2 webparts, and you will need to give some thought to where you are going to put them. “My Absences” is intended to be visible to anyone, so that could go on your main team page, or your HR home page. “Absences to Date” however is only meant for managers, so you will need to place it in a location where only your managers have viewing permissions.
The webpart setup is very simple. Let’s start with “Absences to Date” add the webpart to your chosen page in the same way as we did in part 2.
Now “edit shared webpart”. What PivotPoint is going to do is add all the absences, of each type, that each of your staff members has had in the current year*, then pesent this information to you, in a table which will be automatically updated every time some has more time off approved.
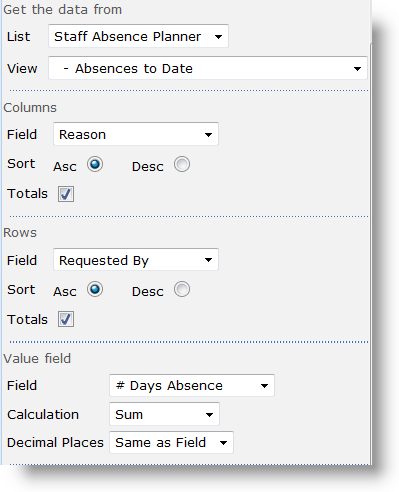
In the webpart configuration tool tell PivotPoint to get its data from the Staff Absence Planner List and the Approved Absences view.
For the columns of our table we want the Reason field from our list, and for the Rows we want the Requested By field. We will have Totals on both columns and rows. Our values will come from the #Days Absence field and the Calculation we want to perform is a simple Sum.
For the set up of the “My Absences” webpart, everything is the same other than the view you want to watch, which is My Absences. There is also little point having totals on the columns for this one.
So, now we are finished, apart from one little glitch, which is how to handle “this year”
*Clearly for this dashboard we only want to be displaying absences in the current absence year. Now luckily, you don’t actually need to sort this out right now, you have until the end of your current year to think about how you handle it, but it’s going to need doing sooner or later so best to give it some thought now.
There are two methods you could use for ensuring these dashboards are only showing data from the current year. The first is to set up a filter on the list, so that PivotPoint only looks at list events for the current year.
The second possible method is to set the system up as a site template, and create a new site for each year.
Either one may work for you, and you have a little while to decide which method suits you best.
Next installment – set up a simple Absence approval workflow with SharePoint Reminder webpart.
Tags: PivotPoint, SharePoint, SharePoint 2010, WebPart


