Posts Tagged ‘SharePoint Designer’

SharePoint – wildcard / free text searching the List View web part

Date:May 30th, 2014 Author: Tags: , ,
Category: Filter, FilterPoint Web Part, SharePoint Development Comments:8 ;

It’s a common requirement to be able to do wildcard free text searches on SharePoint lists.

Whilst you can’t do wildcard or complex Boolean search (that’s what the search system is for) you can get close with a contains search. Thus searching for “Acme” will return “ACME Construction” and “Big ACME Rentals” but not “Rent-A-Crane”

It’s not easy though, and does require SharePoint Designer and a Filter Provider such as our FilterPoint product.

Filter Providers and Filter Consumers.

In SharePoint you have

  • Filter Providers (like FilterPoint or SharePoint Enterprises own filter web parts)
  • Filter Consumers (like the List View web part or other web parts such as our PivotPoint).

The Filter Provider sends the filter you’ve entered (e.g. “Customer” and “Acme”) but it’s entirely up to the Filter Consumer what it does with that filter.

This means that if you want to do things like Date Ranges, wildcard filtering using “Contains” operations you have to set those options on the Filter Consumer.

Our products (PivotPoint, Planner etc) have options to allow you to easily set what to do with the incoming filters, but SharePoints built in List View web part does not.

Using “Contains” filters to do free text search in FilterPoint.

We’re going to use SharePoint Designer to setup Parameters and Filters in the List View Web Part (LVWP) so we can do wildcard type filtering.

(It’s a limitation of SharePoint that you can’t do this without SharePoint Designer – sorry!)

First go to the web part page that has your list (or create a new, empty web part page and add your list to it).

In our example we’ve got a list of Customers with the customer name in the Title field.
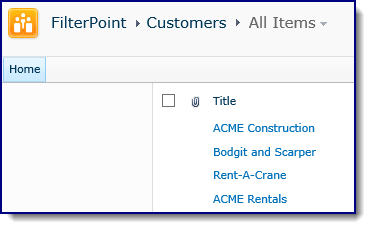
Customers List

  • Open this page in SharePoint Designers edit view.

(Depending on what type of page this is will invoice different steps – see these tips for more help on using SharePoint Designer or the online manual for SharePoint Designer)

SharePoint Designer List Parameters

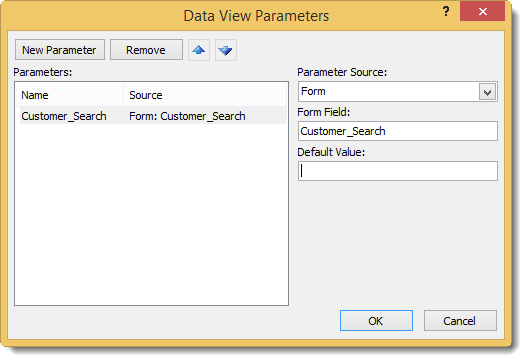
  • In the Data View Parameters window :-
    • Click New Parameter,
    • In the Name box put Customer_Search.
    • (You can use whatever name you want here but it needs to be consistent across the next few steps, also note an underscore, no spaces!)
    • Change Parameter Source to Form
    • Change Form Field to Customer_Search
    • Click OK

SharePoint Desinger - add parameter

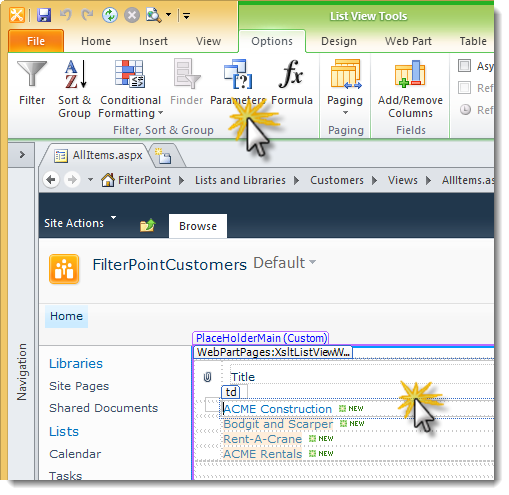
  • Now select Filter from the Ribbon (top left of the edit page view) to open the Filter Criteria window
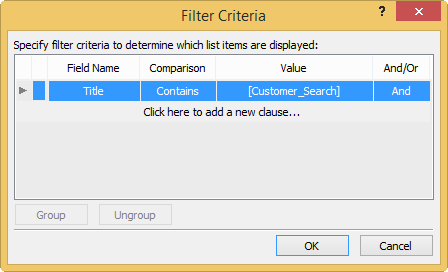
SharePoint Designer - filter criteria

  • Choose
    • The field name you want to filter on – in our case the customers’ names are in the Title field.
    • Set the Comparison operator to Contains (this means that searching for ACME will return “ACME Corporation “or “Big ACME rentals” etc.)
    • Set Value to be the parameter we created above – Customer_Search.
    • Click OK

We’re done with SharePoint Designer (SPD) now so you can hit save and close SPD.

Open the page you’ve been working with in the browser – notice that the list won’t be displaying any results as we’re not passing in anything to our Contains Parameter.

Edit the page and add the Filter Point web part (or another FilterProvider web part of your choosing)
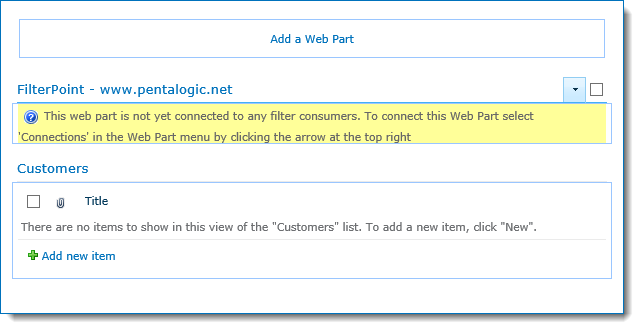
FilterPoint web part added

  • Select the Web Part menu (button on top right highlighted) and then Connections > Provide Filter To > Customers (or whatever your list is called.
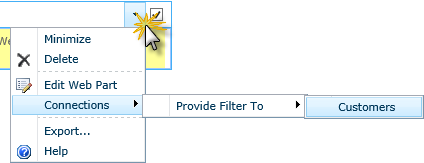
Connect FilterPoint to customers list

  • On the next dialog box select Get Parameters From and then Finish
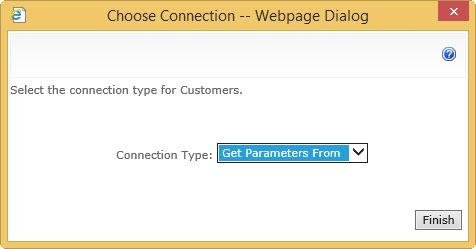
Web Part Connection get parameters from

  • Right – we’ve added a Parameter and a Contains Filter to the List view and connected the FitlerPoint web part to the List View, nearly there!
  • Next open FilterPoint’s configuration toolpane
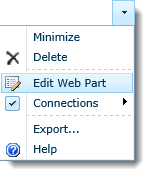
FilterPoint - edit web part

    • Select New and enter a label such as Customer
    • Set the Filter Style to “Free Text”
    • Set the Field Name to From the connected web part and choose the parameter that you set above – in our case Customer_Search.
  • Click OK and you’re finally done.

(For more info on configuring FilterPoint see the manual)

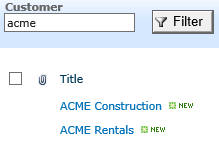
Searching for “acme” or “rent” will now return any customer that has that string in their name :-
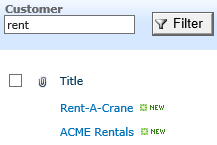
search rent search acme

A couple of points to note :-

  • You can’t do complex searches like “acme AND rent” or “Rent*Crane” – just Contains or Begins With searches.
  • If you want to setup additional filters then once you’ve connected the web parts in “Get Parameters” mode (rather than the normal “Get Filter Values” mode) you will have to repeat the above steps to create Parameters and Filters in the List for each filter. It’s a pain but a limitation of SharePoint.
  • If you do add additional Parameters and Filters be sure to set the And/Or operator correctly – for most use cases you will want And.

#

SharePoint Designer 2013 – How to modify List View web part filters and parameters

Date:May 30th, 2014 Author: Tags: , , ,
Category: Filter, FilterPoint Web Part, General, SharePoint Development, SharePoint Ideas Comments:18 ;

SharePoint Designer is especially useful for things like setting up complex filters and parameters for List View web parts like ‘wildcard’ searches and ‘before or after a date’ filters.

In SharePoint Designer 2013 (SPD 2013) the “Design View” was (controversially) removed so now it’s a little harder to use as you have to wade through some X/HTML soup. There is also a bit of a wicked bug that’s going to trip you up as well so in this post I am going to give a few tips on how get to the Parameters and Filters options in the ribbon menu.

SharePoint Desinger 2013 - Filter and Parameters

Note –this post is NOT a tutorial on how to use SharePoint Designer (its complex and worth a whole book in itself) but just a few tips for those already familiar with using SPD on how to do use the 2013 version. It won’t put back all you’ve lost, just allow you to access the Parameter & Filter options.

Missing Designer View and finding the List View Web Part

When you edit a page the most obvious difference in SPD 2013 is that you don’t get a Design View (the WYSIWYG view that allows you to see how the page will look whilst editing it). Instead you’ve only got the code view and you’re going to have to work through some angle bracket gibberish!

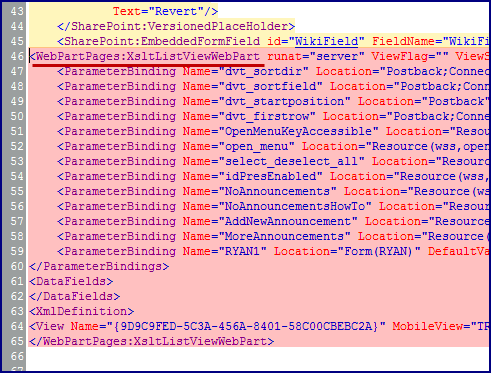
You’re looking for the code that defines the list view – it starts with <WebPartPages:XsltListViewWebPart and ends with </WebPartPages:XsltListViewWebPart> (pink in the pic here).

SharePoint Designer 2013 - how to find List View Web Part LVWP in code view

But save your eyes! Just search (CTRL+F) for XsltListViewWebPart! If the cursor is between the two XsltListViewWebPart tags then this is the same as clicking on the List in the old Design / Split view.

(If there are more than one List View on the page you will have to figure out which is which by the position of the web part in the page or look for the URL listed in TitleUrl, DetailLink or Url)

Getting the List View Tools options to show in the Ribbon

After putting the text cursor (or clicking) in the code that makes up the List View web part the ribbon should show the List View Tools option.

Except… there is a wicked bug in SPD 2013 at the time of writing that means the Ribbon doesn’t update to show the Options menu (unless you’ve turned off Server Rendering).

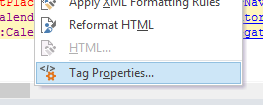
The trick (given to me by MdMazzotti) is to right click on XsltListViewWebPart then select Tag Properties and then click OK without clicking anythingSPD - Tag PropertiesYou will now have access to the List View Tools > Options ribbon and the Filter and Parameters button (see picture at the top of this page) SPD - Web Part Properties
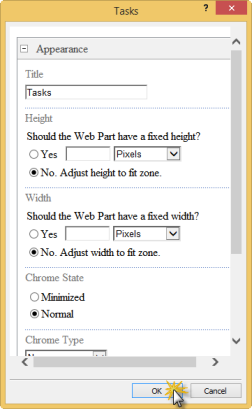
You can view these steps in a video :-

Unable to display content. Adobe Flash is required.

Is Conditional Formatting in SharePoint 2013 dead?

Date:January 25th, 2013 Author: Tags: , ,
Category: Highlighter, SharePoint Development Comments:1 ;

With the release of the controversial new SharePoint Designer 2013, has the ever-popular Conditional Formatting option died a death?

Why is SharePoint Designer 2013 controversial?

The bee in everyone’s bonnet is SPD 2013’s lack of a Design View; one of the staple tools of every Designer user. The place to get up to speed on this topic is Marc Anderson’s article: SharePoint Designer 2013’s Missing Design View

How does this effect the Conditional Formatting option?

I asked the same question myself, so I installed SPD 2013 and gave it a try. After clicking, selecting, choosing, and swearing at pretty much every component I came to the conclusion that I was clearly missing something.

I posted on SPSE expecting a quick helpful pointer. Instead I was met by a resounding silence. After a suitable pause, I reposted onto MSDN, only to find that Conditional Formatting on list view web parts doesn’t seem to be supported anymore! Please feel free mock me mercilessly if this isn’t the case.

Of course it’s still possible to use it for other purposes, but formatting list views is the major purposes of that feature; it seems kind of pointless without it.

Is SharePoint Designer 2013 dead too?

It may still be early days, but when initially searching around for an answer, I was struck by how hard it was to find any blog posts about SPD 2013 (other than complaints about the Design View). For comparison, with the release of SPD 2010, the community was positively frothing over with articles and praise.

The same was true when posting on the forums: I leapt into the middle of the mainstream SharePoint 2013 river, expecting to be swept away by all the keen Designer users already trying out all the features. Instead I found myself sat in a rather shallow puddle.

So how can we apply Conditional Formatting in 2013?

Instead of wildly speculating on the popularity of SharePoint 2013’s tools, here are a couple of methods for working around the problem:

XSLT: It’s possible to create your own XSLT template by customising the default main.xsl, and then assigning it to the LVWP. I’ve searched high and low for a guide on how to apply conditional formatting using this method, with no success. Please let me know if you’ve seen such a thing.

Buying a solution: Inevitably the vulturous SharePoint software vendors have swept down on SPD 2013’s dying form, hoping to profit from its misfortune…

Oh! On an unrelated note; did I mention a new 2013-compatible version of SharePoint Highlighter has just been released? 😉

How to use [Today] in a SharePoint list

Date:May 12th, 2011 Author: Tags: , , , , , ,
Category: Calculated Columns, Highlighter, SharePoint Development, Training Comments:0 ;

today

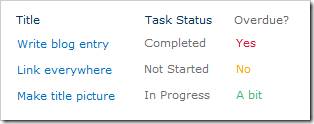
Quite frequently we see questions about using the current date to display messages on a list when a date or time is (or will soon be) overdue. Most of these queries are from frustrated users who are trying to use [Today] in a calculated column, but find it missing.

I’ll quickly outline why this option is missing from calculated columns, and hence why the notorious [Today] trick is quite so controversial. But most importantly, I’ll run you through ways to actually display the information you want.

Why is [Today] missing from calculated columns?

When we look at a SharePoint list, the vast majority of us are instantly reminded of Excel (or Grandfather Excel, if you prefer). Because of this we quite reasonably expect it to act like Excel, and hence expect it to reconsider every formula and data item on the page each time we view it.

Unfortunately because of the much larger amount of information SharePoint has to pass back and forth, it takes a different approach to updating the data items. It will only update calculated values when the related item is added or edited.

Consider SharePoint as an overworked secretary; if you ask for a file to be updated they’ll find it in the filing cabinet, update the information, and correct anything else that’s awry on the paperwork while they’re there. If you ask for all the files for people named “Smith” to be put on your desk, unless you specifically say “And update the information on every single one while you’re at it”, it’s not likely they’ll do the extra work for no reason.

Because of this change in records-keeping, Microsoft had to skip functionality that would make this lower-maintenance updating method obvious. Since having a [Today] option would cause unedited items to go out of date every day, they had to leave it out. The [Me] option was another casualty, as it would require checking the current user every time the data was displayed.

So how do we get our files updated without further flustering our imaginary secretary? There are several options:

  • JavaScript: Use a Content Editor Web Part. Also known as “Do it yourself.”.
  • Designer: Create a custom view in SharePoint Designer. “Ask the secretary really nicely”.
  • Code: Make your own custom field type from scratch. “Get your own team to do it”.
  • SharePoint Highlighter: Our own solution to the problem. “Hire an extra secretary”.

JavaScript document_into8

Of course there’s always a JavaScript solution, and this one in particular from Paul Grenier uses jQuery to help with the process. This will mean adding the jQuery libraries to your site, and it’s also necessary to add a Content Editor Web Part to each page you want the feature to work on.

A little JavaScript knowledge will probably be necessary to make it fit your requirements, and as with any code tweaking, the more you know the better the result will be.

Designer designer30

SharePoint Designer is a free and powerful (and hence often banned) tool from Microsoft for modifying your SharePoint site. Using Designer it’s possible to alter a view so that it uses Today when rendering the data on the page. This done by modifying the view’s XSLT (the template the view uses to decide what data goes where).

If you’d like a dabble to test the water of such changes, MSDN has a nice tutorial on how to get started.

However, if you already have some experience with Designer (or you’d like to just jump straight in), Greg Osimowicz has an article on using Today in XSLT to calculate holidays accrued to date (scroll down to “Below are the steps I followed:”).

Code studio6

There are a number of possible different methods to solving this problem using a custom field type. As always this comes with my standard disclaimer that developing a custom field type from scratch for a single purpose requires a disproportionate investment of time for the results.

In 2010 it’s possible to do the calculations in the custom field type class (with some light persuasion), however this is not possible with 2007 as it does not use the class to render its information on list views.

Unfortunately not even CAML can save us in this instance, as the View Schema doesn’t provide the current date in a usable form. But if you’re using 2010 you may be able to create a workaround with XSLT and Greg’s Designer XSLT solution in the section above.

The last option is to use the field type to get JavaScript onto the page instead of using a CEWP. This has the benefit that you don’t need to put the CEWP on each page, but as I mentioned in my previous article it can be very troublesome to do so: How to do list highlighting in SharePoint

SharePoint Highlighter currency_dollar4

Normally this is the section where I’d talk about the benefits of a commercial solution, and try to avoid mentioning SharePoint Highlighter too much (I might even link to our product comparison page). However, it’s very difficult to talk in general terms about commercial products on the market that have this functionality when yours is the only one that does.

So I’m not going to beat around the bush: If you want to buy a commercial solution to change your list view display based on today’s date, then SharePoint Highlighter is the only (and hence best) solution. It does much more than just this, but I’m not going to blow my trumpet too much.

If you want to see a real life problem and its solution using SharePoint Highlighter; have a look at this SharePoint Overflow question.